
Are you ready to boost your website’s performance and get the most out of your Facebook ads? Installing the Facebook Pixel on your WordPress site is a simple step that can unlock powerful insights about your visitors.
Imagine knowing exactly which pages they visit, what actions they take, and how to reach more people who are just like them. In this guide, you’ll learn exactly how to install the Facebook Pixel on WordPress in 2022—no confusing tech talk, just clear, easy steps that anyone can follow.
Keep reading, and by the end, you’ll have a powerful tool working for your business behind the scenes.
Credit: 360webcare.com
What Is Facebook Pixel
Facebook Pixel is a small piece of code. It helps track visitors on your WordPress site. This tool gives valuable data about user actions. It shows how people use your website after clicking ads.
With Facebook Pixel, you can measure ad performance. It helps you understand which ads work best. You can also create audiences for future ads. This makes your marketing more focused and effective.
What Does Facebook Pixel Do?
Facebook Pixel collects data about visitor actions. It tracks page views, clicks, and purchases. This data helps improve ad targeting and results. You see what visitors do after seeing your ads.
Why Use Facebook Pixel On WordPress?
WordPress is a popular platform for websites. Adding Facebook Pixel helps you track visitors easily. It connects your website data with Facebook ads. This improves your ability to reach the right people.
How Facebook Pixel Helps Your Business
It shows which ads lead to sales or sign-ups. You learn what interests your audience most. This helps save money on ads that don’t work. Your advertising becomes smarter and more efficient.
Benefits Of Using Facebook Pixel
Facebook Pixel helps track what visitors do on your WordPress site. It gives useful data to improve your ads and website. Using Facebook Pixel makes your marketing smarter and more efficient.
This small tool can bring big benefits by showing how people interact with your content. It helps you spend ad money better and reach the right audience.
Improved Ad Targeting
Facebook Pixel tracks visitor actions on your site. This data lets you create ads for people who showed interest. Targeting this way increases the chance of getting clicks and sales.
Better Conversion Tracking
Pixel shows which ads lead to sales or sign-ups. You see what works and what does not. This helps adjust your ads to get better results over time.
Audience Retargeting
You can show ads to people who visited your site but left without buying. This reminds them about your product or service. It often brings visitors back to complete a purchase.
Optimized Ad Spending
Pixel helps you spend money only on ads that work. It cuts waste and makes your budget last longer. You get the most value from each dollar spent.
Detailed Analytics
Facebook Pixel gives clear reports on visitor behavior. You learn what pages they visit and how long they stay. This data guides website improvements and marketing plans.
Preparing Your Facebook Pixel
Preparing your Facebook Pixel is the first step to track your website visitors. It helps you see how people interact with your site. This data improves your ads and website. Setting up the Pixel correctly ensures you get accurate results. Let’s start with creating your Facebook Pixel and finding your Pixel ID.
Create A Facebook Pixel
Go to your Facebook Events Manager. Click on “Connect Data Sources” and select “Web”. Choose “Facebook Pixel” and click “Connect”. Enter a name for your Pixel. Use a name related to your business or website. Add your website URL if asked. Click “Continue” to finish creating the Pixel.
Get The Pixel Id
After creating the Pixel, find your Pixel ID in Events Manager. It is a long number below the Pixel name. Copy this ID carefully. You will need it to install the Pixel on your WordPress site. Keep it handy for the next steps.
Credit: www.jonloomer.com
Installing Pixel On WordPress
Installing the Facebook Pixel on your WordPress site helps track visitors and improve ad targeting. This tool collects important data about user actions. You can add the Pixel to WordPress in two main ways: using a plugin or manually. Both methods are effective and depend on your comfort with WordPress.
Using A Plugin
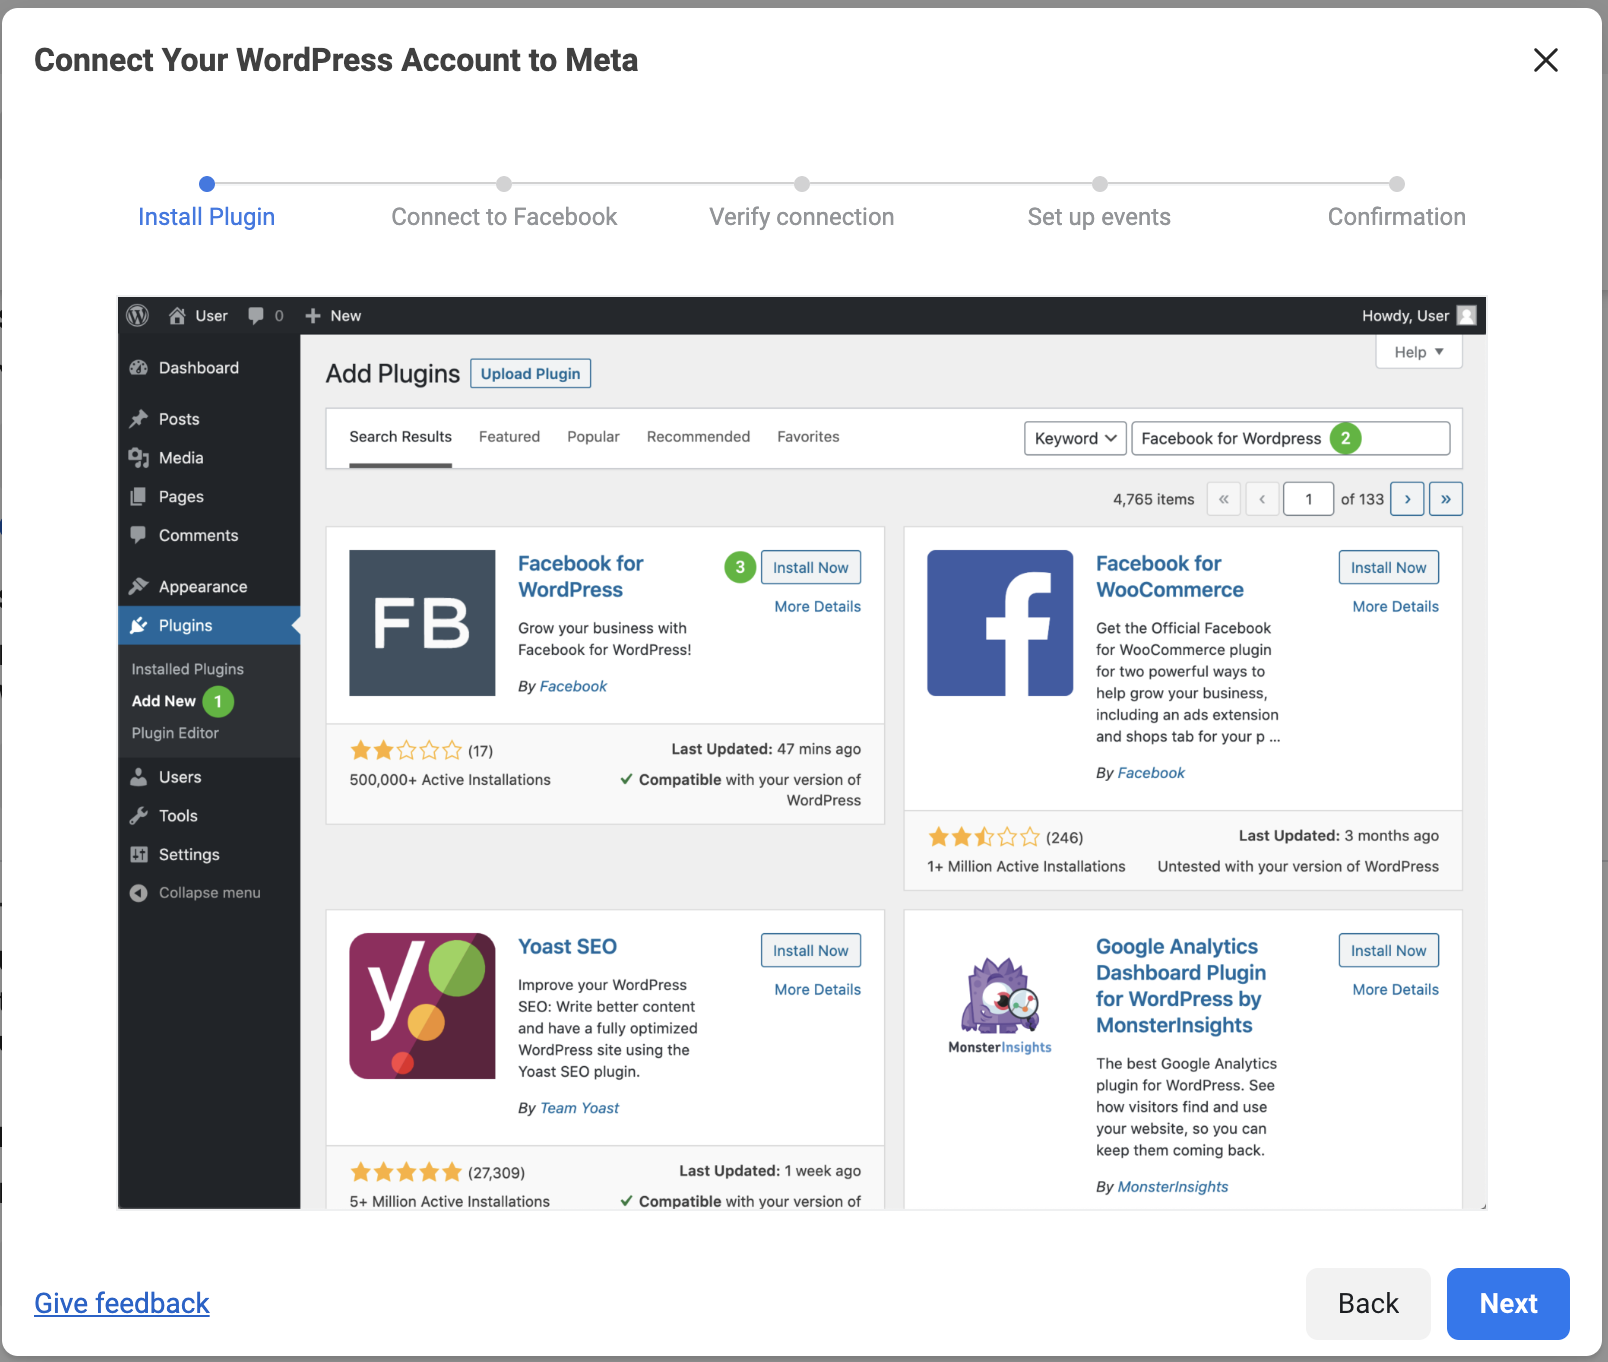
Plugins make adding the Facebook Pixel easy and fast. First, search for a Pixel plugin in the WordPress plugin directory. Popular options include “PixelYourSite” or “Facebook for WordPress.”
After installing and activating the plugin, enter your Facebook Pixel ID in the settings. The plugin will handle the rest. It inserts the Pixel code on all pages automatically. You don’t need to touch any code.
This method is best for beginners. It saves time and reduces errors. You can also manage Pixel events directly from the plugin dashboard.
Manual Installation
Manual installation gives more control but requires editing your site’s code. Start by copying your Facebook Pixel base code from your Facebook Ads Manager.
Next, log in to your WordPress dashboard. Go to Appearance > Theme Editor. Open the header.php file of your active theme.
Paste the Pixel code right before the closing tag. Save the changes and clear your cache. The Pixel will now load on every page.
Manual setup suits users comfortable with code. It allows custom placement and advanced tracking setups.
Verifying Pixel Installation
Verifying your Facebook Pixel installation is important. It ensures your pixel tracks the right data. Without proper verification, your ads may not perform well. Testing the pixel helps catch errors early. Use simple tools to confirm your pixel works.
Using Facebook Pixel Helper
Facebook Pixel Helper is a free Chrome extension. It shows if your pixel is active on your site. After installing the extension, open your WordPress page. Click the Pixel Helper icon in the browser toolbar. The tool displays pixel status and any errors found. Green means the pixel works correctly. Red or yellow signals a problem to fix. This tool helps confirm pixel firing on every page.
Checking Events Manager
Facebook Events Manager tracks pixel activity in real-time. Log into your Facebook Business account to access it. Select your pixel from the list to view data. The dashboard shows events detected from your site. Check if your pixel records page views and other actions. This confirms the pixel sends data to Facebook. You can also spot errors or missing events here. Events Manager helps ensure your pixel gathers useful information.
Setting Up Standard Events
Setting up standard events with Facebook Pixel helps track important actions on your WordPress site. These events show how visitors interact with your pages and content. Tracking these actions gives useful data to improve ads and website experience.
Standard events cover many common user actions. You can easily add them using Facebook’s event codes. These events help identify key moments like purchases, sign-ups, or page views. Tracking these events is crucial for effective marketing and better user insights.
Common Events To Track
Facebook offers several standard events you can use. Purchase tracks when someone buys a product. Lead marks when a visitor shows interest, like filling a form. Add to Cart logs when users add items to their shopping cart.
Other events include ViewContent for page visits and CompleteRegistration for sign-ups. These events help measure how well your site meets your goals. Choose events that match your business needs.
Custom Events Setup
Sometimes standard events do not cover all actions. Custom events let you track unique visitor behavior. You create a custom event by defining a name and code snippet.
Use custom events for special buttons or unique interactions. Add the code to your WordPress site through a plugin or theme editor. Test the events with Facebook’s Pixel Helper tool to ensure they work.
Troubleshooting Common Issues
Installing Facebook Pixel on WordPress is usually simple. Yet, some users face common issues during setup. Troubleshooting helps fix these problems fast. This section covers key errors and clear solutions. Follow these tips to keep your Pixel tracking correctly.
Checking Pixel Installation With Facebook Pixel Helper
Use the Facebook Pixel Helper Chrome extension. It shows if Pixel code is on your site. The tool spots errors like missing IDs or duplicate Pixels. Open your website and click the extension icon. Look for green checkmarks. Red warnings mean problems that need fixing.
Fixing Pixel Not Firing On WordPress
Pixel may not fire due to caching or plugin conflicts. Clear your site cache and browser cache first. Disable other tracking or optimization plugins that might block Pixel. Test again after changes. Make sure Pixel base code is in the header section of your theme.
Resolving Duplicate Pixel Issues
Duplicate Pixels cause wrong data in Facebook Ads Manager. This happens if Pixel code is added twice. Check your header.php file and any Pixel plugins. Remove extra Pixel scripts. Use only one method to install Pixel to avoid overlap.
Handling Event Tracking Problems
Events may not track correctly without proper setup. Verify event code matches Facebook’s guidelines exactly. Use Facebook Pixel Helper to confirm event triggers. Adjust event parameters if no data appears. Test on different pages to ensure events fire properly.
Optimizing Facebook Pixel For 2025
Optimizing Facebook Pixel for 2025 means preparing for new trends and technology. The pixel helps track user actions on your WordPress site. It collects data to improve your ads and marketing results.
With privacy changes and new tools, updating your pixel setup is important. This keeps your tracking accurate and your ads effective. Let’s explore key steps to optimize Facebook Pixel for the future.
Updating Facebook Pixel Code For Better Performance
Use the latest Facebook Pixel code version. This ensures compatibility with new browsers and devices. Replace old code on your WordPress site to avoid tracking errors. Check Facebook’s official site for updates regularly.
Configuring Advanced Matching For More Accurate Data
Enable Advanced Matching to collect more user information safely. This helps Facebook connect website visitors to their profiles. Add user data like email or phone number in hashed form. It improves your ad targeting and reduces lost conversions.
Setting Up Custom Events For Specific User Actions
Create custom events for actions like button clicks or form submissions. Track what matters most to your business. Use Facebook’s Event Setup Tool for easy configuration on WordPress. Custom events help you measure and optimize campaigns better.
Ensuring Compliance With Privacy Laws
Follow privacy rules like GDPR and CCPA. Inform visitors about data collection on your site. Use cookie consent banners and update your privacy policy. This builds trust and keeps your Facebook Pixel data valid.
Testing Pixel Setup Regularly
Use Facebook’s Pixel Helper tool to check your pixel status. Test events and data accuracy after changes. Fix any issues quickly to avoid losing valuable insights. Regular testing keeps your pixel working smoothly.
Credit: www.themediacaptain.com
Frequently Asked Questions
What Is Facebook Pixel And Why Install On WordPress?
Facebook Pixel is a tracking tool that helps measure ad effectiveness. Installing it on WordPress allows you to track visitor actions and optimize ad campaigns for better results.
How Do I Add Facebook Pixel Code To WordPress?
You can add Facebook Pixel by pasting the Pixel code into your WordPress header. Use plugins like “Insert Headers and Footers” or edit the theme’s header. php file.
Can I Install Facebook Pixel Without Coding On WordPress?
Yes, many WordPress plugins enable Facebook Pixel installation without coding. Plugins like PixelYourSite simplify the process with easy setup options.
How To Verify If Facebook Pixel Works On WordPress?
Use Facebook Pixel Helper, a Chrome extension, to check if the Pixel fires correctly. It shows real-time data and alerts for errors.
Conclusion
Installing Facebook Pixel on WordPress helps track visitor actions easily. It improves your ad targeting and measures campaign success clearly. The process is simple with the right steps. You just need to copy the Pixel code and add it to your site.
Testing ensures the Pixel works correctly every time. Start using the Facebook Pixel today to understand your audience better. This small tool can make a big difference in your marketing efforts. Keep your site updated and check Pixel regularly for best results.


