
Are you ready to give your WordPress site a professional touch with your unique logo? Imagine opening your website and seeing your brand proudly displayed, instantly catching the eye of every visitor.
It’s like putting your personal stamp on everything you share online. But how exactly do you insert that logo into your WordPress theme? Maybe you’ve tried before and found yourself tangled in confusing settings, or maybe you’re starting from scratch.
Either way, you’re not alone. Many find this step tricky, yet it’s crucial for building a strong brand identity. Your logo is more than just an image; it’s the face of your business online. Stay with us as we break down the process into simple, actionable steps. By the end of this guide, you’ll not only have your logo displayed but will also gain a deeper understanding of how your WordPress theme can work for you. Ready to make your site truly yours? Let’s dive in!
Choosing The Right Logo
A logo shows your brand. It tells people who you are. People remember logos. A logo should be simple and clear. It needs to look good on websites. A good logo makes your site look professional.
Choose a logo file that is not too big. Smaller files load faster. Use PNG for clear logos. JPEG is good for photos. Keep logos under 300 KB. Size matters. Big logos slow down sites.
Accessing The WordPress Dashboard
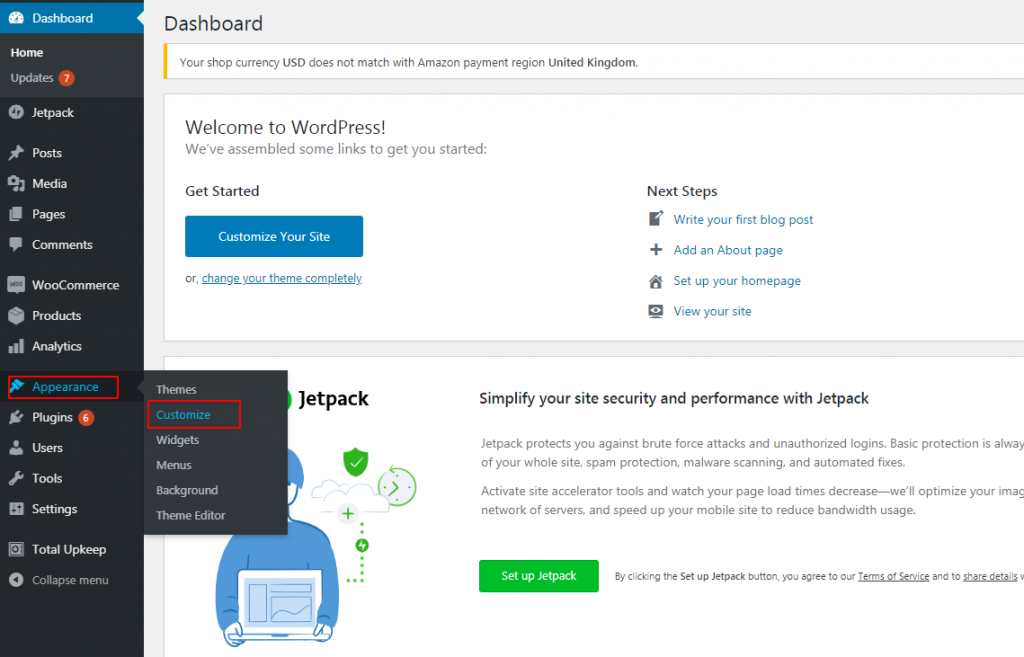
First, open your web browser. Then type your website’s URL. Add “/wp-admin” at the end. Press enter. A login page will appear. Enter your username and password. Click the “Log In” button. This will take you to the WordPress dashboard. The dashboard is where you manage your site.
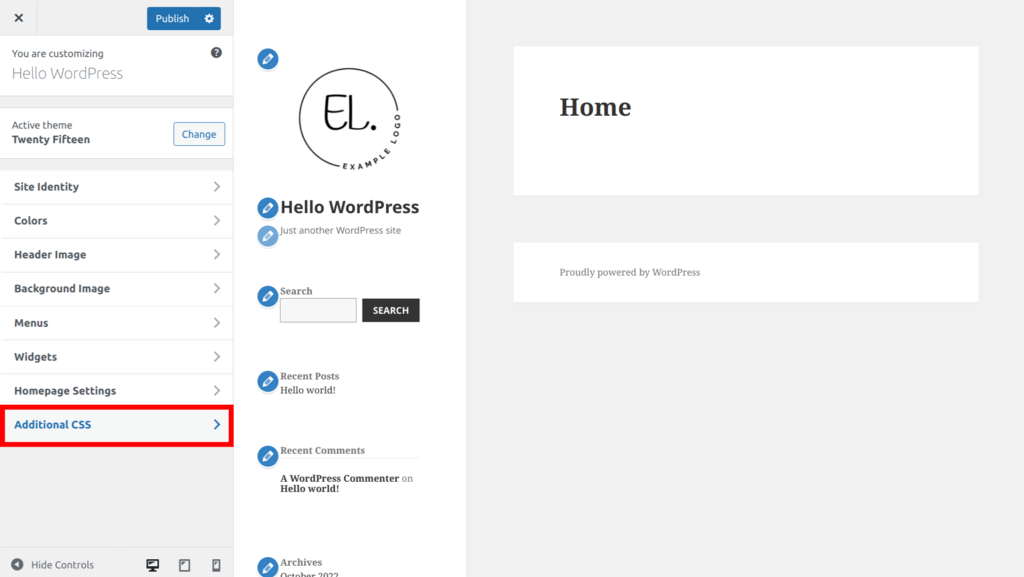
Look for the sidebar on the left. Find the “Appearance” option. Click on it. A menu will drop down. Choose “Customize” from the menu. Now, you are in the theme customizer. Here, you can change many things. To add a logo, find the “Site Identity” section. Click it to open. Then, you can upload your logo.
Using Theme Customizer
Discover the ease of inserting a logo in WordPress using the Theme Customizer. Access the Customizer from your dashboard, then navigate to “Site Identity” to upload your logo effortlessly. Enhance your site’s branding with just a few clicks.
Locating The Logo Upload Option
Open your WordPress dashboard. Find Appearance in the menu. Click on Customizer. This opens the Theme Customizer. Look for the Header section. Sometimes it says Site Identity. Click it. Here, you find the Logo Upload option. It’s easy to miss. So, look carefully. Each theme is different. Some themes have different names for this section.
Uploading Your Logo
Once you find the upload option, click Select Logo. A window pops up. It’s the Media Library. Upload your logo here. It should be in PNG or JPEG format. After uploading, you might need to crop it. Follow the instructions on the screen. Click Save. You should see your logo now. If not, refresh the page. Sometimes it takes a moment.
Adjusting Logo Settings
Logos make your site stand out. Finding the right size is important. Too big or too small looks bad. Use the theme options to resize your logo. Drag corners to make it fit. Positioning is key too. You can put the logo on the left or right. Use the alignment tools. Make sure it looks good on all devices. Preview the changes often. This helps you see how it looks before saving. Check on phones and tablets. Adjusting is simple but needs care. Take your time and make it perfect.
Always preview before you save. This shows how the logo looks live. Find the preview button in the theme settings. Look for problems. Fix them if needed. Check colors and alignment. Make sure everything looks right. View the site like a visitor. This helps you understand the user experience. Previewing avoids mistakes. It saves time too. Happy designing!
Applying Changes
It’s time to save your work. Click the Save button. This keeps your logo safe. Next, click Publish. This shares your logo with the world. Your logo is now part of your site. Everyone can see it.
Visit your live site. See if the logo appears. Check if it’s in the right spot. Look at your site on a phone. Make sure the logo looks good there too. If it doesn’t, you might need to adjust. Try again if needed. Your logo should look great everywhere.
Credit: www.hostinger.com
Troubleshooting Common Issues
Easily insert a logo into your WordPress theme by accessing the Customizer feature. Navigate to “Appearance,” then “Customize,” and find the “Site Identity” section. Upload your logo, adjust its size, and save changes to update your site’s look effortlessly.
Logo Not Displaying
The logo may not show if the upload is incomplete. Check the file type. JPEG and PNG are most common. Ensure the image file is not corrupted. Try uploading again. Sometimes, the logo is hidden by theme settings. Visit the customizer. Look under “Header” options. Make sure the logo is visible. Clear your browser cache. This helps display the latest changes. Check the permissions of the logo file. Ensure it is set to public. This allows everyone to see it. Sometimes, plugins cause issues. Disable them one by one. See if the logo appears.
Image Quality Problems
Low-quality logos can look blurry. Use high-resolution images. Check the logo size in the theme settings. Resize the image to fit. Do not stretch small images to fit large spaces. This causes blur. Use tools like Photoshop or Canva. They help in resizing images without losing quality. Ensure the image is not compressed too much. High compression reduces quality. Use the WordPress media library. Upload logos there to keep quality intact. Choose the right file format. PNG files are better for logos. They maintain quality when resized.
Exploring Plugin Options
WordPress offers many plugins to help with logo management. Some popular ones are Logo Carousel, Site Logo, and WP Custom Logo. These plugins make it easy to add and change logos. Many of them are user-friendly and require no coding skills. They also allow you to customize the logo’s size and placement. This makes your website look professional and unique.
Start by searching for the plugin in the WordPress dashboard. Click on “Install Now” to begin the process. After installation, activate the plugin. Go to the settings page of the plugin to upload your logo. Follow the on-screen instructions to adjust logo settings. Some plugins offer extra features like logo resizing and positioning. Make sure to save your changes. This ensures your logo appears on your site.
Credit: 10web.io
Customizing With Css
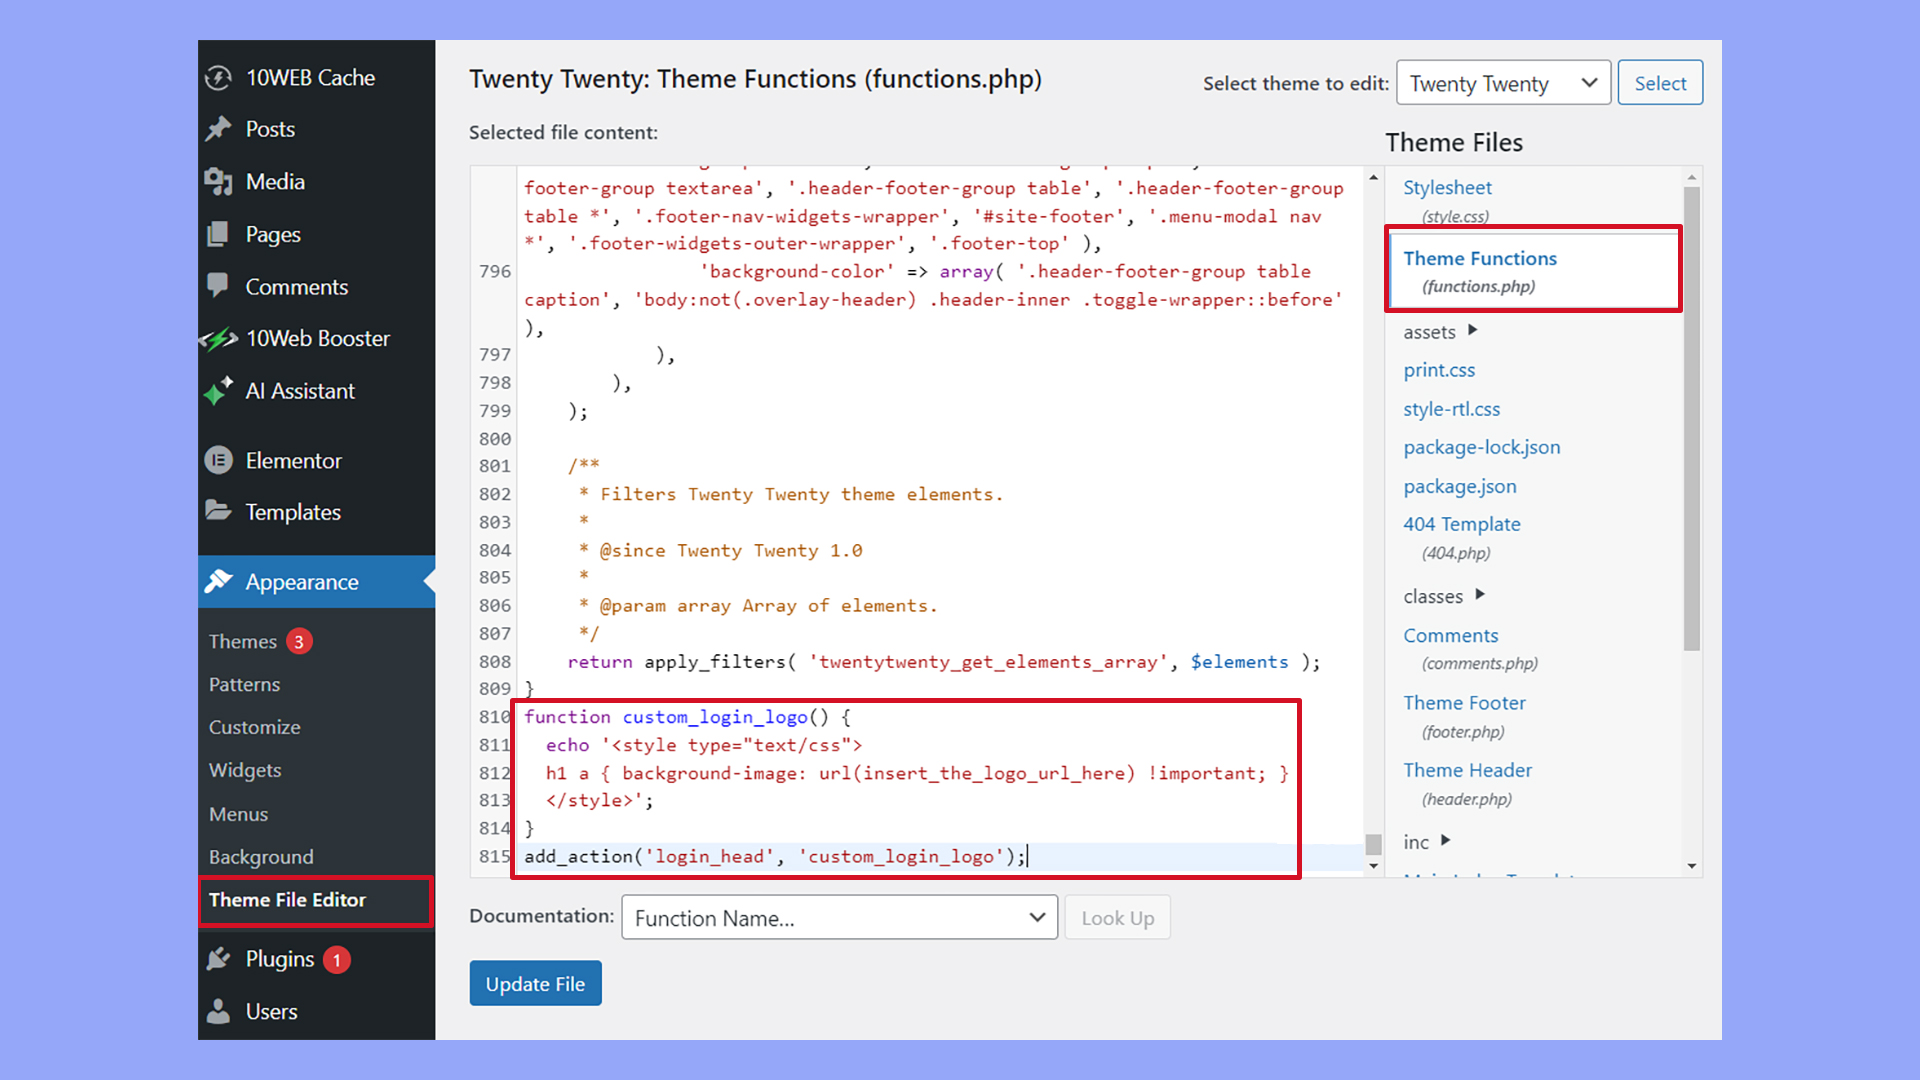
Adding a logo to your WordPress theme is simple with CSS customization. Access the theme’s files and locate the header section. Use CSS to position and style your logo, ensuring it fits perfectly with your site’s design.
Adding Custom Css
Adding a logo can make your site unique. Use Custom CSS to place it. First, find the CSS file in the theme editor. Then, add code to style the logo. Make sure the logo fits well on the page. Adjust the size and position using CSS.
Advanced Styling Tips
Advanced tips help your logo stand out. Use CSS tricks like shadows or borders. This makes the logo look better. Test changes to see how they appear. It’s important to keep the design simple. A simple logo is easy to recognize. Always save your changes in the editor.
Credit: www.inmotionhosting.com
Frequently Asked Questions
How To Add A Logo In WordPress Theme?
To add a logo in WordPress, navigate to Appearance > Customize. Select Site Identity and upload your logo image. Adjust the dimensions if necessary. Save your changes to apply the new logo. Ensure your logo is optimized for web use, maintaining a balance between quality and file size.
Can I Change My WordPress Logo Anytime?
Yes, you can change your WordPress logo anytime. Simply go to Appearance > Customize, select Site Identity, and upload a new logo. Make sure to save your changes. Regular updates can keep your website looking fresh and aligned with branding changes.
What Is The Ideal Logo Size For WordPress?
The ideal logo size for WordPress varies by theme but is usually around 250×100 pixels. Always check your theme’s documentation for specific dimensions. A properly sized logo ensures it looks sharp and professional across all devices.
Why Is My WordPress Logo Not Displaying?
If your WordPress logo isn’t displaying, check if it’s uploaded correctly in Appearance > Customize > Site Identity. Clear your browser cache and refresh the page. Ensure your theme supports logo display and check for any CSS or plugin conflicts that might hide it.
Conclusion
Adding a logo to your WordPress theme is simple. This small step personalizes your site, making it unique. Follow the steps carefully, and your brand will shine. Remember, a clear logo helps visitors recognize your site. Consistency in design boosts your brand identity.
Practice makes it easier each time. Don’t hesitate to experiment with different designs. Your website is your digital storefront. Make it memorable with a distinctive logo. Stay creative and keep your audience in mind. Your effort will make your website stand out.
Happy designing!


