
Are you ready to take full control of your website by hosting your domain on AWS? Whether you want faster loading speeds, better security, or more flexibility, AWS offers all that and more.
But setting it up might seem tricky at first. Don’t worry—this guide will walk you through each step in a simple and clear way. By the end, you’ll know exactly how to host your domain on AWS with confidence and ease.
Keep reading, and let’s get started!
Choosing Your Domain Name
Choosing a domain name is the first step to hosting your website on AWS. It sets your online identity. A good domain name helps visitors find and remember your site. It should reflect your brand or purpose clearly.
Think about your audience. Pick a name that is simple and easy to spell. Avoid long or complex words. A short and clear name works best for any website.
Tips For Selecting A Domain
Use keywords related to your website topic. This can improve your site’s visibility on search engines. Avoid numbers and hyphens, as they confuse users. Choose a domain that sounds good when spoken aloud. Consider using a popular domain extension like .com or .net for trustworthiness. Make sure the name is unique to avoid legal issues.
Checking Domain Availability
Use domain registration sites to check if your chosen name is free. AWS also offers tools to search for available domains. If your first choice is taken, try slight variations. Add a word or change the extension. Do not use names that are trademarked or copyrighted. Secure your domain quickly once available to prevent losing it.

Credit: www.youtube.com
Setting Up An Aws Account
Setting up an AWS account is the first step to hosting your domain on Amazon Web Services. This process opens access to a wide range of cloud services. It may seem complex at first, but it is simple when broken down. Follow the steps carefully to ensure your account is ready for domain hosting.
Creating Your Aws Account
Go to the AWS homepage and click on “Create an AWS Account.” Enter your email address and choose a strong password. Provide your full name and contact information. AWS will ask for payment details, but you can use the free tier for many services. Verify your phone number using the code sent by AWS. Confirm your identity and accept the terms and conditions. Once done, your account will be active and ready to use.
Navigating The Aws Management Console
Log in to the AWS Management Console using your new credentials. The console is the main dashboard for managing AWS services. Use the search bar to find services like Route 53, which handles domain hosting. The interface is user-friendly and shows your recent services. The navigation menu helps you switch between services easily. Spend some time exploring the console to become comfortable. This familiarity will help in managing your domain and other AWS resources.
Registering Your Domain With Route 53
Registering your domain with Amazon Route 53 is a simple step to start hosting your website. Route 53 is a reliable service that manages domain names and DNS settings. It helps connect your website address to your hosting server.
You can either register a new domain or transfer an existing one to Route 53. Both options ensure your domain is ready to use with other AWS services. The process is straightforward and guides you through each step.
How To Register A New Domain
Open the AWS Management Console and go to Route 53. Select “Domains” and then click “Register Domain.”
Enter the domain name you want to buy and check its availability. If available, add it to your cart and proceed.
Fill in your contact details as required by ICANN rules. These details will be used for domain registration.
Review your order and complete the payment. After that, your domain registration starts immediately.
The registration process may take a few minutes to complete. You will receive a confirmation email once done.
Transferring An Existing Domain
Start by unlocking your current domain at your current registrar. This step allows the transfer to begin.
Get the authorization code (EPP code) from your current registrar. This code is necessary for the transfer.
In the Route 53 console, select “Transfer Domain” under the “Domains” section.
Enter your domain name and the authorization code when prompted.
Confirm the transfer details and pay the transfer fee if applicable. The transfer usually completes in a few days.
Keep an eye on your email for updates about the transfer status.
Configuring Dns Settings
Configuring DNS settings is a key step in hosting your domain on AWS. DNS directs internet traffic to your website. Setting it up correctly ensures visitors reach your site smoothly. Amazon Route 53 is the AWS service used for DNS management. It offers reliable, scalable domain name system services.
This section explains how to create hosted zones and add record sets. These tasks link your domain name to your web resources. Follow these steps carefully to avoid downtime and errors.
Creating Hosted Zones
Start by opening the AWS Management Console. Navigate to the Route 53 dashboard. Select “Hosted zones” from the sidebar menu. Click the “Create hosted zone” button.
Enter your domain name without “www.” Choose “Public hosted zone” to make your domain accessible online. Click “Create hosted zone” again to confirm. AWS will generate a set of name servers for you. These name servers must be updated at your domain registrar.
Adding Record Sets
After creating a hosted zone, you need to add record sets. Record sets tell DNS how to handle requests for your domain. Click “Create record” inside your hosted zone.
Choose the record type, such as A, CNAME, or MX. For example, an A record links your domain to an IP address. Enter the required values like IP address or hostname. Set the TTL (time to live) value, which controls caching.
Save the record. Repeat the process for all necessary records. Common records include A, CNAME, MX, and TXT. Each record supports different functions like website hosting or email delivery.
Linking Your Domain To Aws Services
Linking your domain to AWS services makes your website and apps accessible online. This step connects your web address to powerful cloud resources. The process ensures visitors reach your content fast and securely.
Amazon Web Services offers many options to link domains. You can connect to EC2 instances for dynamic websites or use S3 buckets for static sites. Both methods need proper domain setup for smooth operation.
Connecting To Ec2 Instances
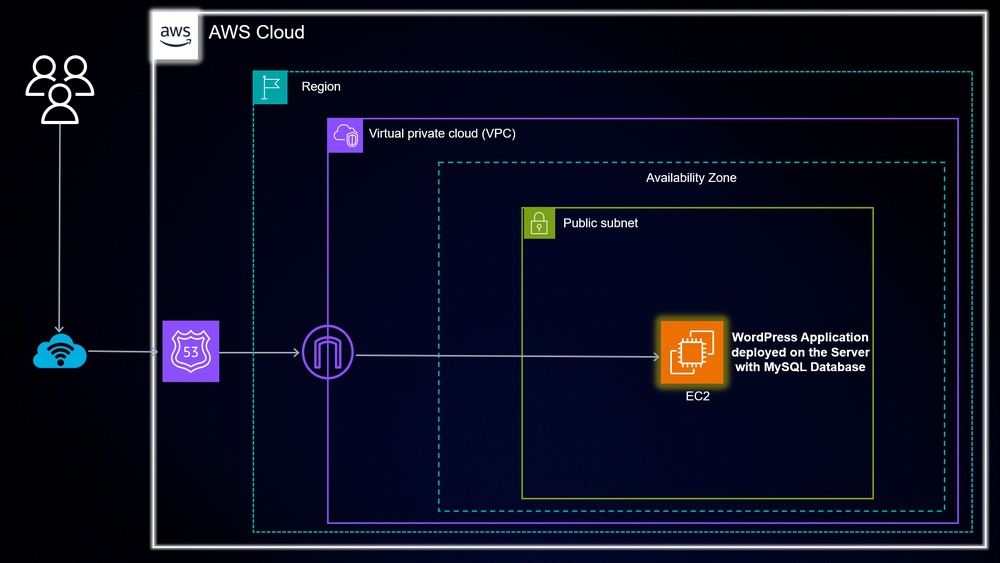
EC2 instances act like virtual servers. To link your domain, create an Elastic IP and attach it to your EC2. This IP stays constant, so your domain always points to the right server.
Next, update your domain’s DNS records. Use an A record to map your domain to the Elastic IP address. This setup sends visitors directly to your EC2-hosted website or app.
Security is important. Use AWS Certificate Manager to add SSL certificates. This makes your site safer with HTTPS and builds trust with visitors.
Using S3 For Static Websites
S3 buckets store files like HTML, CSS, and images. To host a static website, create a bucket named after your domain. Enable static website hosting in the bucket settings.
Upload your website files to the bucket. Then, adjust the bucket policy to allow public read access. This step lets visitors load your site content from the bucket.
Link your domain by creating a Route 53 alias record. Point it to your S3 website endpoint. This connection ensures your domain displays the static site hosted on S3.
Securing Your Domain
Securing your domain is vital for protecting your website and visitors. It prevents hackers from stealing information or redirecting your traffic. AWS provides tools to make your domain safe. These tools help encrypt data and verify your domain’s authenticity. Let’s explore two important steps to secure your domain on AWS.
Setting Up Ssl Certificates
SSL certificates create a secure connection between your website and visitors. This connection encrypts data, stopping others from reading it. AWS offers AWS Certificate Manager (ACM) to get free SSL certificates easily. You request a certificate in ACM and attach it to your AWS services like CloudFront or Elastic Load Balancer. This process makes your site use HTTPS, which builds trust with visitors and improves SEO rankings.
Enabling Dnssec
DNSSEC adds a layer of security to your domain’s DNS system. It ensures DNS responses are valid and not altered by attackers. AWS Route 53 supports DNSSEC for domain registration and DNS hosting. To enable DNSSEC, sign in to your AWS console, go to Route 53, and activate DNSSEC for your domain. This step protects your domain from DNS spoofing and cache poisoning, keeping your website safe and reliable.
Managing Domain Renewal And Billing
Managing your domain renewal and billing is essential to keep your website live and avoid service interruptions. AWS offers tools to help you stay on top of your domain renewals and control your costs easily. Proper management saves time and prevents unexpected charges.
Automating Renewals
AWS allows you to set up automatic domain renewals. This feature ensures your domain name renews before it expires. You won’t need to remember renewal dates. Automatic renewals reduce the risk of losing your domain. Just enable this option in your AWS account settings. AWS will charge your payment method automatically when renewal is due.
Monitoring Costs
Keep track of your domain registration expenses with AWS billing tools. These tools give clear reports about your spending. You can set budgets and alerts to avoid surprises. Regularly checking costs helps you manage your domain budget. AWS provides detailed invoices showing your renewal charges and other fees.

Credit: dev.to
Troubleshooting Common Issues
Troubleshooting is a key step when hosting your domain at AWS. Issues can stop your site from working correctly. Knowing common problems helps you fix them fast. This section covers two main issues: DNS propagation delays and SSL errors.
Dns Propagation Delays
DNS changes take time to spread worldwide. This delay can cause your site to load slowly or not at all. Usually, propagation takes a few hours but can last up to 48 hours.
Clear your browser cache to see updates faster. Use online tools to check DNS status globally. Patience is important during this process.
Resolving Ssl Errors
SSL errors can prevent visitors from accessing your site securely. These errors often appear after setting up your SSL certificate on AWS.
Check if the SSL certificate is active and not expired. Make sure the certificate matches your domain name exactly. Use AWS Certificate Manager to manage your certificates properly.
Clear your browser cache and restart it to remove old SSL info. Confirm your server uses HTTPS and redirects HTTP traffic correctly.

Credit: www.youtube.com
Frequently Asked Questions
What Is The First Step To Host A Domain At Aws?
The first step is to register your domain or transfer it to Amazon Route 53. Then, configure DNS settings in the AWS Management Console.
How Do I Connect My Domain To An Aws Website?
Create a hosted zone in Route 53. Then, update your domain’s nameservers to point to AWS hosted zone nameservers.
Can I Use Aws For Domain Registration And Hosting?
Yes, AWS Route 53 allows both domain registration and hosting, providing integrated DNS management and scalable infrastructure.
How Long Does Dns Propagation Take On Aws?
DNS propagation typically takes 24 to 48 hours but can be faster depending on your TTL settings.
Conclusion
Hosting your domain on AWS offers control and reliability. You can manage your website with simple steps. AWS provides tools to keep your site secure and fast. Costs stay low if you choose the right services. This guide helps you start without confusion.
Try hosting on AWS to see how easy it can be. Your online presence will benefit from stable hosting. Keep exploring AWS features as your site grows. Take small steps and build your site with confidence.


