
Are you ready to take control and host your own web service in IIS7? Whether you’re a seasoned developer or just getting your feet wet, understanding how to effectively use Internet Information Services (IIS) can give your web applications the edge they need.
Imagine having the power to manage your web services with ease, ensuring optimal performance and reliability. IIS7 is packed with features that can help you do just that, but knowing where to start can make all the difference. By the end of this article, you’ll have the knowledge and confidence to host your web service in IIS7, unlocking a world of possibilities for your web projects.
Stick with us, and let’s get started on mastering this essential skill!
Credit: geeksarray.com
Setting Up Iis7
Hosting a web service in IIS7 is straightforward. Begin by installing IIS7 on your server. Follow with deploying your web service application in the IIS manager, ensuring proper configuration of bindings and permissions for seamless access.
Installing Iis7
Begin by accessing the Control Panel. Choose Programs and Features. Click on Turn Windows features on or off. Look for Internet Information Services. Check the box next to it. Hit the OK button. Wait for the installation to complete. Restart your computer if needed.
Configuring Server Roles
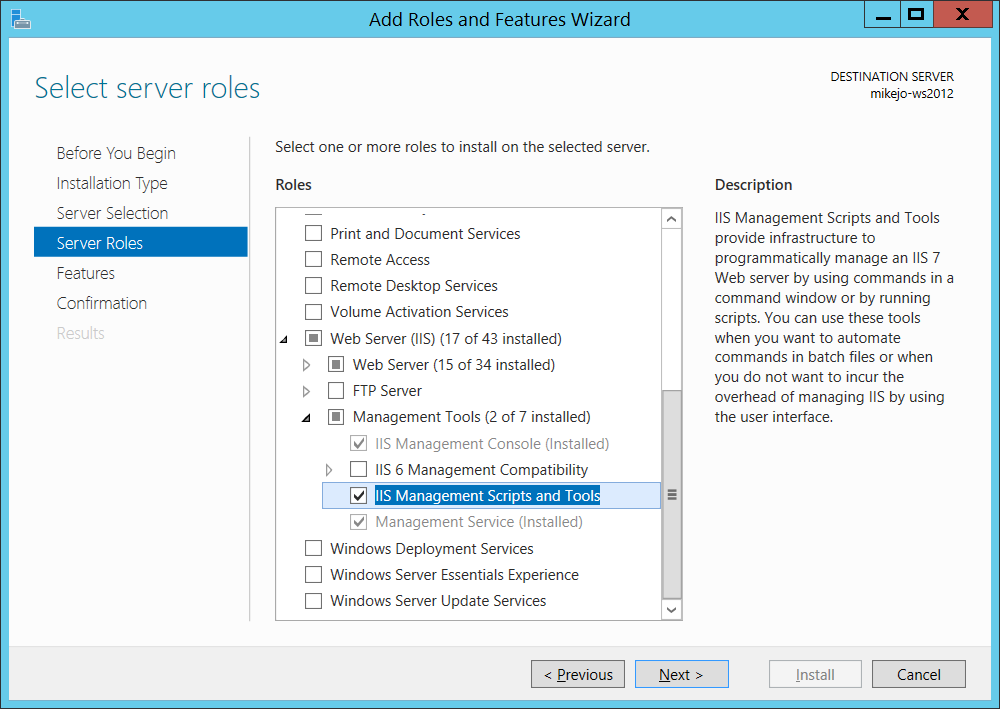
Open Server Manager. Navigate to Roles. Click on Add Roles. Select Web Server (IIS). Follow the prompts. Choose the role services that you need. Click Next to proceed. Complete the setup and confirm the changes. Your server is ready now.
Credit: learn.microsoft.com
Preparing The Web Service
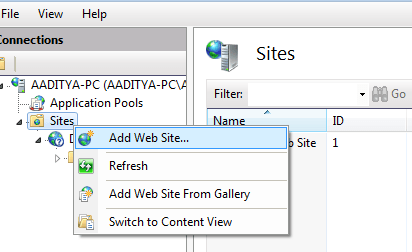
First, open Internet Information Services (IIS) Manager. Click on the server name. Right-click on Sites and choose Add Web Site. Fill in the details like Site Name and Physical Path. Select the correct port number for your site. Make sure that there are no port conflicts.
Go to Application Pools in IIS Manager. Right-click and choose Add Application Pool. Give a name to your Application Pool. Choose the right .NET Framework version. The pool should match your application needs.
Deploying The Web Service
First, locate your web service files. These are important. Use a tool like Visual Studio to publish them. Choose the publish option. Select the destination path carefully. Ensure files are copied correctly. Check every file. Double-check the settings. Look for errors. Fix them immediately. Files must be in perfect condition. Ready to use.
Open Internet Information Services (IIS). Find your website. Right-click to add a virtual directory. Name it wisely. Choose a folder path. This is crucial. Path must be correct. Click “OK” to save. Check the directory settings. Ensure permissions are set right. Test your web service. Make sure it works. No issues should occur. Everything needs to run smoothly.
Configuring Web Service Settings
Security settings keep your web service safe. Start by clicking on the “Security” tab in IIS7. Check the firewall settings. Ensure it allows web service access. Set up SSL certificates for secure connections. Use strong passwords for added protection. Regularly update your security protocols. This helps prevent threats. Always monitor your web service logs. Catch issues early.
Authentication is crucial for user access. Go to the “Authentication” section in IIS7. Choose the right authentication method for your service. Windows Authentication is good for internal networks. Basic Authentication is simple but less secure. Consider Digest Authentication for better security. Enable Anonymous Authentication only if necessary. Configure user roles to control access. Test your settings. Ensure they work properly.
Managing Ssl Certificates
SSL Certificates make websites secure. They protect user data. To install, you need a certificate file. Open IIS Manager. Select your site. Click on ‘Bindings’. Choose ‘Add’. Select ‘HTTPS’. Browse for the certificate file. Click ‘OK’. Your site is now secure. Users will see a padlock icon. This shows the site is safe.
HTTPS is important. It encrypts data. It keeps it safe from hackers. To enable HTTPS, go to IIS Manager. Click ‘Bindings’. Select ‘Add’. Choose ‘HTTPS’. Set the SSL Certificate. Click ‘OK’. Now your website uses HTTPS. It’s safer for users. They trust sites with HTTPS more. Search engines prefer secure sites. It can help with SEO.
Testing The Web Service
Open a web browser on your computer. Type in the URL of your web service. This URL usually starts with http://localhost. Then, add the port number and path if needed. You should see the service details. If the service loads, it means it’s working. Make sure your firewall allows connections. Check your network settings if there are problems.
Sometimes, the service might not work. Check if the IIS7 server is running. Restart it if it’s not. Look at error messages in the Event Viewer. They can give clues. Ensure the service path is correct. Check for any typos in the URL. Verify that all files are in the right folder. Make sure you have the necessary permissions set. These steps usually fix common problems.
Monitoring And Maintenance
Ensuring your web service runs smoothly in IIS7 involves regular monitoring and maintenance. Check server logs for any errors and performance issues. Perform routine updates to keep the system secure and efficient.
Using Iis Logs
IIS logs help keep track of web service activity. They record details like user visits and errors. Analyzing these logs can boost performance and security. Logs show which pages load slowly. Fix these pages to improve user experience. They also reveal error codes. Error codes help identify problems quickly. Regular log checks are important. This ensures the web service runs smoothly. Logs also show peak usage times. Use this data to plan updates during low traffic. Always store logs securely. This protects user privacy and sensitive information.
Performance Optimization
Optimizing performance keeps your web service fast. Reduce image sizes to speed up page loads. Use caching to store data temporarily. This reduces server load. Minimize HTTP requests for quicker responses. Enable compression to shrink file sizes. Regularly update software. Updates fix bugs and improve speed. Monitor server resources. Ensure CPU and memory are not overloaded. Testing changes before deployment is wise. This avoids issues in live environments.

Credit: stackoverflow.com
Frequently Asked Questions
How To Host A Web Service In Iis?
Open IIS Manager. Click “Add Website” in the Actions pane. Set site name, path, and binding settings. Click “OK”.
How To Host Windows Service In Iis?
To host a Windows service in IIS, create a Web API or WCF service application. Deploy it to IIS, configure application pool and bindings. Use service code to interact with Windows service functions via HTTP endpoints. Ensure proper security and authentication settings in IIS for safe access.
How To Host A Web Service On Localhost?
Install a local server software like XAMPP or WAMP. Place your web service files in the server’s root directory. Start the server and access your service via “localhost” in your web browser. Ensure proper configuration and port settings for smooth operation.
How To Deploy A Website On A Local Iis Server?
Install IIS via Control Panel. Create a new site in IIS Manager. Set the site’s physical path. Bind the site to a port. Deploy your website files to the specified folder. Access the site via localhost in a browser. Ensure firewall settings allow traffic to the chosen port.
Conclusion
Hosting a web service in IIS7 is straightforward. Follow the steps carefully. Set up your application pool. Configure your site bindings. Test your web service. Ensure your firewall settings are correct. Keep security protocols in mind. Regularly update IIS7 for best performance.
Troubleshooting is simpler with logs. Regular checks keep your service running smoothly. Hosting in IIS7 boosts site reliability. Enjoy seamless service delivery. With practice, it becomes easy. Remember, patience is key. Happy hosting!


