
Are you ready to take your web service to the next level? Hosting a web service in IIS (Internet Information Services) can seem daunting, but it doesn’t have to be.
Imagine the satisfaction of seeing your service running smoothly, accessible to users around the globe with just a few clicks. You’re about to unlock the potential to enhance your web service’s performance, security, and scalability. Whether you’re a developer, IT professional, or a curious learner, mastering IIS will give you the power to efficiently manage your web applications.
Dive into this guide, and discover how easy it can be to host your web service in IIS. You’re about to make a significant leap forward in your tech journey, and we’re here to help you every step of the way.
Prerequisites For Hosting
Hosting a web service needs certain system requirements. A computer with Windows OS is needed. The processor should be at least 1 GHz. The system must have a minimum of 512 MB RAM. At least 2 GB of free space is necessary. High-speed internet is recommended. These requirements help run IIS smoothly.
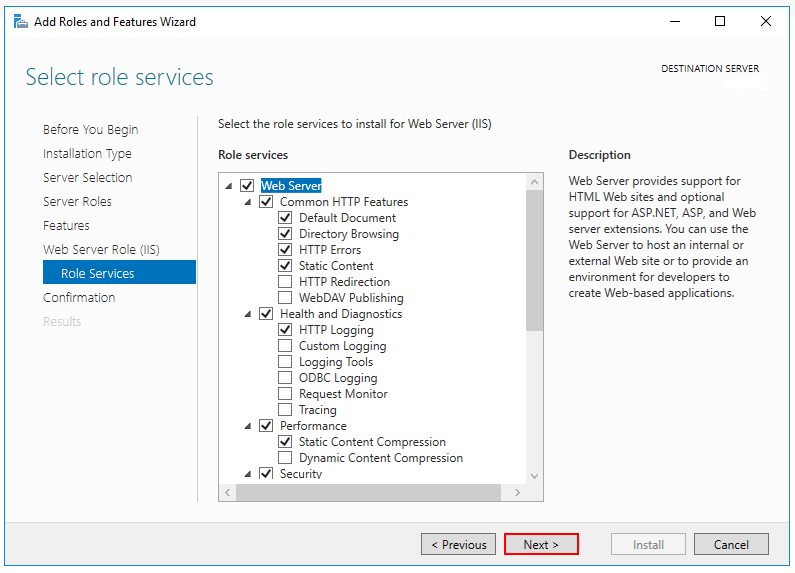
To install IIS, access the Control Panel. Select ‘Programs and Features’. Click on ‘Turn Windows features on or off’. Check Internet Information Services. Wait for the installation. Restart the computer after installation. IIS Manager will now be available. This is where you manage web services.
Configuring Iis
Hosting a web service in IIS involves setting up application pools and configuring site bindings. Ensure your service files are correctly placed in the root directory. Adjust permissions to allow smooth access, ensuring efficient operation and minimal downtime.
Accessing Iis Manager
First, open the Control Panel. Then, go to Administrative Tools. Click on IIS Manager. This opens the main window. You can see all your websites here. Make sure to explore the options. Click on different tabs to learn more.
Creating A New Website
To create a new site, click on Sites. Then, select Add Website. Enter the site name. Choose a folder for your files. Set a port number. Make sure it is unique. Finally, click OK. Your site is now ready. Test it by opening the browser.
Deploying The Web Service
First, open the server’s file manager. Find the folder named inetpub. This is where your files will go. Create a new folder for your web service. Give it a simple name. Now, copy your web service files. Paste them into this folder. Ensure all files are there. Double-check if you missed any. This step is crucial for your service to work.
Open the Internet Information Services (IIS) Manager. Look for the Application Pools option. Click on it. Here, you’ll see a list. Find the DefaultAppPool. Right-click on it. Choose the Advanced Settings option. Now, set the .NET version. Choose the one your service needs. Ensure the pool is running. This keeps your service active. Check if the status shows Started.

Credit: learn.microsoft.com
Configuring Application Settings
The Web.config file is vital. It holds settings for your web app. Open the file to edit. Search for key values. Change settings as needed. Ensure paths are correct. It affects how your app runs. Save changes after editing. Check for errors.
Authentication secures your web service. Go to IIS manager. Select your site. Find the authentication option. Choose the type needed. Options include anonymous and basic. Configure the settings. Ensure users can log in. Test the setup.
Binding And Ssl Configuration
Setting up bindings in IIS is easy. First, open the IIS Manager. Select your website from the list. Click on “Bindings” in the Actions pane. A new window will pop up. Click on “Add”. Choose the type of binding you need. Enter the hostname and port. If needed, select an SSL certificate. Click “OK” to save. Your binding is now set.
SSL keeps data safe. Start by opening the IIS Manager. Choose your site. Click on “Bindings”. Select your binding type. Click “Edit”. Choose an SSL certificate from the list. Don’t have one? Install a new one. Click “OK” to apply. SSL is now configured for your site.
Credit: learn.microsoft.com
Testing The Web Service
Accessing the URL is easy. Type the web address in the browser. The page should open. If it does, your setup is right. Try using different browsers. Check if the service works well on each.
Troubleshooting Common Issues can be tricky. Sometimes, the page does not load. Check your internet connection first. See if the server is running. Look at the error messages. They often tell what’s wrong. If unsure, ask for help. A friend or a tech support might assist. Restarting the server can also help at times. Make sure all cables are connected properly.
Performance Optimization
Hosting a web service in IIS improves performance. Configure settings like application pool, security, and SSL for efficiency. Proper setup ensures better speed and reliability.
Enabling Compression
Web services run faster with compression. IIS supports enabling compression easily. It reduces the size of data sent to users. This makes pages load quickly. Use Gzip for compressing files. It works well with text files like HTML, CSS, and JavaScript. Enabling compression saves bandwidth. This helps in serving more users at once. The server uses fewer resources. This is good for performance. Always test after setting up compression. This ensures everything works smoothly.
Configuring Caching
Caching stores data for quick access. It reduces server load. IIS caching keeps frequently accessed data in memory. This speeds up response times. Clients receive data faster. Enable output caching for static pages. It prevents generating the same data repeatedly. Set cache duration based on content change frequency. Use browser caching for static resources. This helps avoid repeated downloads. Configure caching carefully. It balances speed and freshness.
Security Best Practices
Permissions keep your web service safe. Allow only trusted users to access files. Use strong passwords for accounts. Limit access to sensitive data. Always monitor user activities. Update permissions regularly. Remove access for unused accounts. This helps prevent unauthorized access.
Firewalls protect your web service. They block harmful traffic. Always turn on your firewall. Use a software firewall and hardware firewall. Check firewall settings often. Ensure rules are up-to-date. Firewalls keep hackers away. They stop malicious attacks. A strong firewall is key to security.
Maintaining The Web Service
Hosting a web service in IIS involves setting up a reliable environment for your applications. First, install IIS on your server, ensuring it supports your web service framework. Next, configure the application pool and site bindings to optimize performance and security.
Monitoring Performance
Regular monitoring of your web service is crucial. This ensures it runs smoothly. Use tools to check speed and efficiency. Look for slow response times. Check server load frequently. This helps prevent crashes. Monitor user feedback too. They might spot issues you miss. Keeping an eye on these factors is important. It keeps your service reliable and efficient. Always be ready to fix any problems.
Regular Updates
Updating your web service is important. New versions often have fixes. They also improve security. Bugs can be fixed with updates. Regular updates keep your service safe. They also improve performance. Always use the latest version. Check for updates regularly. Install them as soon as possible. This keeps your service up-to-date. Avoid delays in updating. It might cause problems later.
Credit: www.cloudfronts.com
Frequently Asked Questions
How To Host Web Services In Iis?
To host web services in IIS, first install IIS via Control Panel. Open IIS Manager, and add a new site. Configure site bindings and point to your web service folder. Ensure the application pool is running. Test the service to confirm functionality.
How Do I Add A Web Service To Iis?
Open IIS Manager. Right-click “Sites” or your desired application. Select “Add Application. ” Enter the alias and physical path. Click “OK. ” Ensure correct application pool settings. Your web service is now added to IIS.
How Do I Host A Web Service?
To host a web service, choose a reliable hosting provider. Set up your server environment, upload your web files, and configure DNS settings. Ensure security measures, like SSL certificates. Test your service to confirm it’s working.
How To Host Windows Service In Iis?
Convert the Windows service to a web application. Use Windows Process Activation Service (WAS) for hosting. Deploy the application in IIS and configure the application pool. Ensure all dependencies are correctly installed and configured.
Conclusion
Setting up a web service in IIS is straightforward. Follow each step carefully. Ensure all configurations are correct. Testing is crucial to confirm everything works. Remember, practice makes perfect. With time, it becomes easier. Troubleshooting might be needed sometimes. Stay patient and consult resources if stuck.
IIS offers many useful features. Explore them to improve your service. Consistent updates keep your service secure. Keep learning and experimenting. This will enhance your skills. Hosting services in IIS boosts your online presence. Now, you’re ready to host like a pro.
Happy hosting!


