
Are you looking to host a web service in IIS but unsure where to start? You’re not alone.
Many people find the process daunting at first. However, with the right guidance, it can be straightforward and rewarding. Imagine having your web service up and running smoothly, accessible to users whenever they need it. That’s exactly what you’ll achieve by the end of this guide.
By following simple, step-by-step instructions, you’ll not only learn how to host your web service but also gain the confidence to handle similar tasks in the future. Ready to turn what seems like a technical challenge into a manageable task? Let’s dive in and transform your web hosting experience.
Prerequisites
A computer with a Windows operating system is necessary. Ensure it has at least 4GB of RAM. A dual-core processor or better is recommended. The computer should have enough disk space. At least 10GB free space is advised. An internet connection is also needed.
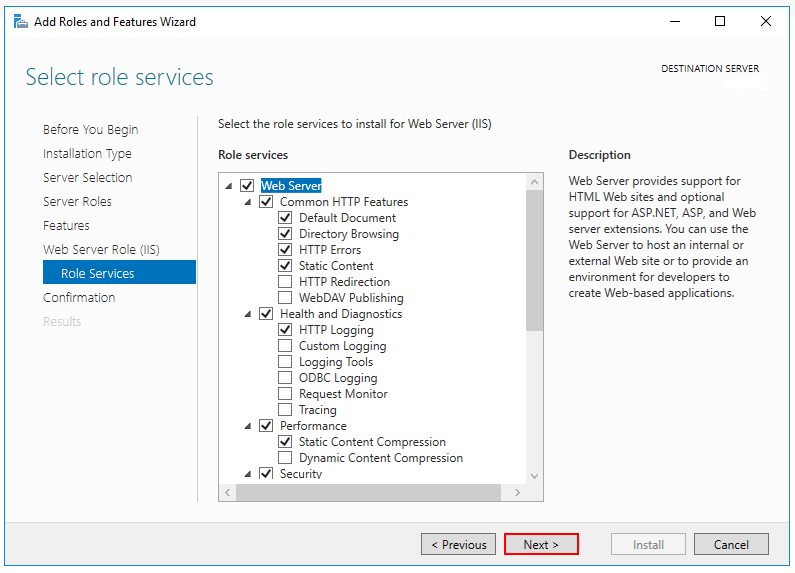
Begin by installing the Internet Information Services (IIS) manager. This tool helps in hosting web services. Make sure to update Windows before starting. Updates often improve performance. Use the Control Panel to add IIS. Select the appropriate features. Always include the Web Management Tools.
Setting Up Iis
First, click on the Start menu. Open the Control Panel. Find and click on Administrative Tools. Now, look for IIS Manager and open it. This tool helps manage websites.
Inside IIS Manager, click on Sites. Choose Add Website from the right menu. Fill in the site name. Set the physical path to your web files. Choose a port number for your site. Click OK to save. Your site is now configured.
Creating A New Website
Choose a site name that is easy to remember. Type the name in the Site Name box. The name helps you find the site later. Make sure it is clear and specific. This step is important for site identification.
The physical path tells where the files are stored. Click the Browse button to select the folder. This folder holds all your web files. Double-check the path to avoid mistakes. If the path is wrong, the site won’t work. Keep paths simple to avoid confusion.
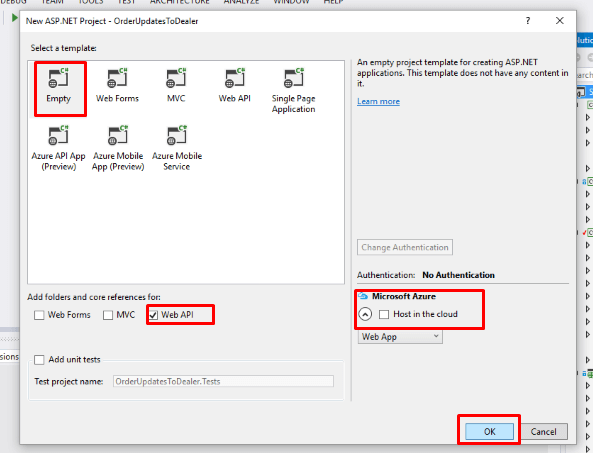
Credit: www.cloudfronts.com
Binding And Port Configuration
Choose the right protocol for your service. Common options are HTTP and HTTPS. For secure sites, use HTTPS. It keeps data safe. Enable the protocol in your IIS settings.
Assign a port number for your service. The most common port for HTTP is 80. For HTTPS, it’s 443. Ensure the port is not in use by another service. Configure the port in IIS under the bindings tab.
Deploying Web Service
First, prepare your web service files. These include all necessary DLLs and the main service file. Make sure you have all files together. Then, connect to your server. You can use Remote Desktop or FTP. After connecting, locate the folder where you want to store the web service. Copy all files into this folder. Ensure you copy every file. Missing files can cause errors. Check file permissions. Files must be accessible to IIS.
Open the Web.config file in the server folder. This file controls settings for your web service. You may need to adjust some settings. Ensure the connection strings are correct. Check that error handling is enabled. This helps in troubleshooting. Verify the authentication settings. Proper settings keep your service secure. Save changes once done. Restart IIS to apply changes.
Credit: learn.microsoft.com
Configuring Application Pool
Open Internet Information Services (IIS) Manager on your computer. Look for the Application Pools option on the left side. Right-click on it and choose Add Application Pool. Give your new pool a name. Make sure to choose the correct .NET Framework version. Click OK to create the pool.
After creating the pool, you need to set its properties. Right-click on your new pool and select Advanced Settings. Adjust the CPU limits to control app usage. Check the recycling settings to restart apps automatically. Make sure the identity is set to a secure user. Click OK after changes.
Security Settings
Authentication lets the server know who’s accessing it. Web services need secure authentication. In IIS, several methods are available. Basic Authentication uses a username and password. It’s simple but less secure. Windows Authentication uses Windows credentials. It’s safer and ideal for internal networks. Digest Authentication enhances security over Basic. Each method has its pros and cons. Choose the one that fits your needs. Always consider the security level required. Change settings in the IIS Manager. Navigate to the Authentication feature. Enable or disable methods as needed.
Authorization decides what users can do on the server. It controls access to resources. IIS allows detailed authorization settings. Permissions can be set for users and groups. Use the Authorization Rules feature in IIS Manager. You can allow or deny access. Rules can be based on user roles. Ensure correct rules are set. This protects sensitive data. Regularly review and update rules. This keeps the server secure. Set rules that match your security needs. Always prioritize data safety.

Credit: learn.microsoft.com
Testing The Web Service
Hosting a web service in IIS involves installing IIS, configuring application pools, and deploying your service. Follow steps to set up the server and ensure the web service runs smoothly. Test your configuration to verify functionality and accessibility.
Accessing Through Browser
Open your web browser. Type the web service URL in the address bar. Press “Enter.” Wait for the page to load. You should see the web service details. Check if all information is correct. If the page doesn’t load, check your network connection. Ensure the server is running. Also, verify the URL is correct.
Troubleshooting Common Issues
If you face issues, don’t worry. First, ensure the web service is deployed. Check the IIS settings. Make sure the application pool is running. Look for error messages in the browser. These messages can give clues. You can also check the event logs. Logs can show what went wrong. Fix the issues based on these clues. Restart IIS if needed.
Monitoring And Maintenance
Setting up a web service in IIS involves precise monitoring and maintenance. Keep your server running smoothly by regularly checking its performance and applying updates. Ensure security patches are current to protect your web service from threats.
Performance Monitoring
Keeping an eye on performance is very important. Always check the server’s speed. Use tools to see how fast it runs. Slow speeds can make users unhappy. Make sure there is no lag. This keeps services smooth and fast. Checking regularly helps catch problems early. Fixing issues quickly keeps users happy. Performance can change over time. Regular checks help maintain quality.
Regular Updates
Updates keep your web service strong and safe. New updates fix problems. They also add new features. Always update to the latest version. This protects against bugs and hackers. Regular updates improve service performance. They ensure the system runs smoothly. Users enjoy better experiences with updated services. Never skip an update. It is important for security and efficiency.
Frequently Asked Questions
How To Host Web Services In Iis?
Open IIS Manager, create a new website, and set the physical path to your web service files. Configure bindings, application pool, and authentication settings. Ensure port and firewall settings allow traffic. Test by accessing the URL in a browser.
How Do I Add A Web Service To Iis?
Open IIS Manager. Right-click “Sites” and select “Add Web Site. ” Enter site name and physical path. Set binding information. Click “OK” to add your web service.
How To Deploy Web Application In Iis Step By Step?
Open IIS Manager and create a new website. Set the physical path to your web app folder. Assign a domain name and configure bindings. Check application pool settings for. NET compatibility. Test by browsing the site locally.
How To Host A Web Service?
Choose a reliable hosting provider. Register a domain name. Set up your server environment. Deploy your web service files. Configure DNS settings to point to your server. Regularly update and maintain the server. Ensure security measures are in place. Monitor performance and traffic analytics to optimize.
Conclusion
Hosting a web service in IIS is straightforward. Follow the steps carefully. Install IIS and configure settings. Deploy your web service. Test to ensure it runs smoothly. Troubleshoot common issues if they arise. With practice, you’ll get better. This guide helps you manage IIS easily.
Now, you’re ready to host web services effectively. Keep learning to improve your skills. Explore more features of IIS. Enhance your web hosting experience. Practice makes perfect in web hosting. Stay curious and keep exploring IIS capabilities.


