
Are you ready to elevate your web app hosting game? Hosting your web app on Microsoft Server 2016 can be a game-changer, offering you robust features, enhanced security, and a seamless user experience.
But, figuring out the best way to set it up might seem overwhelming. Don’t worry; you’re not alone, and you’ve landed in the right place. Imagine the peace of mind you’ll have once your app is up and running smoothly, ready to deliver top-notch performance to your users.
In this guide, you’ll discover simple, step-by-step instructions to get your app hosted without a hitch. Let’s dive into the process and transform your web app into a powerhouse on MS Server 2016.

Credit: learn.microsoft.com
Preparing The Server Environment
First, download the software needed. Get Internet Information Services (IIS). It’s important for hosting. Install it using the server manager. Next, install the Web Deploy tool. This helps with deployment. Follow the prompts and complete the setup. Ensure all updates are installed. Updates keep the server secure. Double-check for any missed installations.
Open the Network and Sharing Center. Click on change adapter settings. Select your network connection. Right-click and go to properties. Set up a static IP address. This makes the server stable. Input the IP address, subnet mask, and default gateway. Configure DNS settings too. Use reliable DNS servers. Check settings to ensure everything is correct.

Credit: www.linkedin.com
Setting Up Internet Information Services (iis)
Open the Server Manager on your system. Select the “Manage” option. Click on “Add Roles and Features”. Navigate through the wizard. Choose “Role-based or feature-based installation”. Scroll down to select “Web Server (IIS)”. Check the box to enable it. Confirm your selections and proceed. Let the installation complete. Restart your server if needed.
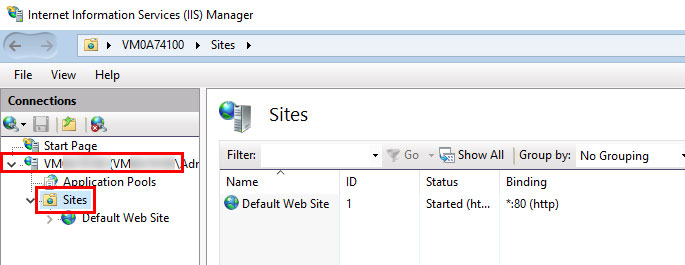
Open the IIS Manager from the start menu. Locate the “Sites” option in the left panel. Right-click and select “Add Website…”. Enter a name for your site. Specify the physical path for your web files. Choose a binding type like HTTP or HTTPS. Set the port number to 80 or 443. Press “OK” to create your site. Your website is now ready to host content.
Deploying The Web Application
Start by uploading your web app files to the server. Use tools like FTP or SFTP. These tools help move files from your computer to the server. Ensure all files are in the right place. Check that images, scripts, and stylesheets are included. Double-check file paths to avoid errors. This step is crucial for a smooth deployment.
After uploading files, configure application settings. This involves setting up database connections and environment variables. Make sure the web server points to the correct directory. Adjust settings in web.config files. These settings ensure your app runs correctly. Use simple values for easy understanding. Remember, correct configuration is key to app performance.
Configuring Security Settings
Firewalls keep your web app safe. They block bad traffic. Set rules to allow only trusted traffic. Open ports that your app needs. Close unnecessary ports. This reduces risks. Use a strong password for firewall access. Change passwords often. Keep firewall software updated. Updates fix security holes. Enable logging to track activity. This helps find problems early.
Not all users need full access. Give limited access to most users. Only admins should have full control. Use roles and groups to set permissions. This makes managing users easier. Review permissions regularly. Remove access for users who leave. Too many permissions can be a risk. Keep user accounts secure with strong passwords. Enforce password changes every few months.
Testing The Deployment
Deploying a web app on MS Server 2016 involves testing its functionality. Ensure the server settings are correct to avoid issues. Verify that the app runs smoothly and meets user needs.
Accessing The Web App
Open your browser. Type the web app’s URL in the address bar. Press enter. The web app should load now. If it doesn’t, check the server settings. Ensure the server is running. Check the network connection too. All these can affect access.
Troubleshooting Common Issues
Sometimes, the web app won’t load. A common issue is a wrong URL. Check the spelling. Also, verify the server is on. Another problem could be firewall settings. Make sure the firewall allows web traffic. If errors persist, review the server logs. Logs provide clues to issues. They help fix problems faster.
Credit: www.ionos.com
Monitoring And Maintenance
Regular backups are very important. They protect your web app data. Always schedule backups at a fixed time. Use secure storage for saved data. This keeps your data safe. Backups help when something goes wrong. They let you restore your web app quickly. Make sure your backup system works well. Test it often to ensure reliability.
Performance monitoring tools track your server’s health. They help you see how your app runs. Use them to find slow areas. Fixing these can make your app faster. Some tools alert you to problems. This means you can act quickly to solve them. Choose tools that are easy to use. Ensure they fit well with your server.
Frequently Asked Questions
How To Host A Website On Windows Server 2016?
Install IIS from the Windows Server Manager. Open IIS Manager and create a new site. Configure the site’s bindings and select the website folder. Ensure your DNS points to the server’s IP. Finally, test the website to confirm it’s online.
How Do I Host A Web Application On A Server?
Choose a hosting provider and plan. Upload your web application files via FTP or a control panel. Configure the server settings, such as domain and database. Secure your application with SSL certificates. Monitor and maintain server performance regularly.
How To Deploy Asp.net Web Application In Windows Server 2016?
Deploy ASP. NET on Windows Server 2016 by installing IIS. Publish the application using Visual Studio. Copy files to the server. Configure IIS to point to the application’s folder. Set up the website in IIS Manager. Ensure network settings allow access and verify functionality in a browser.
How To Install Web Server On Windows Server 2016?
Install the Web Server (IIS) role via Server Manager. Open Server Manager, click “Add roles and features,” select “Web Server (IIS). ” Follow installation steps and configure settings as needed. Access IIS Manager to manage your web server and start hosting websites efficiently on Windows Server 2016.
Conclusion
Hosting a web app on MS Server 2016 is straightforward. Follow the steps. Ensure all settings are correctly configured. This helps your app run smoothly. Keep your server updated. Regular updates enhance security and performance. Troubleshoot any issues promptly. Quick fixes prevent bigger problems later.
Practice makes perfect. The more you host, the better you get. Remember, patience is key. Take your time to understand each step. Soon, you’ll be a pro at hosting. Happy hosting!


