
Have you ever wondered how you can host your Web API in your local IIS environment? You might be developing a new application or testing features before going live, and having your Web API hosted locally can significantly streamline the process.
By doing this, you gain more control over your testing environment and can ensure that your API functions seamlessly before sharing it with the world. You’ll discover simple steps to host your Web API in local IIS effortlessly. Imagine the confidence you will have knowing that your API is fully tested and reliable.
Keep reading, and you’ll unlock the secrets to mastering this skill, making your development process smoother and more efficient.

Credit: docs.appeon.com
Prerequisites For Hosting
The computer needs to have a Windows operating system. It should be Windows 7 or higher. The system must have at least 4GB of RAM. Ensure ample disk space for the application files. A stable network connection is helpful. The processor must be dual-core or better. Always check for latest updates on your system.
Internet Information Services (IIS) must be installed. IIS version should be 7 or higher. Install .NET Framework for web applications. Visual Studio helps in development. Ensure SQL Server for database needs. Web Deploy is necessary for publishing. Check for IIS extensions for added features.
Credit: learn.microsoft.com
Preparing The Web Api
First, create a new project in your coding tool. Choose Web API as the template. Use simple names for files and classes. This helps in understanding the code better. Keep the code clean and simple. Avoid complex logic in one file. Organize code into small parts. This makes it easy to manage and debug later.
Open the project settings in your tool. Set the project to use IIS Express. This allows for easy testing. Check the URL and make sure it is correct. Set the build mode to Debug for easier problem-solving. Ensure all dependencies are installed. This helps the API run smoothly. Test the API locally to confirm it works well.
Setting Up Iis
IIS stands for Internet Information Services. It is a web server for Windows. To start, open the Control Panel. Click on “Programs.” Then, click on “Turn Windows features on or off.” Look for Internet Information Services. Check the box next to it. Click “OK” to install. Your computer might ask to restart. Let it restart to finish installation.
IIS has many features. Some help to run web applications. Open the IIS Manager from the Start menu. Find Application Pools on the left panel. Right-click on it and select “Add Application Pool.” Name your pool and choose settings. Click “OK” to save. Next, click on Sites. Right-click to add a new site. Fill in the site details. Choose the path to your Web API folder. Set the port number and click “OK.” Your site is now ready to run.
Creating A Website In Iis
First, open the IIS Manager. Look for the “Sites” section. Right-click on it. Choose “Add Website.” A new window will appear. Enter the site name. This is your choice. Select the physical path. This is where your files are. Enter the port number. Usually, it’s 80. Click “OK.” Your site is now added.
In the IIS Manager, select your new site. On the right, click “Bindings.” A window will pop up. Here, you can add or edit bindings. For HTTP, use port 80. For HTTPS, use port 443. Choose the IP address or use “All Unassigned.” Click “OK” to save. Your site bindings are now set.
Deploying The Web Api
Publishing the API helps it work on your computer. First, open Visual Studio. Choose Build from the top menu. Then select Publish. Follow the steps shown. This will create a folder with the API files. Use these files later.
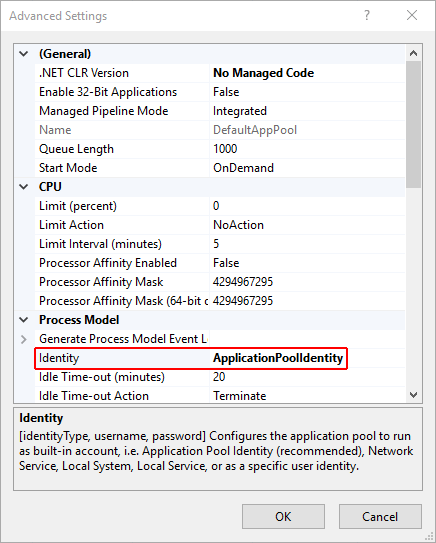
An Application Pool is important for the API. It keeps the API running smoothly. Go to IIS Manager. Select Application Pools from the left side. Click Add Application Pool. Give it a name. Choose CLR version. This is usually v4.0. Click OK to finish. The pool is now ready.
Testing The Web Api
Hosting a Web API in local IIS allows for efficient testing and development. Start by installing IIS via Windows Features. Then, configure the Web API by creating a new site in IIS Manager, pointing it to your API folder.
Accessing Locally
Access the Web API from your computer. Open a browser and type the local URL. The URL looks like http://localhost/YourWebAPI. Check if the page loads. If it does, the API works. Use tools like Postman to send requests. This helps test different API functions. Use simple GET requests first. See if data returns correctly.
Troubleshooting Common Issues
Sometimes the Web API might not work. Check the IIS settings. Ensure the application pool is running. Look at the firewall settings. Make sure the port is open. Errors can occur in the code. Review the code for mistakes. Logs can help find problems. Check the server logs for errors. Fix the errors and test again.
Security Considerations
Setting up a Web API in local IIS requires careful attention to security details. Ensure strong authentication and authorization protocols are in place to protect sensitive data. Regularly update software and monitor logs to detect and respond to potential threats promptly.
Ssl Configuration
Setting up SSL ensures data is safe. It prevents others from seeing it. Always use a valid SSL certificate. This encrypts the data. Install the certificate on your server. Make sure it matches your domain. Test the SSL setup after installation.
This ensures everything works. Errors can cause security risks. Check for SSL errors regularly. Fix them quickly to protect your data.
Access Control
Access control is important for security. Limit who can access your Web API. Set permissions for different users. Only allow trusted users to access sensitive data.
Use strong passwords for accounts. Change them often to ensure safety. Monitor login attempts for suspicious activity. Block users who try too many times.

Credit: learn.microsoft.com
Optimizing Performance
Caching helps speed up your Web API. It saves data for quick access. This reduces the time taken to fetch data. Use memory cache for frequent requests. This keeps data in memory. It is very fast. For less frequent data, use disk cache. It saves data on a hard drive. This is slower but saves space. Choose the right cache type for your needs.
Load balancing spreads work evenly. It uses many servers for this task. Each server handles part of the load. This prevents any server from being too busy. It makes your Web API faster. It also makes it more reliable. If one server fails, others can still work. Use round-robin method to distribute load evenly. It gives each server a turn. This keeps performance steady.
Frequently Asked Questions
How To Deploy Web Api In Local Iis?
Install IIS via Windows Features. Publish your Web API in Visual Studio. Move published files to IIS’s wwwroot. Open IIS Manager, create a new site, and point to the API folder. Assign a port and set authentication. Start the site to deploy the Web API locally.
How Do I Host A Website On A Local Iis Server?
Install IIS via Windows features. Create a new site in IIS Manager. Set the site’s physical path. Configure bindings for domain name and port. Start the site. Ensure firewall allows access and test the site locally.
How Do I Host My Web Api?
Host your Web API using cloud providers like AWS, Azure, or Google Cloud. Choose a platform, deploy your API, and ensure scalability. Configure security settings and monitor performance for optimal results. Consider using Docker for containerization and ease of deployment across various environments.
How To Host .net Core Web Api As Windows Service?
Host. NET Core Web API as a Windows Service by using Worker Service template. Add necessary configurations in Program. cs. Use `sc. exe` command to create and start the service. Ensure proper installation steps and handle service lifecycle events within your code.
Conclusion
Hosting a Web API in local IIS is straightforward. Follow the steps carefully. Start by configuring IIS on your computer. Ensure the Web API is ready to deploy. Double-check the application settings. Verify the site bindings are correct. Test the API locally.
Make sure it runs without errors. Troubleshoot issues if they occur. Once successful, your Web API is ready for use. Local hosting offers flexibility and control. A practical solution for developers. With patience, anyone can achieve this setup. Keep experimenting and learning.
Your skills will grow with practice.


