
Are you ready to give your website a professional look without spending a fortune? Hosting your own domain on Blogger is a smart and simple way to do just that.
Imagine having a custom web address that reflects your brand or personality, while enjoying Blogger’s easy-to-use platform. This guide will walk you through every step to make your domain live on Blogger, even if you’re not tech-savvy. Keep reading—you’re just moments away from turning your dream website into reality.
Credit: filebase.com
Choosing The Right Domain
Choosing the right domain is a key step in hosting your domain on Blogger. The domain name shapes your website’s identity. It affects how visitors find and remember your blog.
A good domain name builds trust and boosts your site’s visibility. It should be easy to type and recall. The process starts by selecting a domain registrar, picking a memorable name, and checking availability.
Selecting A Domain Registrar
A domain registrar sells and manages domain names. Choose a registrar that is reliable and user-friendly. Look for one with clear pricing and good customer support. Popular registrars include GoDaddy, Namecheap, and Google Domains.
Make sure the registrar supports custom domains for Blogger. Check if they offer easy DNS management. This simplifies connecting your domain to Blogger later.
Picking A Memorable Domain Name
Choose a domain name that is short and simple. Avoid long or complex words. Use keywords related to your blog’s topic to improve search rankings.
Make the name easy to spell and pronounce. This helps visitors remember and share your site. Avoid numbers and hyphens because they confuse users.
Checking Domain Availability
Before buying, check if the domain name is available. Use the registrar’s search tool to see if others own it. If taken, try slight variations or different extensions like .net or .org.
Make sure your domain name does not infringe on trademarks. This avoids legal issues and protects your brand. Confirm the domain is free of negative history by checking domain reputation tools.
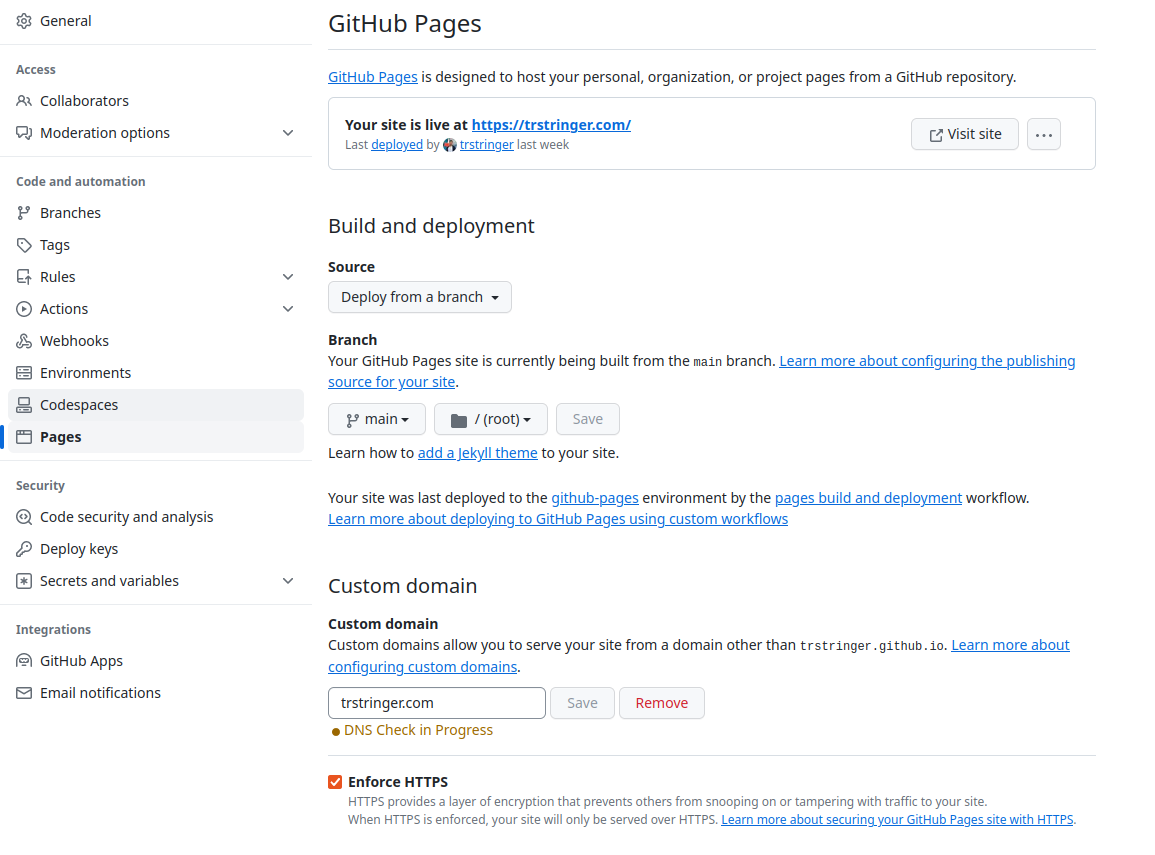
Credit: trstringer.com
Setting Up Your Domain
Setting up your domain is the first step to make your Blogger site look professional. It gives your blog a unique web address that visitors can remember easily. This process involves a few important steps. You need to register your domain, change some settings at your domain provider, and understand key DNS records.
Registering Your Domain
Choose a domain name that fits your blog topic. Use a trusted domain registrar like GoDaddy, Namecheap, or Google Domains. Search if your desired domain name is available. Once you find one, buy it for one year or more. Keep your account details safe for future access.
Configuring Dns Settings
DNS settings connect your domain name to your Blogger site. Log in to your domain registrar’s control panel. Find the DNS or Name Server settings section. Here, you will add records that point your domain to Blogger’s servers. This step is important to make your domain work with Blogger.
Understanding Cname And A Records
CNAME and A records are types of DNS records. A CNAME record points your domain to another domain name, like Google’s server. You need to add a CNAME record for Blogger to verify your domain. A records link your domain to specific IP addresses. Blogger uses several IP addresses, so add all four A records provided by Google. These records ensure your domain directs visitors to your Blogger site correctly.
Linking Domain To Blogger
Linking your custom domain to Blogger helps you create a professional web address. This makes your blog easier to find and remember. The process involves a few simple steps in your Blogger settings and your domain registrar.
Follow these steps carefully to connect your domain and start using it with your Blogger site.
Accessing Blogger Settings
Log in to your Blogger account first. Go to the dashboard of your blog. Find the “Settings” menu on the left side. Scroll down to the “Publishing” section. This area controls your blog’s web address and domain settings.
Adding A Custom Domain
Click on “Custom domain” under the Publishing section. Enter your full domain name, including “www.” For example, www.yourdomain.com. Click “Save” to continue. Blogger will show an error message with two CNAME records. These are needed for domain verification.
Verifying Domain Ownership
Go to your domain registrar’s website and log in. Find the DNS or domain management area. Add the two CNAME records exactly as Blogger shows them. Also, add A-records to point your domain to Google’s servers. Wait for the changes to update. This can take a few hours. Return to Blogger and click “Save” again. Your domain should now link properly.
Troubleshooting Common Issues
Hosting your domain on Blogger can sometimes bring small issues. These problems often stop your site from working right. Knowing how to fix them quickly saves time and stress. The most common issues involve DNS delays, SSL errors, and redirects. Each has simple solutions to get your blog running smoothly again.
Fixing Dns Propagation Delays
DNS propagation takes time after you link your domain. It can take up to 48 hours for all servers to update. During this time, your site might not load correctly. Wait patiently and check your domain using online DNS tools. Clear your browser cache to avoid old data. If the delay lasts too long, contact your domain provider for help.
Resolving Ssl Certificate Errors
SSL errors happen when the site’s security certificate is missing or not set up right. This can make browsers show warnings or block access. On Blogger, enable HTTPS in your settings to fix this. Make sure your custom domain supports SSL. Sometimes, it takes a few hours for the certificate to activate. Clear cache and try again after some time.
Handling Redirect Problems
Redirect issues occur if your domain does not point to Blogger correctly. Check that your domain’s CNAME and A records match Blogger’s instructions. Wrong records cause loops or errors. Use Blogger’s custom domain setup guide to verify your settings. Reset your domain records if needed. Test your site in different browsers to confirm the fix.
Optimizing Your Blogger Site
Optimizing your Blogger site improves user experience and search ranking. It helps your blog look professional and attract more visitors. Small steps can make a big difference.
Customizing Blog Appearance
Choose a simple and clean design. Use colors that match your brand or topic. Add a clear header with your blog’s name. Pick easy-to-read fonts for all devices. Organize your layout with widgets and menus. This makes navigation easy for readers.
Setting Up Seo Basics
Write clear and short titles for each post. Use relevant keywords naturally in your content. Add descriptions that explain your post’s topic. Use labels to group similar posts together. Submit your blog to Google Search Console. These steps help search engines find your blog.
Enabling Https For Security
Turn on HTTPS in Blogger settings to protect your site. HTTPS keeps user data safe and builds trust. It also helps improve your blog’s search ranking. Make sure all your links use HTTPS to avoid warnings. Secure sites attract more visitors and keep them safe.

Credit: isoc.net
Frequently Asked Questions
How Do I Connect My Domain To Blogger?
To connect your domain, update your domain’s DNS settings with Blogger’s CNAME records. Verify ownership in Blogger’s settings, then save changes. It typically takes a few hours for DNS propagation.
Can I Use A Custom Domain With Blogger For Free?
Yes, you can use a custom domain on Blogger without extra cost. However, domain registration fees apply. Blogger offers free hosting, but you must buy your domain separately.
What Dns Records Are Needed For Blogger Domain Setup?
You need to add two CNAME records from Blogger and four A records pointing to Google’s IPs. This setup ensures proper domain redirection to your Blogger blog.
How Long Does Domain Setup On Blogger Take To Work?
Domain setup can take from a few minutes to 48 hours. DNS changes need time to propagate globally. Usually, it completes within a few hours.
Conclusion
Hosting your domain on Blogger is simple and effective. Follow the steps carefully to avoid errors. Your blog will look professional with a custom domain name. This helps people find your site more easily. Keep your settings updated for the best results.
Enjoy sharing your ideas with the world through your own domain. Start now and watch your blog grow steadily.


