
You’re about to dive into the world of hosting your MVC Web API in IIS, and this is where you begin to simplify the process. Imagine taking control of your web application’s performance and accessibility, all while boosting your skills in server management.
Whether you’re a seasoned developer or new to web hosting, understanding how to efficiently deploy your Web API in IIS can make all the difference in your project’s success. This guide is designed to empower you with straightforward steps and practical tips, ensuring you can confidently set up and manage your application.
Keep reading, and you’ll unlock the secrets to seamless hosting, making your web API accessible and efficient for all users.
Prerequisites For Hosting
A server computer is necessary. It should have Windows Server OS. IIS must be installed on this server. The CPU should be fast. Enough RAM is needed for smooth operation. Ensure there is ample disk space. A reliable network connection is crucial. Firewall settings must allow web traffic.
Visual Studio is required to build your Web API. Install the .NET Framework for compatibility. The MVC framework should be part of your project. SQL Server might be needed if databases are involved. IIS must be configured correctly. Check for updates to ensure software stability.
Preparing The Mvc Web Api
First, create a new Web API project in Visual Studio. Set the framework version. Choose the correct template for Web API. Check the folders and files. Ensure all are in place. Open the WebApiConfig.cs file. Register routes for the API. Use MapHttpRoute method. Set controller and action. This helps in routing requests.
Check for errors in the code. Use the Build option in Visual Studio. This compiles the code. Fix any errors shown. Ensure the build is successful. Once done, the project is ready. It can now be hosted in IIS.
Setting Up Iis
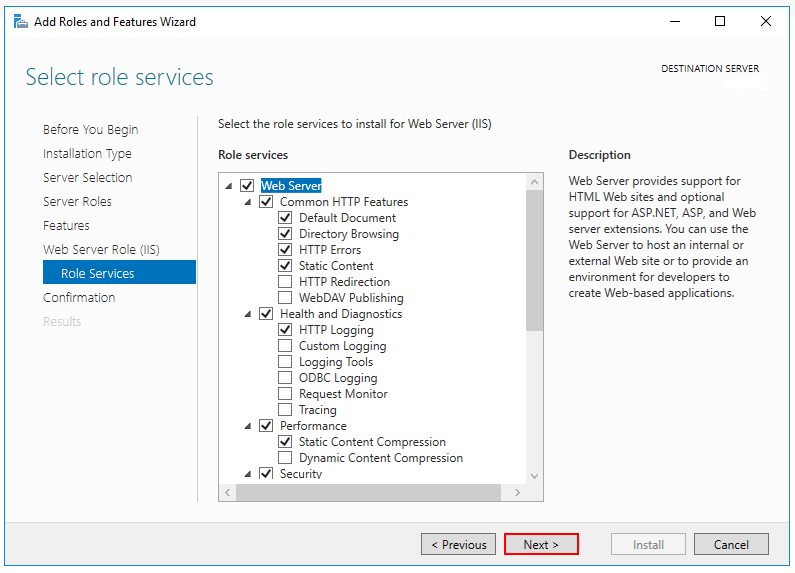
First, open the Control Panel on your computer. Click on Programs. Then click on Turn Windows features on or off. A window will pop up. Look for Internet Information Services. Check the box next to it. This will install IIS on your computer. Make sure your computer is connected to the internet. This helps the installation process. Wait for the installation to finish. Now, IIS is installed on your computer.
After installing, open IIS Manager. You will see a list of features. Application Development is important. Check features like ASP.NET and ISAPI Extensions. These help in hosting web applications. Also, check HTTP Features. They are crucial for web communication. Always ensure all necessary features are enabled. This helps your application run smoothly. Save your changes and exit.
Deploying Web Api To Iis
Begin by opening the IIS Manager. Find the Application Pools option on the left side. Click it. You will see a list of pools. Choose Add Application Pool from the right pane. A window will open. Enter a name for your pool. Choose the .NET CLR version your API needs. Set the pipeline mode to Integrated. Press OK to create the pool. Your new application pool is ready.
Go back to the IIS Manager. Click on Sites in the left panel. Choose Add Website from the right side. A form will appear. Enter your site name. Select the application pool you made. Set the physical path to your Web API folder. Enter the binding details like port. Click OK. Your website is now set up on IIS.
Configuring Application In Iis
First, open the IIS Manager on your computer. Find the Application Pools option. Click on it. Here, you can create a new pool. Click Add Application Pool. Give it a simple name. Choose .NET CLR version. Make sure it’s the correct version. Click OK. Now, your pool is ready. Assign this pool to your application. Select your application in IIS. Click on Basic Settings. Choose the right application pool. Click OK.
Select your application in IIS Manager. Click on Edit Site. Then, choose Basic Settings. You will see the Physical Path. Click the Browse button. Find your application folder. Select the folder. Click OK. Ensure the path is correct. This path points to your files. It helps IIS know where to look. Now your path is set.

Credit: www.youtube.com
Managing Security And Permissions
Always set right permissions for your Web API. Give access only to people who need it. Use the Windows File Explorer to manage these settings. Right-click on the folder. Select Properties. Then go to the Security tab. Click Edit to change permissions. Be careful! Wrong settings can cause problems. Only trusted users should have full access. This keeps your API safe.
Decide how users will log in to your API. Use Windows Authentication for trusted networks. It uses user accounts from Windows. For public access, Basic Authentication can work. But it’s less secure. Always use HTTPS with Basic Authentication. This protects user data. Finally, test to make sure everything works. Ensure users can log in without issues.
Testing The Hosted Api
Accessing API Endpoints is simple. Open your browser. Type the API URL. Make sure the URL is correct. Press Enter. The page will show the API data. Check if the data is correct. Verify each endpoint one by one. Use tools like Postman for more tests. It helps in checking responses. Make sure all endpoints work well.
Troubleshooting Common Issues can be tricky. Sometimes the API does not work. Check the IIS settings first. Ensure the application pool is running. Make sure the correct version of .NET is installed. Look at the logs for errors. They can show what went wrong. Restart IIS if needed. This can solve many problems.
Credit: learn.microsoft.com
Performance Optimization Tips
Hosting MVC Web API in IIS improves performance. Enable Windows Authentication for security and configure application pool settings. Use caching strategies to reduce server load and enhance speed.
Caching Strategies
Caching boosts speed. It saves data for quick access. Use server-side caching. It reduces server load. Client-side caching is helpful too. Browsers store data for fast use. Pick the right cache method. It depends on your needs. Regular checks ensure cache effectiveness. Update cache settings often. It keeps performance high.
Enabling Compression
Compression reduces data size. Smaller files move faster. Enable compression in IIS. It speeds up data transfer. Use gzip for effective compression. It’s widely supported. Check your server settings for compression options. Monitor compression results. Ensure data quality stays intact. Adjust settings if needed. Proper compression saves bandwidth.
Monitoring And Maintenance
Hosting an MVC Web API in IIS requires careful monitoring and maintenance for optimal performance. Regularly check server logs and update software to ensure smooth operation. Configure application pools and manage permissions effectively to avoid downtime.
Setting Up Monitoring Tools
Monitoring tools help check your Web API’s health. Use tools like New Relic or AppDynamics. These tools track API performance. They alert you if something goes wrong. Choose tools that fit your needs. Set up alerts for quick fixes. Alerts should be clear and helpful. Strong monitoring saves time.
Regular Maintenance Practices
Regular maintenance keeps your API running smoothly. Check logs daily for errors. Fix issues quickly to avoid bigger problems. Update software when new versions come out. Don’t wait too long to update. Clean up unused files often. They can slow down your system. Make backups of important data. Backups protect against data loss.
Credit: docs.aspnetzero.com
Frequently Asked Questions
How To Host A Mvc Application In Iis?
To host an MVC application in IIS, install IIS, add the website, select the app pool, and set folder permissions. Ensure. NET is installed and configured correctly.
How To Host The Web Api In Iis?
To host a web API in IIS, install IIS via the Control Panel. Deploy the API files to the server. Configure the application pool for. NET. Add a new site in IIS and set the physical path to the API folder.
Bind the site to a port. Start the application pool.
How Do I Publish .net Core Mvc To Iis?
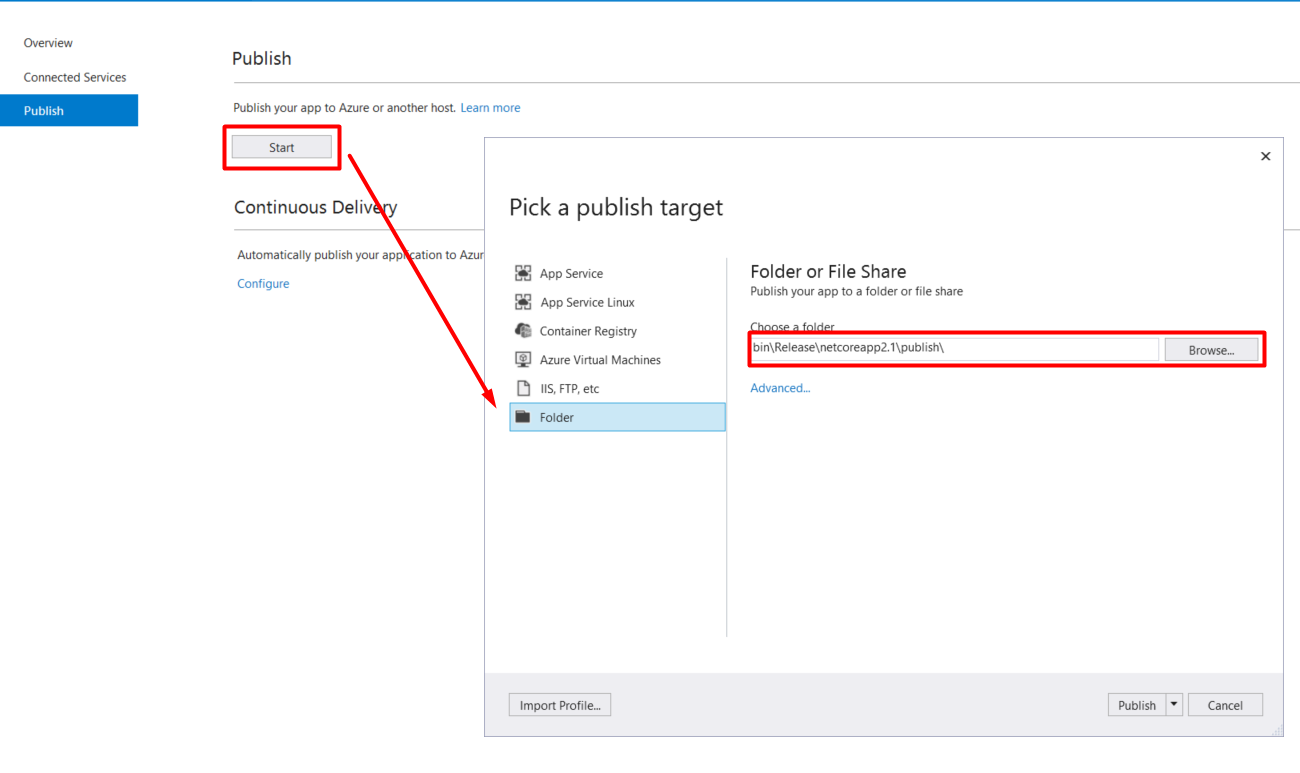
Publish. NET Core MVC to IIS by first building the project in Visual Studio. Then, create a publish profile and publish the files. Next, configure IIS by adding a new site and pointing to the published folder. Ensure the correct.
NET Core hosting bundle is installed on the server.
How To Host .net Core Web Api As Windows Service?
To host a. NET Core Web API as a Windows service, use the Microsoft. Extensions. Hosting. WindowsServices package. Install it via NuGet. Modify the Program. cs file to call `hostBuilder. UseWindowsService()`. Build the solution, then register and start the service using the Windows Service Controller.
Conclusion
Setting up MVC Web API in IIS is straightforward. Follow each step carefully. Ensure your application runs smoothly. Double-check configuration settings. Troubleshoot common errors promptly. Secure your application properly. Regular updates keep it efficient. Monitor performance regularly. A well-hosted API enhances user experience.
It also boosts application reliability. Make sure your server meets necessary requirements. Proper hosting ensures seamless integration. Implement security measures for data protection. Keep learning to improve your hosting skills. A little effort goes a long way. Happy hosting and good luck with your project!


