
Are you ready to get your website live with a custom domain? Hosting your site from GitHub and linking it to your Namecheap domain is easier than you think.
Imagine having full control over your site, making updates anytime, and showing off your brand with a professional web address—all without breaking the bank. In this guide, you’ll discover simple, step-by-step instructions to make this happen quickly. By the end, you’ll know exactly how to connect your GitHub project to your Namecheap domain and start sharing your work with the world.
Let’s dive in and make your website stand out!
Prepare Your Github Repository
Preparing your Github repository is the first step to host your website on a Namecheap domain. This part focuses on creating the repository, adding your website files, and enabling Github Pages. These actions make your site ready to go live.
Create A Github Repository
Start by logging into your Github account. Click on the “New” button to create a repository. Give your repository a clear and simple name. Choose “Public” to allow the site to be visible online. Do not initialize the repository with a README file. Click “Create repository” to finish this step.
Add Your Website Files
Upload your website files to the repository. Click on “Add file” and select “Upload files.” Drag and drop your HTML, CSS, and image files here. After uploading, click “Commit changes” to save your files. This action puts your website content in Github.
Enable Github Pages
Go to the “Settings” tab in your repository. Scroll down to the “Pages” section. Under “Source,” select the main branch and root folder. Click “Save” to activate Github Pages. Your website will get a Github URL ready to link with your Namecheap domain.
Credit: www.namecheap.com
Buy And Access Your Namecheap Domain
Buying and accessing your domain on Namecheap is the first step to hosting your site. This process gives you control over your website’s address. It is simple and fast. Follow these steps to start your online journey.
Purchase A Domain On Namecheap
Go to the Namecheap homepage. Use the search bar to find a domain name you want. Type the name and press enter. Namecheap shows available options instantly. Pick the best one that fits your site. Click the “Add to Cart” button. Review your cart to confirm the choice. Proceed to checkout. Create an account or log in. Enter your payment details. Complete the purchase. You now own the domain.
Access Domain Management Settings
Log in to your Namecheap account dashboard. Find the “Domain List” section. Click on your purchased domain name. You see domain details and settings. Manage DNS, contact info, and renewals here. Use the “Manage” button to change settings. This area controls your domain’s connection to GitHub. Keep this page handy for future updates.
Configure Dns Settings On Namecheap
To connect your GitHub Pages site to your Namecheap domain, you must configure DNS settings. This step links your domain to the GitHub servers. Proper DNS setup ensures visitors reach your website without errors.
Namecheap makes it easy to manage DNS records. You will mainly work with A records and CNAME records. These records point your domain to the right place on the internet. Follow these steps carefully to avoid downtime.
Add Custom A Records
Start by logging into your Namecheap account. Go to the Domain List and find your domain. Click on “Manage” to open the settings.
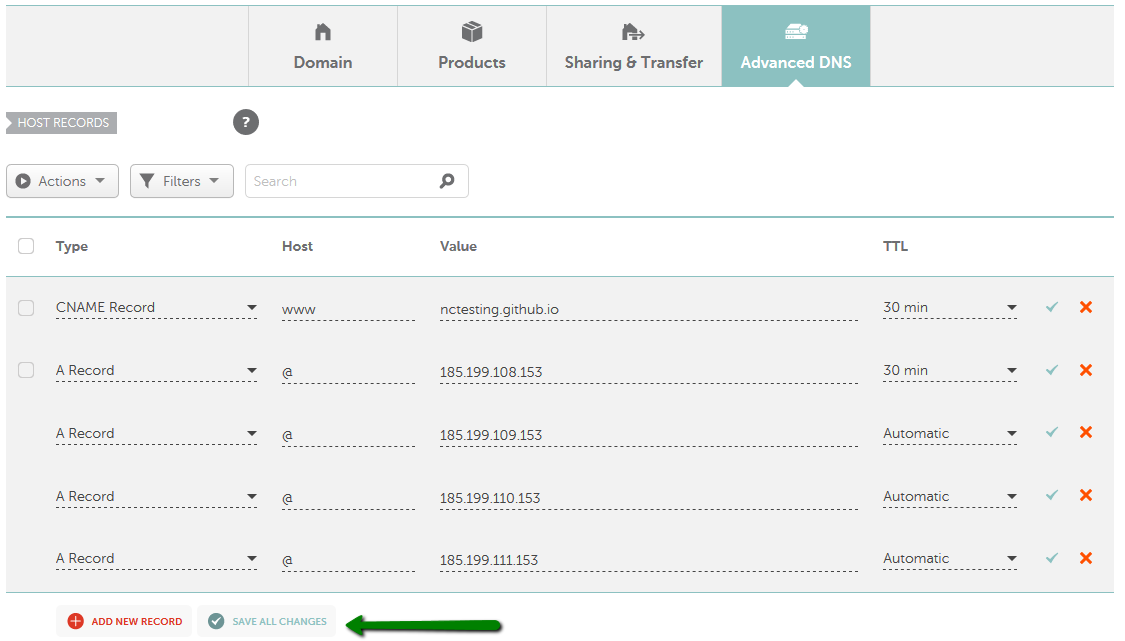
Navigate to the “Advanced DNS” tab. Here, you will add new A records. These records point your domain to GitHub’s IP addresses.
Add four A records with the following IPs:
- 185.199.108.153
- 185.199.109.153
- 185.199.110.153
- 185.199.111.153
Set the host field to “@”. This means the record applies to the root domain. Leave the TTL (Time to Live) as automatic or set it to 30 minutes.
Save each record after adding it. This action tells Namecheap where to send visitors for your main domain.
Add Cname Record For Github Pages
Next, add a CNAME record for your subdomain or “www” version. This record points a subdomain to your GitHub username’s pages.
In the same “Advanced DNS” tab, click on “Add New Record”. Choose “CNAME Record” from the drop-down menu.
Set the host to “www”. For the value, enter your GitHub Pages URL, usually username.github.io.
This step ensures visitors who type “www.yourdomain.com” reach your GitHub site. Save the record to apply changes.
Wait for DNS propagation. It can take up to 48 hours but often completes sooner. Your domain will then show your GitHub Pages content.
Link Github Pages To Your Domain
Linking your GitHub Pages site to a Namecheap domain makes your website look professional. It also helps visitors find your site easily. This process connects your custom domain with the site you host on GitHub Pages. You need to configure both GitHub and Namecheap settings correctly.
This guide explains how to create a CNAME file on GitHub. Then, it shows how to verify the connection with your domain. Follow these steps to make your website live on your Namecheap domain.
Create A Cname File In Github
First, open your GitHub repository for your website. In the root folder, create a file named CNAME. This file tells GitHub which domain to use for your site.
Inside the CNAME file, write your domain name. For example, www.yourdomain.com. Save and commit the file to your repository.
GitHub will now know to serve your site on this domain. The CNAME file helps link your GitHub Pages site to your custom URL.
Verify Domain Connection
Next, log in to your Namecheap account. Go to the Domain List and select your domain.
Find the DNS settings section. Add two CNAME records:
- Host:
www, Value:your-github-username.github.io - Host:
@, Value:your-github-username.github.io
Save the changes. DNS updates may take a few minutes to a few hours.
Finally, check your domain in a browser. Your GitHub Pages site should load under your custom domain. This confirms the connection works correctly.
Set Up Ssl For Secure Connection
Setting up SSL is essential for securing your website. It protects data and builds trust with visitors. Without SSL, browsers may show warnings that your site is unsafe. This guide helps you enable SSL on both GitHub Pages and your Namecheap domain.
Enable Https On Github Pages
GitHub Pages supports HTTPS by default. First, go to your repository’s settings. Scroll down to the “Pages” section. Check the box for “Enforce HTTPS.” This option forces all connections to use HTTPS. Wait a few minutes for the certificate to activate. Your site will then load securely with HTTPS.
Configure Ssl On Namecheap
Namecheap allows you to add SSL to your domain easily. Log in to your Namecheap account. Find your domain in the dashboard and select “Manage.” Go to the “Advanced DNS” tab. Set the CNAME record to point to your GitHub Pages URL. Next, buy or use a free SSL certificate like Let’s Encrypt. Install the certificate through Namecheap’s SSL panel. This step ensures your custom domain is secure with HTTPS.

Credit: www.youtube.com
Test And Troubleshoot Your Website
Testing and troubleshooting your website is a vital step after hosting from GitHub to your Namecheap domain. This step ensures your site works correctly for visitors. It helps catch errors that stop your site from showing up. Checking your website early saves time and improves user experience.
Problems can happen with domain settings or file uploads. Testing helps find these issues fast. Fixing them keeps your website live and smooth. Follow these simple steps to check and fix your site.
Check Domain Propagation
Domain propagation means your domain connects to your website server. This process can take from a few minutes to 48 hours. To check propagation, use online tools like DNS Checker. Enter your domain name and see if the DNS records match your GitHub pages IP.
If propagation is complete, your site should load from your domain. If not, wait a bit longer and check again. Avoid making many changes during this time. It can slow down the process.
Fix Common Issues
Common problems include DNS errors, wrong repository setup, or missing files. Check your GitHub repository for a file named index.html. This file is the homepage. Without it, your site won’t display.
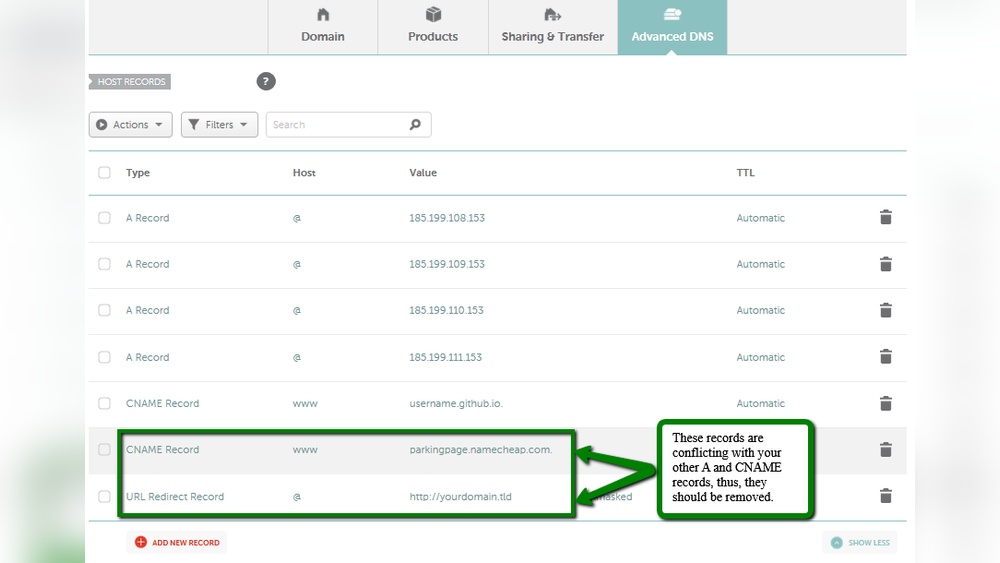
Make sure your DNS records in Namecheap match GitHub’s instructions. The CNAME record must point to your GitHub username followed by .github.io. Remove any conflicting records.
Clear your browser cache to see recent changes. Sometimes, browsers show old versions of your site. Using incognito mode also helps test your site fresh.
If issues persist, review GitHub Pages settings and Namecheap DNS configuration carefully. Correct any mistakes and test again until your site works smoothly.

Credit: www.youtube.com
Frequently Asked Questions
How To Connect Github Pages With A Namecheap Domain?
To connect, update your Namecheap DNS settings. Point your domain’s A records to GitHub IPs. Then, add a CNAME file in your GitHub repo with your domain name. Finally, enable GitHub Pages in your repository settings for the site to go live.
What Dns Records Are Needed For Namecheap And Github?
You need A records pointing to GitHub’s IPs: 185. 199. 108. 153, 185. 199. 109. 153, 185. 199. 110. 153, and 185. 199. 111. 153. Also, add a CNAME record with your custom domain to ensure proper routing and SSL support on GitHub Pages.
Can I Use Https With My Namecheap Custom Domain?
Yes, GitHub Pages supports HTTPS for custom domains. After DNS setup, GitHub automatically provisions an SSL certificate. It may take some time to activate. Ensure your domain uses the correct DNS records and HTTPS will secure your website traffic.
How Long Does Dns Propagation Take For Namecheap Domains?
DNS propagation usually takes a few minutes to 48 hours. This delay depends on your ISP and DNS cache. Be patient after updating DNS records. You can check propagation status with online DNS lookup tools to confirm changes are live.
Conclusion
Hosting your site from GitHub to a Namecheap domain is simple. Follow the steps carefully to connect your domain with GitHub Pages. This way, your website will be live and easy to access. Managing your domain and GitHub settings keeps your site running smoothly.
Keep your content updated and enjoy your new online presence. You now have a clear path to share your work with the world. Start hosting and watch your website grow!


