

Have you ever wondered how to host your Freenom domain locally without relying on expensive web hosting services? If you want full control over your website and save money at the same time, this guide is made just for you.
Imagine being able to access your site directly from your own computer, making updates instantly and testing changes without any delay. You’ll discover simple steps that anyone can follow to set up your Freenom domain right on your local machine.
Ready to take charge of your website like a pro? Keep reading and unlock the secrets to local hosting today.

Credit: register.domains
Setting Up Your Freenom Domain
Setting up your Freenom domain is the first step to hosting it locally. It involves registering a free domain and adjusting its settings. These steps help direct your domain to your local server. A clear setup makes your website accessible from your own computer.
Registering A Free Domain
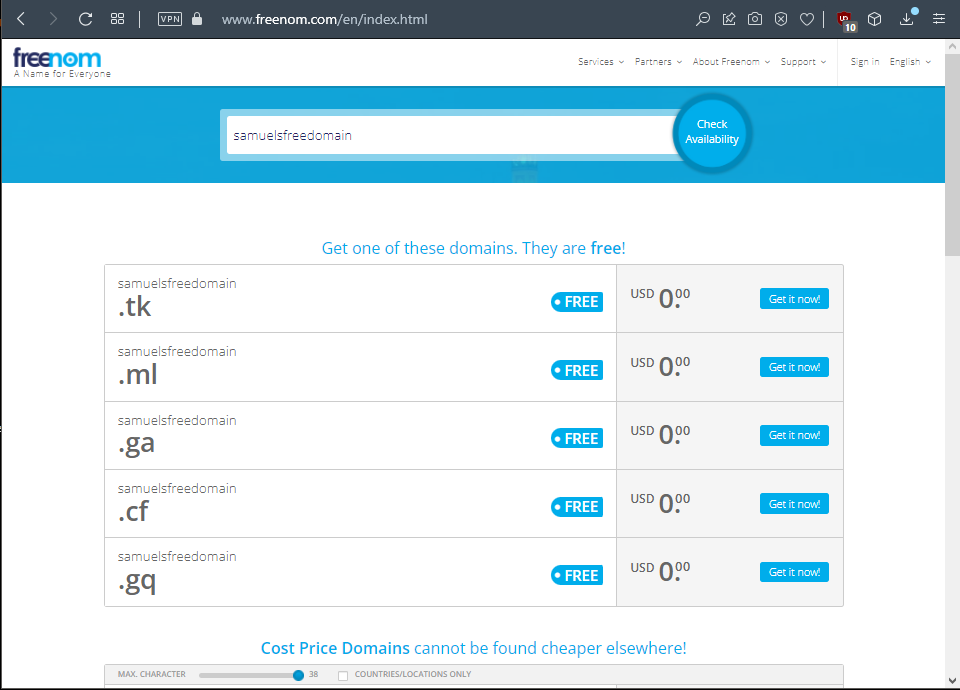
Visit the Freenom website and search for a domain name. Choose a name that fits your website’s purpose. Select one of the free domain extensions available, like .tk or .ml. Add the domain to your cart and proceed to checkout. Create a Freenom account or log in if you have one. Complete the registration process by confirming your contact details. After registration, your domain will be ready to configure.
Configuring Domain Settings
Log in to your Freenom account and go to the “My Domains” section. Find your registered domain and click “Manage Domain.” Select “Manage Freenom DNS” to set up your DNS records. Point your domain to your local IP address using A records. If your IP changes, update these records to keep your site online. Save changes and wait for DNS propagation, which may take a few hours. Once done, your domain will link to your local server.
Credit: discuss.openedx.org
Preparing Your Local Environment
Preparing your local environment is the first step to host your Freenom domain on your computer. It creates a space where your website can run smoothly. Setting up the right tools and files helps your site work like it would online. This makes testing and changes easy without affecting the live site.
Getting everything ready might seem hard, but breaking it down into steps helps. Focus on installing a local server, setting up a database, and configuring host files. Each step builds on the last to create a solid foundation.
Installing A Local Server
A local server lets your computer act like a web server. Popular options include XAMPP, WAMP, and MAMP. These tools are free and easy to install. Download the version that fits your operating system. After installation, start the server services like Apache or Nginx.
Check if your server runs by typing localhost in your browser. You should see a welcome page. This means your local server is ready for hosting your Freenom domain.
Setting Up A Database
Many websites need a database to store information. Use MySQL or MariaDB, which come with most local servers. Open the database management tool like phpMyAdmin. Create a new database for your website.
Note the database name, username, and password. You will need these details in your website’s configuration file. This step ensures your site can save and retrieve data properly.
Configuring Host Files
Host files connect your Freenom domain to your local server. On Windows, find the file at C:\Windows\System32\drivers\etc\hosts. On Mac or Linux, it is at /etc/hosts. Open this file with a text editor as an administrator.
Add a new line with your local IP address and your Freenom domain name. For example: 127.0.0.1 yourdomain.tk. Save the file. This change tells your computer to load your website from the local server.
Linking Domain To Localhost
Linking a Freenom domain to your localhost lets you access your local website using a real domain name. This process helps with testing and development. It creates a bridge between your local server and the internet.
You need to adjust some settings in your domain and local network. This section explains how to connect your Freenom domain to your local machine step-by-step.
Modifying Dns Records
Start by logging into your Freenom account. Go to the “My Domains” section and select your domain. Find the “Manage Freenom DNS” option.
Add an A record pointing to your public IP address. This tells the domain where to find your server. Use your current IP from websites like “whatismyip.com”.
Save the changes. Remember, DNS updates can take time to spread worldwide. Be patient and wait for the changes to take effect.
Using Dynamic Dns Services
Most home internet connections have changing IPs. Dynamic DNS (DDNS) services help keep your domain linked to your changing IP.
Sign up for a free DDNS provider like No-IP or DynDNS. Set up their client on your local machine. It updates your IP address automatically.
Update your Freenom DNS A record with the DDNS hostname. This setup keeps your domain pointing correctly to your home server.
Testing Domain Resolution
Check if your domain points to your localhost IP. Use the command prompt or terminal. Type ping yourdomain.tk and look for your IP address.
Open your browser and enter your domain name. Your local website should load if everything is set up correctly.
Use online tools like “DNS Checker” to verify DNS propagation. This step confirms your domain resolves globally to your IP.
Troubleshooting Common Issues
Troubleshooting common issues is key to successfully hosting your Freenom domain locally. Problems often arise during setup or after changes. Knowing how to fix them saves time and frustration. This section covers simple solutions to frequent errors.
Fixing Dns Propagation Delays
DNS changes take time to update worldwide. This delay can cause your domain to not load correctly. Wait up to 48 hours after changing DNS settings. Clear your browser cache to see updates faster. Use online DNS checkers to track propagation status.
Resolving Server Configuration Errors
Incorrect server settings can stop your site from working. Check your server’s configuration files carefully. Ensure the document root points to the right folder. Verify that your server supports your website’s language and scripts. Restart the server after changes.
Checking Firewall And Port Settings
Firewalls can block access to your local server. Make sure ports 80 and 443 are open for web traffic. Check your computer’s firewall rules and router settings. Allow connections to your server from your network. This ensures visitors can reach your site.
Optimizing Your Local Hosting
Optimizing your local hosting ensures your Freenom domain runs smoothly. It helps protect your site, saves your data, and boosts speed. Small steps can make a big difference. Focus on security, backup, and performance for the best experience.
Enabling Ssl Locally
SSL keeps your site secure by encrypting data. Use tools like OpenSSL to create a local certificate. Install the certificate on your local server. This step protects your website and builds trust. Browsers show a padlock when SSL is enabled. It also helps with SEO rankings.
Setting Up Automatic Backups
Automatic backups save your files regularly. Use scripts or software to schedule backups daily or weekly. Store backups in a separate folder or external drive. This protects you from data loss during crashes or errors. Test backups to ensure they work correctly. Restore speed is key in emergencies.
Improving Performance
Fast websites keep visitors happy. Optimize images to reduce file size without losing quality. Use caching to store frequently accessed data. Minimize server requests by combining files. Monitor server resources like CPU and memory. These steps reduce load time and improve user experience.

Credit: discuss.openedx.org
Frequently Asked Questions
How Do I Link Freenom Domain To Local Server?
To link a Freenom domain locally, update the domain’s DNS settings. Point the A record to your local IP address. Use port forwarding on your router. Ensure your local server is configured to accept external connections.
Can I Host A Website On Freenom Domain Locally?
Yes, you can host a website locally using a Freenom domain. Configure your DNS to point to your local IP. Set up a web server like Apache or Nginx on your machine. Use port forwarding to allow external access.
What Are Common Issues Hosting Freenom Domains Locally?
Common issues include incorrect DNS settings, no port forwarding, and firewall blocks. Ensure your DNS points to your public IP. Open necessary ports on your firewall. Verify your ISP allows hosting on residential connections.
Is It Free To Host A Freenom Domain Locally?
Yes, Freenom domains are free, but local hosting may incur costs. You need a stable internet connection and hardware. Port forwarding and DNS updates are free. However, electricity and hardware maintenance might have costs.
Conclusion
Hosting a Freenom domain locally is simple and cost-effective. You control your website and test changes easily. Setting up a local server helps you learn web management quickly. Remember to keep your domain settings updated for smooth access. This process saves money and boosts your technical skills.
Try it step-by-step, and you will see good results. Local hosting suits beginners and small projects well. Start today and enjoy full control over your website.


