
Are you ready to take full control of your website by hosting your domain on your own server? Imagine the freedom to customize every detail, boost your site’s speed, and save on costly hosting fees.
But where do you start? This guide will walk you through the simple steps to get your domain up and running on your server, even if you’re new to the process. Keep reading, and you’ll soon have the power to manage your website exactly the way you want.
Choosing The Right Server
Choosing the right server is a key step in hosting your domain. The server affects your website’s speed, security, and reliability. It is important to match your needs with the right type of server. Consider the size of your website, traffic volume, and budget. A good server will help your site run smoothly and keep visitors happy.
Dedicated Vs Shared Hosting
Dedicated hosting gives you a whole server for your website. You get full control and better performance. This option suits bigger sites or those with high traffic. Shared hosting means your site shares a server with other websites. It costs less but may slow down if others use too many resources. Choose dedicated for power and shared for budget.
Server Specifications
Server specs matter a lot. Look at the CPU, RAM, and storage types. A fast CPU handles tasks quickly. More RAM helps with multiple users at once. SSD storage is faster than traditional hard drives. Pick specs that match your site’s needs. More complex sites need stronger specs for smooth operation.
Operating System Options
Servers run on different operating systems like Linux or Windows. Linux is popular for its stability and security. It works well with many web technologies and is often free. Windows servers support specific software like ASP.NET. Choose an OS that fits the software your site uses. This choice affects how easy it is to manage your server.
Registering A Domain Name
Registering a domain name is the first step to host a domain on your server. This process gives you a unique address on the internet. It helps people find your website easily. Choosing and registering the right domain name is very important for your online presence.
Selecting A Domain Registrar
A domain registrar is a company that sells domain names. Pick a registrar that is reliable and trusted. Check their prices and services before buying. Look for easy domain management tools. Also, consider customer support quality. Popular registrars include GoDaddy, Namecheap, and Google Domains.
Domain Name Tips
Choose a domain name that is short and simple. Avoid using numbers or hyphens. Use keywords related to your website topic. Make sure the name is easy to spell and remember. Check if the name is not trademarked. Pick a .com extension if possible, as it is the most common.
Completing Registration
Once you select your domain, fill out the registration form. Provide accurate contact information. This helps in domain ownership verification. Choose the registration period, usually one year minimum. Pay the registration fee to complete the process. Save your confirmation email and login details carefully.
Setting Up Dns Records
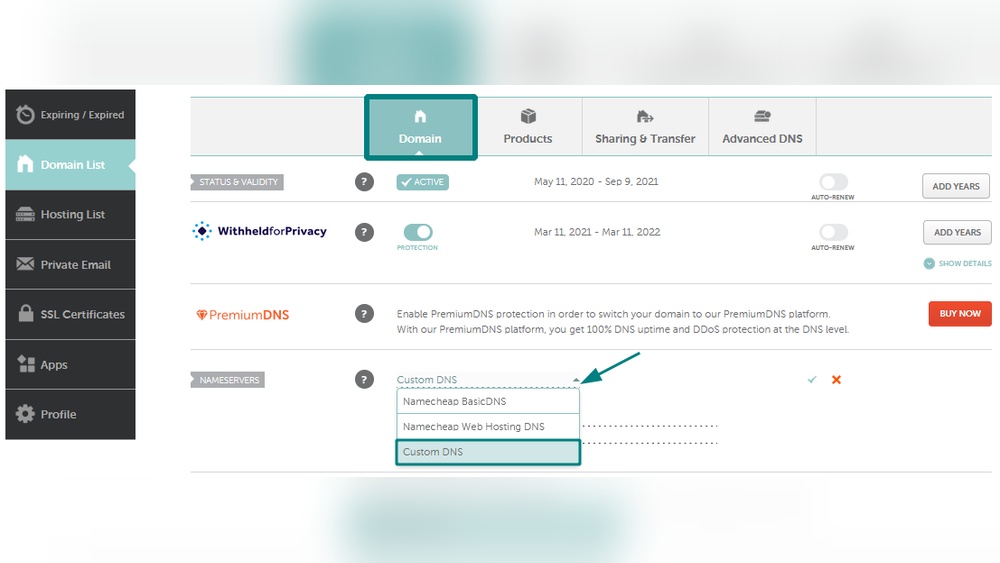
Setting up DNS records is a key step in hosting your domain on your server. DNS records tell the internet where to find your website and services. Proper setup ensures your site loads correctly and your emails work smoothly. Understanding DNS records helps avoid common errors and downtime.
Understanding Dns Basics
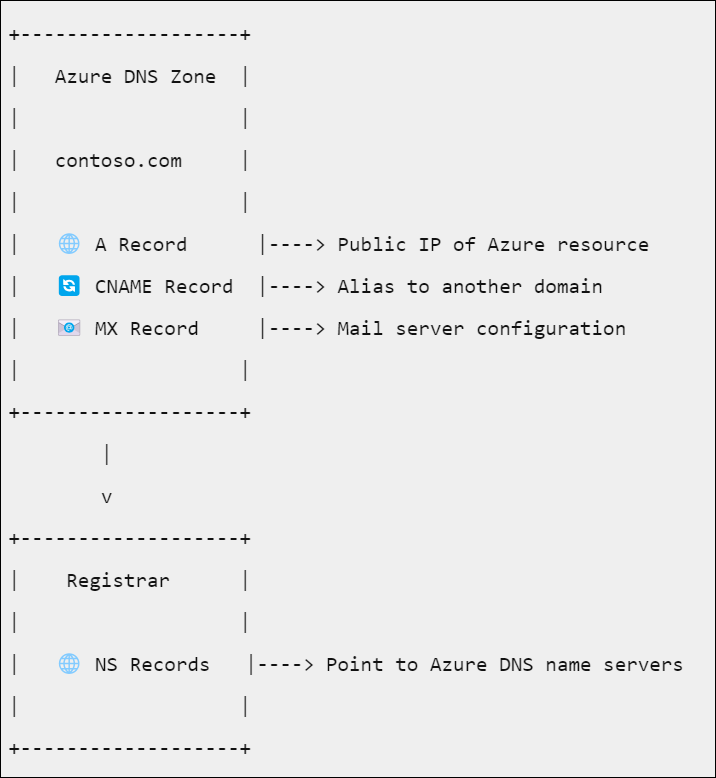
DNS stands for Domain Name System. It acts like a phonebook for the internet. It converts domain names into IP addresses. Your server uses these IP addresses to deliver your website to visitors. Each DNS record has a specific role. Knowing these roles helps you manage your domain better.
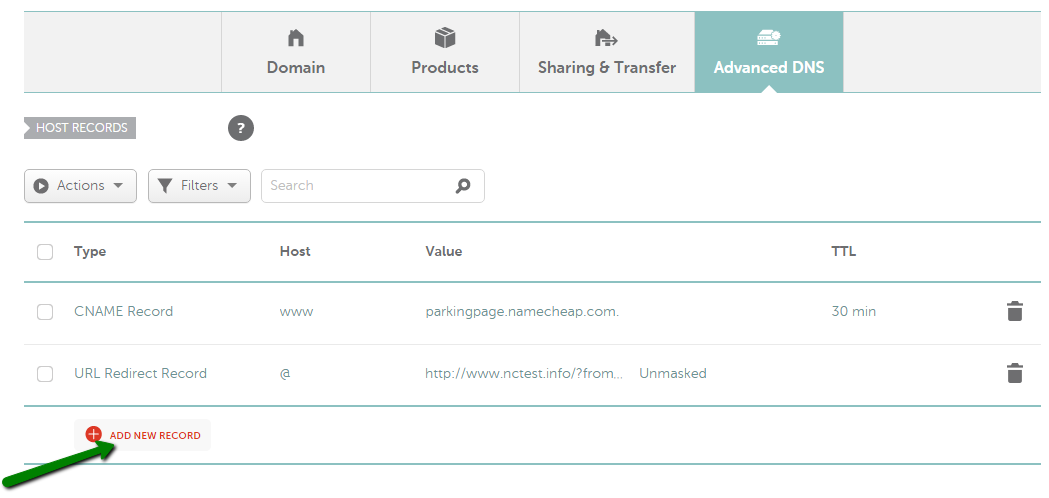
Configuring A And Cname Records
A records link your domain to your server’s IP address. This record tells browsers where your website lives. Use the A record for the main domain and subdomains. CNAME records point one domain name to another. Use CNAME for aliases like www pointing to the main domain. Both records must be accurate for proper website access.
Managing Mx And Txt Records
MX records control email delivery for your domain. They point email traffic to your mail servers. Set these records carefully to avoid email loss. TXT records hold text information for your domain. They help verify domain ownership and improve email security. Common uses include SPF and DKIM settings. Proper MX and TXT records keep your email safe and trusted.
Credit: www.namecheap.com
Installing Web Server Software
Installing web server software is the first step to host your domain on a server. This software handles requests from visitors and shows your website. Picking the right software makes your website faster and more secure.
Many web servers exist, but Apache and Nginx are the most popular. Both work well but have different strengths. Understanding their features helps you choose the best one for your needs.
Choosing Between Apache And Nginx
Apache is easy to use and has many features. It works well with many types of websites. Apache supports .htaccess files for simple configuration changes.
Nginx is faster and uses less memory. It is great for busy websites and handles many users at once. Nginx uses a different way to serve files, making it efficient.
Choose Apache if you want simplicity and compatibility. Choose Nginx for speed and handling many visitors.
Installation Steps
Start by updating your server’s package list. This ensures you get the latest software version.
To install Apache, use this command:sudo apt install apache2
After installation, check if the server is running. Use:sudo systemctl status apache2 or sudo systemctl status nginx
If not running, start it with:sudo systemctl start apache2 or sudo systemctl start nginx
Basic Configuration
Find the main configuration file for your web server. For Apache, it is usually /etc/apache2/apache2.conf. For Nginx, it is /etc/nginx/nginx.conf.
Edit these files to set your server name and document root. The document root is where your website files will live.
For Nginx, add under the server block:server_name yourdomain.com;
Restart the web server to apply changes:sudo systemctl restart apache2 or sudo systemctl restart nginx
Uploading Website Files
Uploading website files to your server is a key step in hosting your domain. This process moves your site’s content from your computer to the server. Once uploaded, visitors can access your website online. Proper uploading ensures your site runs smoothly and loads fast.
Careful management during this step avoids errors and broken links. It also helps keep your files safe and organized. The right tools and settings make uploading easier and more efficient.
Using Ftp Clients
FTP clients help transfer files between your computer and server. Popular options include FileZilla and Cyberduck. You need to enter your server address, username, and password in the client.
After connecting, you see files on your computer and server side-by-side. Drag and drop your website files into the server’s public folder. This folder is usually named “public_html” or “www”.
FTP clients show progress and any errors during upload. They also allow you to pause and resume transfers.
File Organization Tips
Keep your website files well-organized for easy updates. Group similar files into folders, like images, scripts, and stylesheets. Use clear and consistent names for files and folders.
A tidy structure helps you find files quickly. It also prevents broken links caused by misplaced files. Avoid spaces and special characters in file names.
Setting Permissions
File permissions control who can read, write, or execute files on your server. Correct permissions keep your website secure and functional. Usually, files need permission set to 644 and folders to 755.
Use your FTP client or server control panel to change permissions. Avoid giving full access (777) to files or folders. Wrong permissions can expose your site to hackers or cause errors.
Configuring Server Security
Configuring server security is a key step in hosting a domain on your server. It protects your website and data from threats. A secure server builds trust with visitors and keeps your site running smoothly. Follow simple steps to strengthen your server’s defenses. These steps help prevent unauthorized access and data loss.
Setting Up Firewalls
Firewalls act as a barrier between your server and the internet. They block harmful traffic and allow safe connections. Start by enabling the built-in firewall on your server. Configure rules to allow only necessary services like HTTP, HTTPS, and SSH. Regularly check firewall logs to spot suspicious activity. A properly set firewall reduces the risk of attacks.
Installing Ssl Certificates
SSL certificates encrypt data between your server and visitors. This protects sensitive information like passwords and credit card numbers. Obtain an SSL certificate from a trusted provider or use free options like Let’s Encrypt. Install the certificate on your server and enable HTTPS. Secure connections improve SEO rankings and visitor confidence.
Regular Updates And Backups
Keep your server software updated to fix security flaws. Updates patch vulnerabilities that hackers exploit. Schedule automatic updates or check for new versions often. Backups save copies of your website data. Store backups in a safe location separate from your server. Regular backups ensure you can restore your site after data loss or attacks.
Testing Your Website
Testing your website after hosting a domain on your server is crucial. This step ensures your site works properly and is accessible. Checking the website thoroughly helps avoid surprises later. It also improves user experience and site reliability. Follow the steps below to test your site effectively.
Checking Domain Propagation
Domain propagation means your domain name points to your server globally. It can take time, usually up to 48 hours. Use online tools to check if your domain points to your server IP. Enter your domain name and see the results worldwide. If propagation is incomplete, wait and check again later. This step confirms your site is visible to everyone.
Troubleshooting Common Issues
Sometimes your site may not load or show errors. Check your server settings and DNS records carefully. Clear your browser cache to avoid old data. Verify your website files are uploaded correctly to the server. Check for typos in configuration files like .htaccess or index.html. Restart your server if needed. These actions fix common problems quickly.
Performance Optimization
Speed matters for your website visitors and search engines. Test your site loading time using free online tools. Compress images and use caching to improve speed. Minimize the use of heavy scripts and plugins. Choose a reliable hosting plan with good server response time. Fast websites keep visitors happy and improve rankings.

Credit: support.intermedia.com
Credit: learn.microsoft.com
Frequently Asked Questions
What Is The First Step To Host A Domain On My Server?
First, register your domain with a domain registrar. Then, configure your server to handle web traffic. Finally, update your domain’s DNS settings to point to your server’s IP address.
How Do I Point My Domain To My Server’s Ip?
Access your domain registrar’s DNS settings. Replace the existing A record with your server’s IP address. Save changes and wait for DNS propagation, which may take up to 48 hours.
Can I Host Multiple Domains On One Server?
Yes, you can host multiple domains using virtual hosting. Configure your web server software to serve different sites based on domain names. This optimizes server resources and simplifies management.
What Server Software Is Best For Hosting A Domain?
Popular choices include Apache, Nginx, and Microsoft IIS. Each offers unique features and performance benefits. Choose based on your technical skills and server environment.
Conclusion
Hosting a domain on your server can save money and give control. Follow the steps carefully to avoid common mistakes. Keep your server secure and updated to protect your site. Test your setup to make sure everything works well. With patience, your website will run smoothly online.
Try it today and see the results yourself.


