
When you’re ready to showcase your ASP.NET Web API to the world, hosting it on an IIS server is a powerful solution. You might think it sounds complicated, but it doesn’t have to be.
Imagine effortlessly managing traffic and enjoying seamless integration with your existing systems. This guide will show you how to unlock these benefits step-by-step. By the end, you’ll gain the confidence to deploy your API efficiently, ensuring smooth performance and a professional touch.
Ready to transform your project from local to global? Let’s dive in and explore how easy it can be to host your ASP. NET Web API on an IIS server.
Prerequisites
First, ensure Windows is updated. Install IIS on your machine. Check your ASP.NET version. Download and install Visual Studio. This helps create the web API. Confirm that .NET Framework is installed. This is crucial for running applications.
Open the IIS Manager. Click on Sites in the Connections panel. Right-click and select Add Website. Enter a name for your website. Choose your web API folder path. Set the application pool to use your ASP.NET version. Check if the binding settings are correct. Ensure your site is running successfully.
Use Visual Studio to build your web API project. Check for errors and debug them. Deploy the project to the selected folder. Test the API using a browser or tool. Ensure all endpoints work correctly.
Setting Up Iis
IIS is a web server for hosting applications. First, open the Control Panel. Go to Programs. Then click on Turn Windows features on or off. Find Internet Information Services in the list. Check the box next to it. Click OK to install IIS. Wait until the installation finishes. Now IIS is ready to use.
IIS has many features. Open the IIS Manager from the start menu. Look for Application Pools. This helps manage your web applications. Click on Add Application Pool. Name it as you like. Choose the .NET CLR version. Click OK to create it. Next, go to Sites and select Default Web Site. Right-click and choose Add Application. Set your alias and physical path. Choose the application pool you made. Click OK and your app is set.
Preparing The Asp.net Web Api
Start by creating a new ASP.NET Web API project. Use Visual Studio for this task. Choose the right template. Ensure it’s the Web API one. Double-check your project’s settings. Make sure they’re correct. Click “Create” to start building. Write your API code carefully. Check for errors often. Use simple code. Keep it clean and tidy. Save your project regularly. This helps prevent data loss. Remember to test your API. Make sure it works well before moving to the next step.
Open the “Build” menu in Visual Studio. Click on “Publish” to start. Choose a folder profile. This will store your files. Select the correct folder path. Check the options before you publish. Click “Publish” to proceed. Wait for the process to complete. You will get a success message. Your API is now ready to be hosted. Keep the published files safe. They are important for the next steps.

Credit: learn.microsoft.com
Deploying To Iis
First, open the IIS Manager. You will see a list of servers. Right-click on the Sites folder. Choose Add Website. A new window will pop up. Fill in the Site name and physical path. The physical path is where your files live. Now, click OK.
Look at the Binding section in the window. You see a port number there. The default is 80. You can change it. Pick a number not used by another site. Type your chosen number in the box. Click OK to save.
Find the Application Pools option in the IIS Manager. Right-click to add a new pool. Give it a simple name. Choose the correct .NET version. Use the Integrated pipeline mode. Click OK to finish. Assign this pool to your new site.
Configuring Application Pool
Choosing the right .NET version is important for your app. The version must match your project. Check your project’s settings. Set the same version in IIS. This ensures your app runs smoothly.
Setting Identity is the next step. The identity tells IIS who runs the app. Use a custom identity for more control. This helps in managing permissions. Set it in the application pool settings. Choose a user with the right permissions. This avoids errors when running your app.
Configuring Web.config
Setting up the connection strings is very important. They help connect your app to the database. Make sure to place them in the Web.config file. Use clear names for each connection. It helps in understanding later. Protect sensitive data using encryption. This ensures data safety. Always test your connection strings. Check if they work properly.
Good error handling makes apps more reliable. Use error pages for users. It keeps them informed. Log errors in a file. It helps in fixing issues. Keep error messages simple. Users should understand them easily. Use try-catch blocks in code. They help handle exceptions. Regularly review your error logs. It helps in improving the app.
Handling Security
SSL keeps data safe. It stops others from seeing it. It is important for web security. Follow these steps to enable SSL on IIS. First, install a security certificate. Then, configure your IIS server to use it. Go to the server settings. Select the website. Choose SSL settings. Click to enable SSL. This makes sure your site is secure.
Authentication checks who can enter your site. It keeps unwanted visitors out. For IIS, set up Windows Authentication. This uses user details from Windows. Go to the server. Find authentication settings. Select Windows Authentication. Turn it on. This keeps your site safe from strangers. Use it wisely.
Testing The Deployment
Deploying Asp Net Web API on an IIS server requires testing to ensure seamless functionality. Verify configurations and monitor performance to troubleshoot issues efficiently. Regular checks help maintain server reliability and optimize user experiences.
Accessing The Api
Check if the API works. Open a browser. Type the API URL. Press Enter to access. You should see the response. This means the API is working. Try different endpoints. Make sure each gives the correct response. Ensure all routes are accessible. Verify response format matches expectations. Use tools like Postman for detailed testing. Testing ensures no errors remain.
Troubleshooting Common Issues
Sometimes the API won’t work. Check the firewall settings. Ensure ports are open. Verify IIS configuration is correct. Confirm the application pool is running. Check logs for errors. Logs help find problems. Recheck the web.config file. Ensure it has correct settings. Restart the server if needed. Updating IIS may fix issues. Use forums and guides for help. Troubleshoot until the API runs smoothly.
Optimizing Performance
Hosting an ASP. NET Web API on an IIS server boosts performance and efficiency. Configure IIS settings for optimal API response times. This setup ensures smooth client-server communication and reliable application delivery.
Enabling Compression
Compressing data reduces the size of files sent. Smaller files travel faster over the network. This boosts your API’s speed and efficiency. Enable HTTP compression in IIS. Use gzip or deflate methods. Check the compression settings. Ensure static and dynamic content are compressed. This lowers bandwidth usage and improves load times.
Caching Strategies
Caching stores data temporarily. It helps avoid repeated requests. Use output caching for your API. It saves server resources. Set cache rules in IIS. Cache frequently accessed data. This speeds up response times. Configure cache duration wisely. Prevent stale data by updating cache regularly. These strategies enhance performance and user experience.

Credit: www.dotnetcurry.com
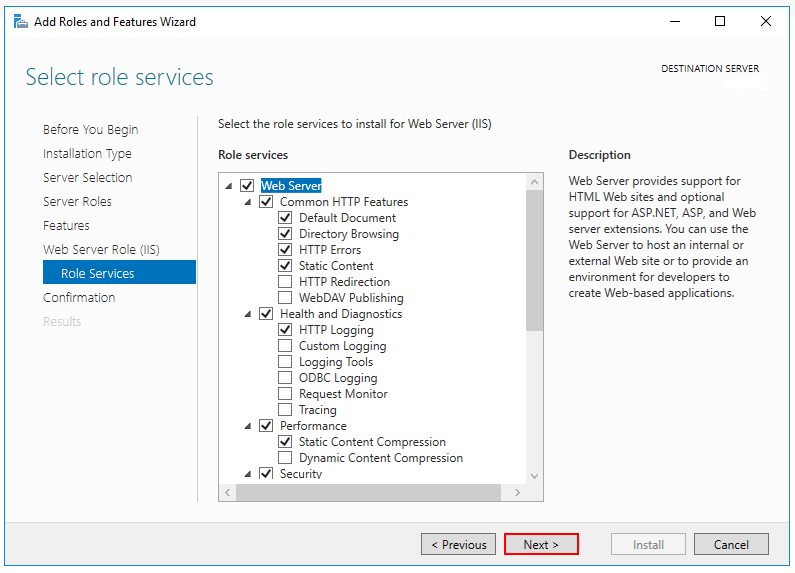
Credit: learn.microsoft.com
Frequently Asked Questions
How To Host A Web Application On An Iis Server?
Open IIS Manager and add a new site. Specify the site name, physical path, and binding details. Deploy your web application files to the specified path. Configure application pool settings to match your application’s requirements. Test the application by accessing the URL via a browser.
Can We Host Asp.net Web Api Without Iis?
Yes, ASP. NET Web API can be hosted without IIS. Use self-hosting options like OWIN or Kestrel for deployment. These tools provide flexibility and are lightweight, suitable for both development and production environments. This approach enhances performance and scalability, especially for microservices architecture.
How To Run Asp File On Iis Server?
Install IIS on your Windows machine. Enable ASP support in IIS settings. Place your ASP files in the designated directory. Open IIS Manager to create a new site or configure an existing one. Browse to the site URL in your browser to run the ASP file.
How To Set Up Iis For Asp.net Web Api?
To set up IIS for ASP. NET Web API, install IIS from Windows features first. Then, add your website and point it to the API’s folder. Configure application pool settings to support. NET framework. Finally, enable necessary IIS features like authentication and logging for optimal performance.
Conclusion
Hosting ASP. NET Web API on IIS is straightforward. Start by configuring your IIS settings properly. Ensure the server is equipped with necessary features. Deploy your API files in the correct directory. Always check permissions and security settings. Use application pools for efficient management.
Regular monitoring of server performance is vital. Troubleshoot common errors promptly. Keep your web services updated for optimal performance. IIS offers robust support for hosting ASP. NET applications. With careful setup, you can ensure reliable and efficient API hosting. Your web services will run smoothly and meet user demands effectively.


