
Are you ready to take control of your web hosting needs? Setting up a web server on Windows Server 2016 might sound daunting, but it’s easier than you think.
Imagine having the power to manage your own website, ensuring it runs smoothly and efficiently. This guide will walk you through each step, breaking down complex processes into simple, actionable tasks. By the end, you’ll be equipped with the knowledge to host your own web server, boosting your confidence and your site’s performance.
Dive in and discover how you can transform your digital presence with Windows Server 2016.
Setting Up Windows Server 2016
Windows Server 2016 needs a strong computer. Ensure you have a 64-bit CPU. At least 1.4 GHz is necessary. You need 512 MB RAM or more. The system disk should have 32 GB of free space. A DVD drive or USB is essential for installation. Keep a reliable internet connection ready.
Start by inserting the installation media. Choose Install Now on the screen. Follow the steps carefully. Select Custom installation for a fresh setup. Choose the drive to install Windows. Wait for the files to copy. The system will restart. Complete setup by entering a password. Your Windows Server 2016 is ready.

Credit: learn.microsoft.com
Configuring Network Settings
To assign an IP address, open the Control Panel. Find the Network and Sharing Center. Click “Change adapter settings” on the left. Right-click on your network connection. Choose “Properties”. Select “Internet Protocol Version 4 (TCP/IPv4)”. Click “Properties” again. Choose “Use the following IP address”. Enter your desired IP address. Set the Subnet mask and Default gateway. Confirm with “OK”.
First, go to “Internet Protocol Version 4 (TCP/IPv4)” settings. Choose “Use the following DNS server addresses”. Enter the Preferred DNS server. You can use Google’s DNS: 8.8.8.8. Enter the Alternate DNS server like 8.8.4.4. These settings help find websites quickly. Click “OK” to save changes. Now, your DNS is set up.
Installing Web Server Role
Open the Server Manager. Click on “Add Roles and Features.” Choose the Role-based or feature-based installation. Select your server from the server pool. Click Next. Find the Web Server (IIS) role. Check the box. Click “Next” and again to confirm features. Finally, click “Install” to add IIS.
Open the Internet Information Services (IIS) Manager. Click on your server name. Double-click on Default Document to set default pages. Use Bindings to manage IP addresses and ports. Set the authentication as needed. Use Directory Browsing to allow users to see files. Click “Apply” to save your settings.
Managing Websites
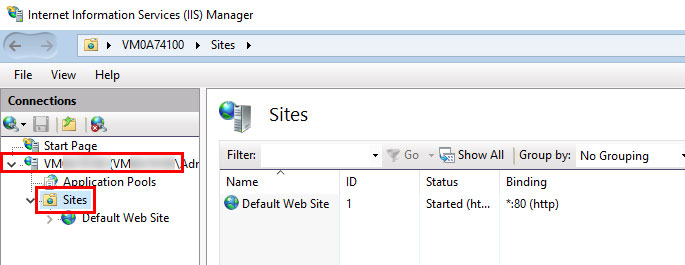
Start by opening the IIS Manager on your server. Click on “Sites” in the left panel. Then, choose “Add Website” from the right. A new window will pop up. Enter the name for your website. Choose a physical path where your files are stored. Pick a port number for the site. Usually, port 80 is common for HTTP. Click “OK” to create the site. Now, your new website is ready. You can see it listed under “Sites”.
Open the IIS Manager again and select your website. Find “Bindings” in the right panel and click it. A window will appear. Click “Add” to set a domain. Choose “http” type and enter your domain name. Make sure the port is 80. Click “OK” to save. Now, your domain is linked to your website. People can visit your site using the domain name.
Securing The Web Server
Hosting a web server on Windows Server 2016 requires attention to security measures. Safeguard your server by updating software regularly and configuring firewalls. Implement SSL certificates and monitor user access to protect sensitive data.
Setting Up Https
HTTPS keeps data safe. It uses encryption to protect information. First, get an SSL certificate. It’s like a digital lock. Next, install it on your server. This makes your website secure. Visitors see a padlock icon in their browser. It shows the site is safe. Use strong certificates. They provide better security. Keep them updated. This avoids risks. HTTPS builds trust with users. They feel safe sharing info.
Firewall Configuration
A firewall acts like a protective barrier. It blocks unwanted traffic. Set up rules to allow or deny access. Only allow trusted IP addresses. This keeps bad users out. Monitor firewall logs regularly. They show any suspicious activity. Update your firewall settings often. This adapts to new threats. Use both hardware and software firewalls. They give double protection. A strong firewall keeps your server safe.
Monitoring And Maintenance
Using Performance Monitoring Tools is important. These tools help keep your server running well. Check the CPU usage often. This tells you how busy the server is. Keep an eye on memory usage too. High memory usage can slow things down. Disk space is also important. Not enough space can cause problems. Use tools like Task Manager and Resource Monitor. These are built into Windows Server 2016. They show you what resources are being used. This helps you fix issues quickly.
Regular backups are very important. They keep your data safe. If something goes wrong, you can restore your data. Use Windows Server Backup for this task. It is easy to set up. Schedule backups at regular times. Daily backups are a good idea. Store backups in a safe place. Maybe on a different server. This way, your data is always protected.
Troubleshooting Common Issues
Setting up a web server on Windows Server 2016 involves addressing common issues. Troubleshoot network connectivity, firewall settings, and software compatibility for a smooth hosting experience. Regular updates and monitoring can prevent potential problems and ensure server reliability.
Connectivity Problems
Check if all network cables are connected. Ensure the server’s IP address is correct. Verify that the firewall is not blocking connections. Restart the server if needed. Use ping to test connectivity. Make sure DNS settings are accurate. Update network drivers if outdated. Ensure the router settings allow traffic. Check for any broken cables.
Error Logs Analysis
Review the error logs for clues. Note the time and date of errors. Look for repeated error messages. Identify the error codes. Search online for error code solutions. Check if any services failed to start. Use the Event Viewer for detailed logs. Contact support if errors persist. Ensure software updates are applied. Keep logs for future analysis.
Credit: www.ionos.com

Credit: www.linkedin.com
Frequently Asked Questions
How To Host A Website On Windows Server 2016?
Install IIS via Server Manager on Windows Server 2016. Create a new website in IIS Manager. Set the site’s directory path and bind it with a domain. Ensure firewall settings allow traffic. Upload website files to the server’s directory. Test the site by entering the domain in a browser.
How To Install Web Server On Windows Server 2016?
To install a web server on Windows Server 2016, open Server Manager and select “Add Roles and Features”. Choose “Web Server (IIS)” and follow prompts to complete installation. Configure settings as needed.
How To Create A Web Server In Windows Server?
To create a web server in Windows Server, install Internet Information Services (IIS) via Server Manager. Configure IIS settings, add a website, and manage permissions. Ensure security settings are optimized for best performance. Regularly update and monitor your server for security and functionality.
Where Is Iis In Windows Server 2016?
Find IIS in Windows Server 2016 by accessing Server Manager. Click on ‘Manage’, then ‘Add Roles and Features’. Select ‘Web Server (IIS)’ from the list. Follow the installation prompts to complete the process. Access IIS from the Start menu or search for “Internet Information Services”.
Conclusion
Setting up a web server on Windows Server 2016 is straightforward. Follow the steps, and you’re on your way. Start with installing IIS, then configure your settings. Don’t forget security! Protect your server with a strong firewall. Test your server to ensure it’s running smoothly.
Regular updates keep everything working well. Hosting your own server gives you control and flexibility. Practice makes perfect, so keep exploring. With these tips, you can host confidently. Enjoy your new web server!


