
Are you ready to take your web application live and share it with the world? Hosting your app on a Tomcat server is a smart choice, offering flexibility and robust support for Java-based applications.
But, where do you begin? You might feel a bit overwhelmed by the technicalities, but fear not. This guide is designed to simplify the process, breaking it down into manageable steps that even a beginner can follow. By the end of this article, you’ll have the confidence to host your application seamlessly.
Dive in to discover how easy it can be to turn your digital dreams into reality.
Prerequisites For Hosting
A computer with at least 2GB RAM is needed. Ensure you have a dual-core processor. The operating system should be Windows, Linux, or MacOS. A stable internet connection is also necessary. Disk space of at least 1GB is required. These are the basic needs.
Download the Java Development Kit (JDK). Install it first. Then, get the Apache Tomcat package. Follow the simple setup instructions. Ensure you configure the environment variables properly. This helps the system find the tools. Check if both JDK and Tomcat are installed correctly. Use the terminal or command prompt for this.

Credit: aws.amazon.com
Setting Up Tomcat
First, visit the official Tomcat website. Locate the download section. Choose the version you need. Download the binary distribution file. This file is usually in ZIP or TAR format. Save it to your computer.
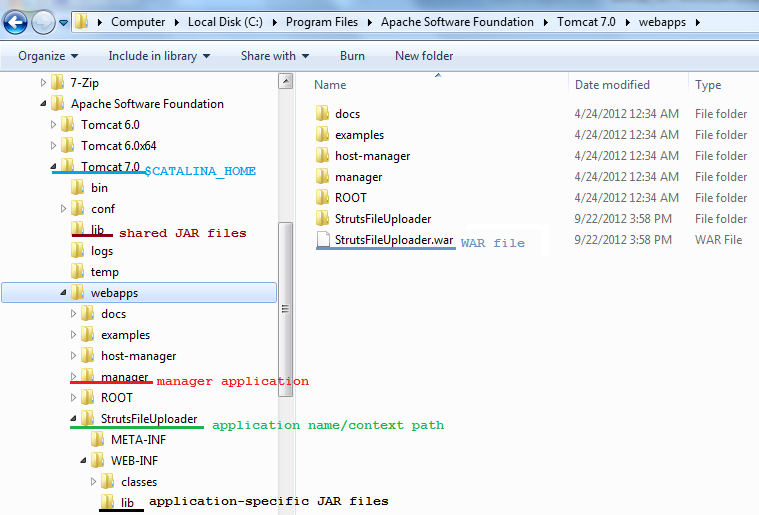
Next, extract the downloaded file. Use any file extraction tool. Now, you have the Tomcat folder. This folder contains all necessary files.
Open your computer’s system settings. Find the section for environment variables. You need to set the JAVA_HOME variable. Point it to your Java installation directory.
Also, add the CATALINA_HOME variable. This should point to the Tomcat folder. Save all your changes. Now, your system knows where Tomcat and Java are located.
Deploying The Web Application
First, package your web application into a WAR file. This is like a special box. It keeps all your app parts together. You need a tool like Maven or Gradle for this. These tools help build the WAR file. Check if the file has all the right parts. Look for code, images, and other files. Your WAR file should be complete. If something is missing, the app won’t work.
Open the Tomcat manager page. You’ll find this in your web browser. Enter your username and password to log in. Click on the “Deploy” section. Here, you will see an option to upload your WAR file. Select your file and click upload. Wait a few seconds. Your application should now be live. Check if it runs properly. If not, see the logs for errors. Fix any issues you find.
Configuring Tomcat Server
Edit the server.xml file in Tomcat. This file is key for settings. Find it in the conf folder. Use a text editor to open it. Change settings as needed. Save changes to apply them. Also, check the web.xml file for more options. These files tell Tomcat how to work. Be careful with changes. Wrong edits might break the server. Always back up files first.
Tomcat uses ports to communicate. The default port is 8080. You can change it in the server.xml file. Look for the Connector tag. Change the port number there. Context paths help in accessing apps. Set them in the context.xml file. This file is found in the conf folder. Make sure paths are correct. Wrong paths can cause errors. Check paths after changes to ensure they work.
Testing The Deployment
Deploying a web app to Tomcat requires testing to ensure everything works correctly. Make sure to check each feature. Verify that the server handles requests properly and that the application displays correctly.
Accessing The Application
Open a web browser. Type the server’s IP address in the address bar. Add a colon and the port number next. Hit enter to load the page. If the app shows up, deployment is successful. Test different pages to be sure. Refresh the page to see changes. If nothing loads, there might be a problem.
Troubleshooting Common Issues
Sometimes the app doesn’t work. Check if Tomcat is running. Use the command line for this. Verify the server logs for errors. Logs tell you what’s wrong. Ensure the firewall allows traffic through. Double-check file paths in the code. Make sure they are correct. Restart the server if needed. This can fix many issues.
Credit: www.geeksforgeeks.org
Security Considerations
Ensure your Tomcat server is secure by regularly updating it. Use firewalls to block unauthorized access. Always configure strong passwords for access control. Encrypt data to protect sensitive information.
Implementing Authentication
Protecting your web app is very important. Authentication helps keep users safe. It checks if users are real. Always use strong passwords. Encourage users to change them often. Multi-factor authentication adds extra safety. It uses more than one way to verify users. This makes it harder for bad people to get in.
Securing Data Transmission
Data transmission must be safe too. Use HTTPS for secure data exchange. It keeps data private. Encrypt the data to make it unreadable to others. This way, only the right people can see it. SSL certificates help with this. They prove your site is secure. Always update them. Regular updates keep your site safe.
Performance Optimization
Adjusting server settings is crucial. It helps in better performance. Allocate enough memory for the application. This prevents slowdowns. Set the correct number of threads. Too few or too many can cause issues. Configure the connection timeout properly. It helps in managing requests effectively. Regularly check the server logs. This helps in spotting errors early. Use the Tomcat Manager for easy monitoring. Always update the server to the latest version. It ensures security and better performance.
Keep an eye on the server’s resource usage. Use tools to monitor CPU and memory. High usage indicates a problem. Check disk space regularly. Low space can cause server issues. Use monitoring tools like JConsole or VisualVM. They provide detailed insights. Set up alerts for unusual activity. This helps in taking quick action. Regular checks ensure the server runs smoothly.
Maintaining The Server
Hosting a web application in Tomcat Server requires configuring the server with your app’s files. Ensure the web application is in the “webapps” directory for automatic deployment. Regularly check server logs to maintain smooth operation and quickly address any issues.
Regular Updates
Keeping the server updated is crucial. Updates fix bugs and improve security. Check for new updates often. Install them promptly. This helps keep your server safe. Security patches are important. They protect against threats. Always read update notes. They tell you what has changed. Update notes can be helpful.
Backup Strategies
Backups protect data. Make backups regularly. Use a reliable backup tool. Store backups safely. Consider cloud storage for backups. Cloud storage is safe and accessible. Test your backups. Ensure they work. A working backup is essential. Plan your backup schedule. Stick to it. A good backup plan prevents data loss.
Credit: www.codejava.net
Frequently Asked Questions
How Do I Host A Web Application On A Server?
To host a web application, choose a reliable server provider. Upload your application files using FTP. Configure the server settings, including the domain name. Secure the application with SSL certificates. Finally, test the application to ensure it runs smoothly.
Can Tomcat Be Used As An Application Server?
Tomcat functions as a servlet container, handling Java servlets and JSPs. While not a full application server, it supports web applications. For full Java EE features, use servers like WildFly or GlassFish. Tomcat suits lightweight applications, emphasizing performance and simplicity.
It is popular for web-focused developments.
How To Create A Simple Web Application In Tomcat?
Install Tomcat and set up the environment. Create a new web project in your IDE. Develop Java servlets or JSP pages. Package the project as a WAR file. Deploy the WAR file to Tomcat’s webapps directory. Start the Tomcat server and access the application via a web browser.
How To Deploy A Web Application In An Apache Http Server?
To deploy a web application on Apache HTTP server, upload files to the server’s “htdocs” directory. Configure “httpd. conf” for site settings. Ensure correct permissions and restart Apache using “sudo service apache2 restart”. Check your application by accessing the server’s IP address or domain name in a browser.
Conclusion
Hosting your web application on a Tomcat server is straightforward. Follow the steps, and your application will be online soon. Remember to check server logs for any issues. Regular updates keep your server secure and efficient. Test your application thoroughly before launching it to users.
This ensures a smooth experience. Troubleshoot any problems quickly to avoid downtime. Keep learning more about server management. This enhances your skills and keeps your web applications running smoothly. Enjoy the process and see your application come to life!


