
Are you ready to take your web application live and reach more users? Hosting it on IIS 7 could be your ticket to a seamless and professional online presence.
Whether you’re a developer or a small business owner, learning how to host a web application in IIS 7 can seem daunting at first. But don’t worry; we’re here to guide you every step of the way. Imagine the satisfaction of seeing your application running smoothly, accessible to anyone, anywhere.
By the end of this article, you’ll have the confidence and knowledge to get your app up and running on IIS 7. Let’s dive in and unlock the potential of your web application!
Credit: www.sslshopper.com
Setting Up The Environment
First, open the Control Panel. Find the Programs section. Click on Turn Windows features on or off. A list will appear. Look for Internet Information Services (IIS). Check the box next to it. This will start the installation process. Wait for it to finish. Once done, IIS 7 is installed.
Open the Windows Features dialog again. Expand the IIS section. Check the boxes for Web Management Tools. Also, enable World Wide Web Services. These are important. They help your web app work smoothly. Make sure to check all needed features. Click OK to apply changes. Your environment is now ready.

Credit: learn.microsoft.com
Preparing The Web Application
First, ensure your web app works with IIS 7. Not all apps do. Check the framework version and dependencies. Some apps need specific settings to run. Review all requirements carefully.
Make a neat package for your web app. Include all files needed. This includes code, images, and configurations. The package should be easy to deploy. Keep things simple and organized.
Configuring Iis 7
First, open IIS Manager. Click on the server name. Find the “Sites” option. Right-click on it. Choose “Add Website.” A new window will appear. Enter the website name. Select the physical path. This is where your files are. Your website files should be here. Click “OK” to save.
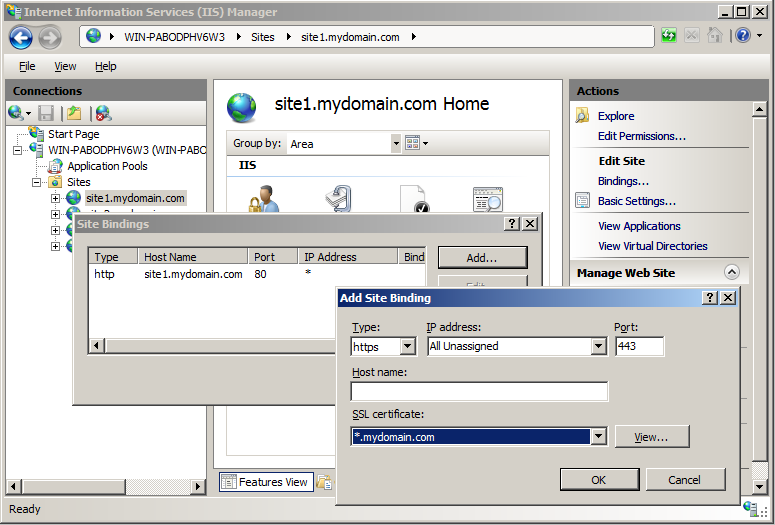
Bindings link your site to a domain. Click on the website name. Find “Bindings” on the right. Click it. A window will pop up. Click “Add.” Choose the type, like HTTP. Enter your domain name. Use port 80 for HTTP. If using HTTPS, use port 443. Click “OK” to apply. Your site is now ready.
Deploying The Web Application
First, gather all the web application files. These include HTML, CSS, and JavaScript files. Use an FTP client to transfer files to the server. Connect to the server using your credentials. Navigate to the directory where you want your files. Upload all files there. Ensure all files are correctly uploaded. Check for any missing files. You can use the server’s file manager to verify.
Open the IIS Manager on your server. Find the “Application Pools” section. Click on “Add Application Pool”. Name your new pool. Choose the .NET version if needed. Select the “Integrated” pipeline mode. Click “OK” to create it. Assign your web application to this pool. Right-click on your site and choose “Manage Application”. Then, set your application pool. This step ensures better performance and security.
Testing And Troubleshooting
Hosting a web application in IIS 7 involves setting up the server environment. Testing and troubleshooting ensure smooth deployment. Regular checks help identify and fix any issues, guaranteeing optimal performance.
Verifying Application Accessibility
Ensuring your web application is accessible is important. First, check if the application opens in a browser. Use different browsers to test access. Make sure the URL is typed correctly. Next, test on different devices. Phones, tablets, and computers should all work. Ensure the network connection is stable. Weak connections can cause problems. Verify that the IIS server is running. Check server settings and permissions. Double-check firewall settings. Firewalls can block access if not set properly.
Resolving Common Errors
Errors can happen during hosting. One common error is a 404 Not Found. This means the page cannot be found. Check the URL for mistakes. Another error is 500 Internal Server Error. This means something went wrong on the server. Check server logs for details. Sometimes, errors are due to permissions. Ensure users have access rights. Incorrect settings can cause authentication errors. Verify login information is correct. Ensure IIS is configured properly. Check all settings for accuracy.

Credit: learn.microsoft.com
Security Considerations
Authentication helps protect your web app from unauthorized users. Use Windows Authentication for internal users. For public access, choose Forms Authentication. These methods ensure only the right people can enter. Always check your authentication settings. Keep them up to date. This helps avoid unwanted access.
SSL encrypts data between the server and the user. It keeps information safe. To use SSL, get an SSL certificate from a trusted provider. Install it on the server. Then, configure IIS to use HTTPS. This adds a layer of security. It builds trust with users. They see the padlock icon and know their data is safe.
Optimizing Performance
Hosting a web application in IIS 7 boosts performance through efficient configuration. Set up your server by installing IIS, creating a new site, and deploying your application files. Adjust settings to optimize speed and security, ensuring smooth user experience.
Enabling Caching
Caching helps your web app load faster. IIS 7 allows caching for quick access. Use caching to store common data. Images, scripts, and styles can be cached. Cached data reduces server load. Users see faster page loads. Enable caching in the IIS settings. It boosts your web app speed.
Configuring Compression
Compression makes files smaller. Smaller files travel faster online. IIS 7 supports file compression. Enable compression for CSS and HTML. Compressed files use less bandwidth. This makes web pages load quicker. Set compression in IIS to improve speed. It ensures a better user experience. Faster sites lead to happier visitors.
Maintaining The Application
Keep an eye on your app’s performance. Check for errors regularly. Look at the logs for unusual activity. Use tools to track server health. Stay alert for any downtime. A healthy app runs smoothly. Regular checks prevent problems. Respond fast to any alerts.
Backups are crucial. Save data often. Use a schedule for backups. Store them in a safe place. Choose a reliable method. Check backup integrity. Keep copies offsite. Restore files easily when needed. Regular backups protect your information.
Frequently Asked Questions
How Do I Host A Web Application In Iis?
To host a web application in IIS, install IIS, create a new site, set application path, and configure bindings. Deploy your application files to the specified directory. Ensure necessary permissions and start the site in IIS Manager.
How To Deploy And Publish A .net 7 App In Iis?
Install. NET 7 Hosting Bundle on the server. Publish your app using Visual Studio or CLI. Copy the published files to the IIS server. Configure a new website in IIS, set the app’s folder path. Ensure correct application pool settings.
Test by accessing the site via a browser.
What Is The Difference Between A Site And An Application In Iis?
A site in IIS is a root container hosting multiple applications. An application is a subcomponent within a site, executing specific tasks. Sites manage overall settings, while applications focus on individual functionalities. Sites serve as platforms for applications, enabling seamless integration and operation within IIS.
How To Run An Application In Iis?
To run an application in IIS, first open IIS Manager. Add your website under “Sites” and set the application path. Configure bindings and assign a port. Ensure necessary permissions and features are enabled. Finally, click “Start” to run your application on IIS.
Conclusion
Hosting a web application in IIS 7 is quite manageable. Follow each step carefully. Understand the basics, like setting up your server. Configure your application pool properly. Check your settings for errors. Security settings are crucial for protection. Test your application thoroughly before going live.
Ensure everything runs smoothly for users. Troubleshooting might be needed at times. Stay updated with any new IIS features. With practice, hosting will become easier. Always keep learning and adapting. Your web app will be ready for visitors. Enjoy the process and see your project thrive.


