
Are you ready to bring your new domain online but unsure how to set it up in cPanel? Hosting a new domain might seem tricky at first, but with the right steps, you can have your website live in no time.
This guide will walk you through the exact process, making it simple and clear. By the end, you’ll feel confident managing your domain like a pro. Keep reading—your website’s success starts here!
Credit: www.cpanel.net
Choosing A Domain Name
Choosing a domain name is the first step in hosting a new website on cPanel. It shapes your online identity. A good domain name helps visitors remember your site. It also affects your search engine ranking. Spend time picking the right name to start strong.
Tips For Selecting A Domain
Pick a domain name that is short and simple. Avoid complex words or long phrases. Use keywords that describe your business or content. Make sure the name is easy to spell and pronounce. Choose a name that fits your brand and style. Stay away from numbers or hyphens. These can confuse visitors and hurt your credibility.
Checking Domain Availability
Use domain search tools to see if your name is free. Many websites offer free domain availability checks. If the name is taken, try different extensions like .net or .org. Consider slight changes in spelling or adding a keyword. Avoid buying domains with a bad reputation. Check if the domain has been used before. This helps prevent future issues with your website.

Credit: www.cpanel.net
Registering Your Domain
Registering your domain is the first step to creating your website. It gives your site a unique address on the internet. Choosing the right domain name is important for your brand and for visitors to find you easily.
After picking a domain name, you must register it through a domain registrar. This process secures your domain and links it to your hosting account. Registration usually lasts for one year but can be renewed anytime.
Popular Domain Registrars
Domain registrars sell and manage domain names. Some popular ones include GoDaddy, Namecheap, and Google Domains. These companies offer easy tools to search and buy domain names. They also provide support and extra services like privacy protection.
Registration Process
First, search your desired domain name on the registrar’s website. Check if the name is available or taken. Next, choose the domain extension like .com, .net, or .org. Then, add the domain to your cart and proceed to checkout.
During checkout, enter your contact details. This information is required for domain ownership records. Finally, complete the payment to register your domain. You will receive a confirmation email with details about your new domain.
Accessing Cpanel
Accessing cPanel is the first step to managing your new domain hosting. This control panel helps you handle files, databases, emails, and more. Knowing how to log in and move through the interface saves time and avoids confusion.
Login Methods
You can log in to cPanel in several simple ways. The most common method uses a web address with your domain, like yourdomain.com/cpanel. Enter your username and password provided by your hosting provider. Another way is through your hosting account dashboard. Some hosts offer a direct login button that takes you straight to cPanel. Always keep your login details safe. Use strong passwords to protect your account from unauthorized access.
Navigating The Dashboard
The cPanel dashboard is user-friendly and organized into sections. Each section contains tools for different tasks, such as managing files, emails, or databases. Icons and labels make it easy to find what you need. Use the search bar at the top to quickly locate features. The interface allows you to customize the layout for faster access to your favorite tools. Spend some time exploring the dashboard to feel comfortable using it.
Adding A New Domain In Cpanel
Adding a new domain in cPanel is a simple way to manage multiple websites. It allows you to host different domains under one hosting account. This saves money and keeps your sites organized.
This process involves setting up the domain and choosing where its files will be stored. cPanel makes it easy to add domains without technical trouble.
Using The Addon Domains Feature
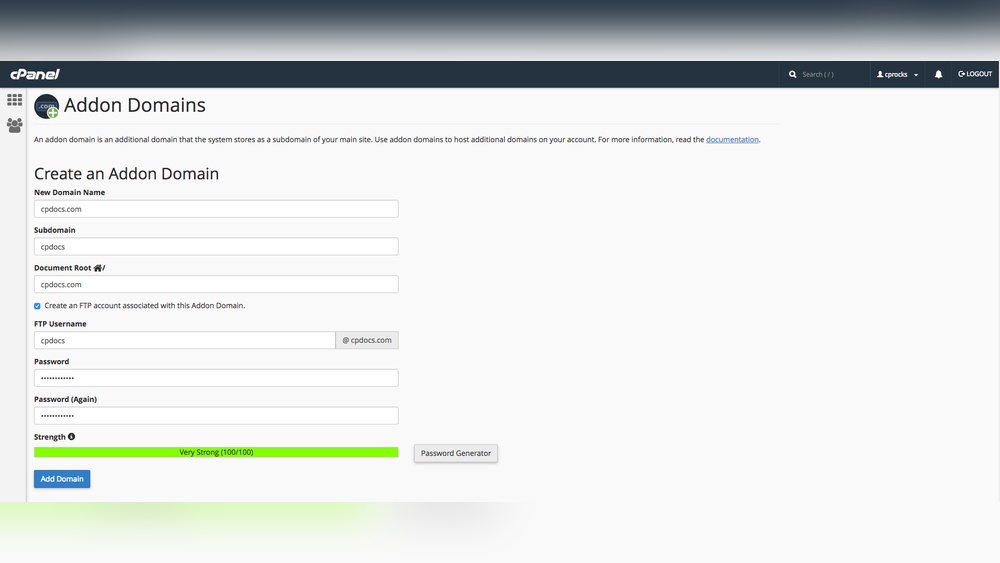
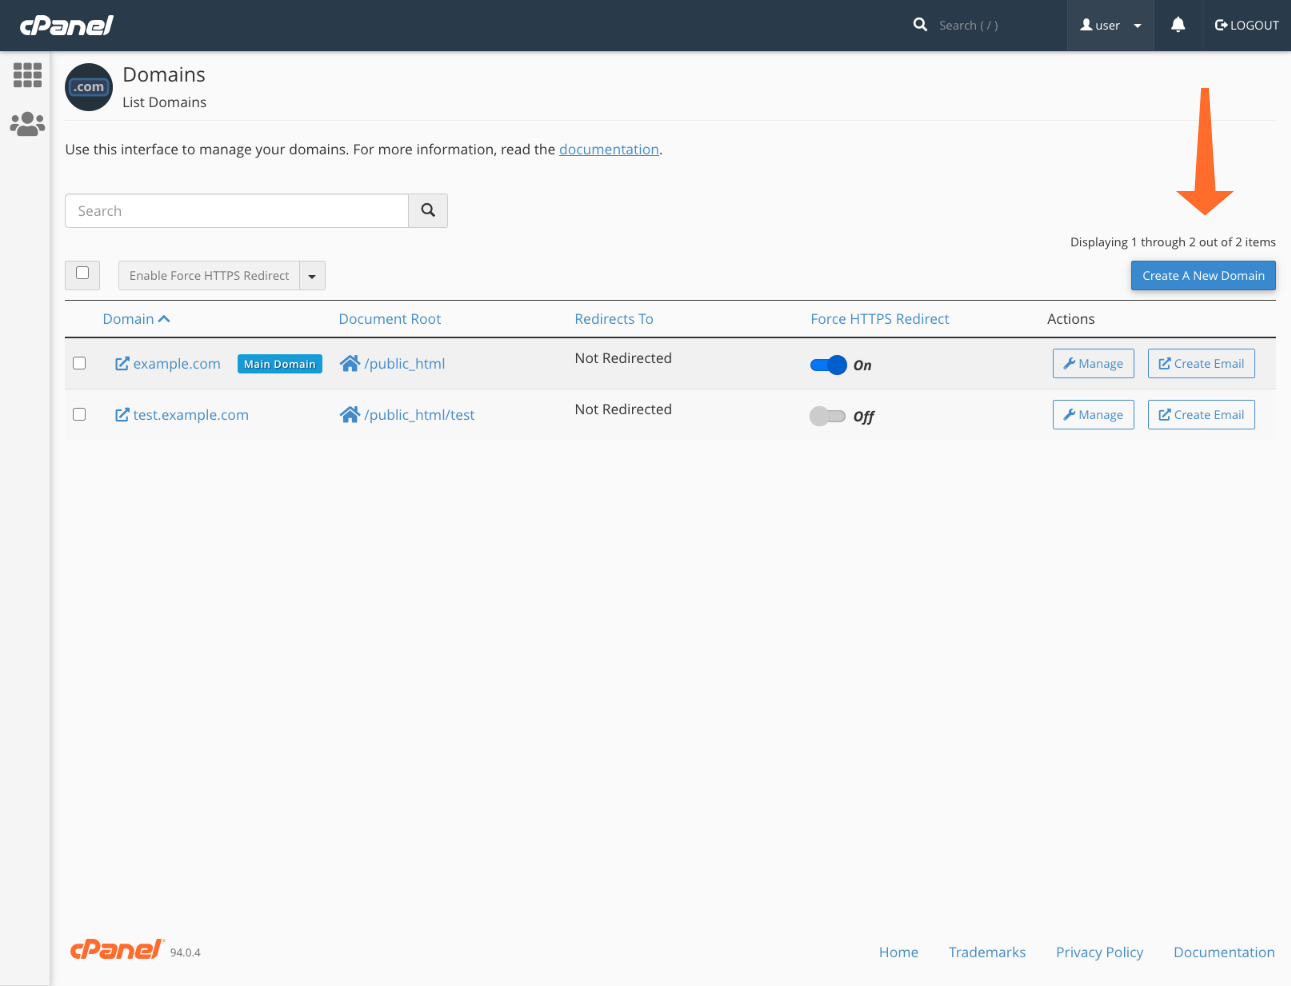
Start by logging into your cPanel dashboard. Find the “Addon Domains” option under the “Domains” section. Click on it to open the setup page.
Enter the new domain name in the “New Domain Name” field. cPanel will fill in the “Subdomain” and “Document Root” automatically. You can change these if needed.
Click “Add Domain” to complete the process. cPanel will create the domain and set up necessary files. Your new domain is now ready to use.
Setting Document Root
The document root is the folder where your domain’s files are stored. It controls what visitors see when they visit your site.
You can change the document root during the addon domain setup. Choose a folder that matches your domain name or create a new one. Keep it organized to avoid confusion.
Make sure the folder exists in your hosting account. Upload your website files to this folder to make the domain live.
Configuring Dns Settings
Configuring DNS settings is a key step when hosting a new domain in cPanel. It tells the internet where your website lives. Without proper DNS setup, visitors cannot find your site. This process involves updating nameservers and managing DNS records. Each part plays a vital role in linking your domain to your hosting server.
Updating Nameservers
Nameservers direct your domain to the correct hosting server. Your domain registrar usually provides default nameservers. To host your site on cPanel, replace these with your hosting provider’s nameservers. Log in to your domain registrar account. Find the option to change nameservers. Enter the nameservers given by your hosting company. Save the changes and wait for them to take effect. This update can take a few hours to complete.
Managing Dns Records
DNS records control how your domain handles different types of traffic. The most common records are A, CNAME, MX, and TXT. The A record points your domain to your website’s IP address. CNAME records link subdomains to the main domain or other URLs. MX records handle email routing for your domain. TXT records store text information for verification or security. You can manage these records inside your cPanel’s DNS zone editor. Make sure each record is correct to avoid website or email issues.
Uploading Website Files
Uploading website files is a key step to make your site live on a new domain using cPanel. This process moves your website content from your computer to your web server. You can do this in two main ways: through the File Manager or using FTP. Both methods are simple and fast.
Using File Manager
File Manager is a built-in tool in cPanel. It lets you upload files directly from your browser. Start by logging into your cPanel account. Find and open the File Manager. Navigate to the public_html folder. This is where your website files should go. Click the Upload button and choose your website files. Wait for the upload to finish. After that, check if your files are in the correct place. File Manager is good for small files or quick updates.
Ftp Upload Steps
FTP stands for File Transfer Protocol. It is a fast way to upload large files. First, download an FTP client like FileZilla. Open the FTP client and enter your server details. These include the host, username, and password from cPanel. Connect to your server. Locate the public_html folder on the server side. Find your website files on your computer. Drag and drop the files into the public_html folder. Wait until the transfer completes. FTP is useful for uploading many files at once.
Setting Up Email Accounts
Setting up email accounts for your new domain is essential for professional communication. It lets you create custom email addresses that match your domain name. This adds credibility and trust to your business or personal brand.
With cPanel, managing email accounts is simple and quick. You can create multiple email addresses and control their settings. This section explains how to create new email addresses and configure email clients.
Creating New Email Addresses
Log into your cPanel dashboard to start. Find the “Email Accounts” section and click it. Click the “Create” button to add a new email address. Enter your desired email name before the @ symbol. Select your domain from the dropdown menu if you have more than one. Set a strong password or use the password generator. Choose a mailbox quota to limit storage space. Finally, click “Create” to save the email account. Your new email address is ready to use.
Configuring Email Clients
Access the “Email Accounts” section again. Find your email and click “Connect Devices.” Here, you see the settings needed for your email client. You will need the incoming and outgoing server names. Also, note the port numbers and security types. Use these details to set up your email on apps like Outlook, Apple Mail, or Thunderbird. Enter your full email address and password in the client. Choose IMAP or POP3 for the incoming server. IMAP syncs emails across devices, while POP3 downloads them. After setup, send a test email to check the connection. Your email client is now ready to send and receive messages.

Credit: www.inmotionhosting.com
Testing Your Website
Testing your website is a crucial step after hosting a new domain on cPanel. It ensures your site works as expected and visitors see the right content. This phase helps catch errors early, saving time and effort later.
Checking your website involves verifying that the domain points correctly to your hosting server. It also means confirming that all pages load fast and display properly. Testing helps maintain a smooth user experience and keeps your site reliable.
Checking Domain Propagation
Domain propagation is the time your domain takes to update across the internet. This process can take from a few minutes to 48 hours. Use online tools to check if your domain points to your hosting server.
Clear your browser cache before testing the site. Use different devices or networks to confirm the site loads correctly. If the domain is still not active, wait a few more hours and check again.
Troubleshooting Common Issues
Sometimes your website may not load as expected after hosting. Check your DNS settings in cPanel to ensure they are correct. Verify that your files uploaded properly to the public_html folder.
Look for errors like “404 Not Found” or “Server Error.” These usually indicate missing files or incorrect permissions. Use cPanel’s file manager or FTP to fix these issues quickly.
If problems persist, review your .htaccess file for incorrect rules. Contact your hosting provider’s support for help if needed. Testing and fixing issues early keeps your website reliable and user-friendly.
Frequently Asked Questions
What Are The First Steps To Host A New Domain In Cpanel?
Start by logging into your cPanel account. Next, find the “Addon Domains” section. Enter your new domain name and set the document root. Finally, click “Add Domain” to complete the process. This makes your domain ready for hosting.
How Do I Link My Domain To Cpanel Hosting?
To link your domain, update your domain’s nameservers to those provided by your hosting provider. This connects your domain to the cPanel server. It may take up to 24-48 hours for DNS changes to propagate fully across the internet.
Can I Host Multiple Domains In One Cpanel Account?
Yes, cPanel allows hosting multiple addon domains. Each domain can have its own website and files. Use the “Addon Domains” feature to manage them easily within one account, saving you money and effort.
How To Upload Website Files To A New Domain In Cpanel?
Use the “File Manager” or an FTP client to upload files. Navigate to the domain’s root directory specified during addon domain setup. Upload your website files here to make your site live and accessible on the new domain.
Conclusion
Hosting a new domain in cPanel is simple and clear. Follow each step carefully to avoid mistakes. Managing your domain becomes easier with practice. Keep your login details safe and update settings as needed. Regular checks help your website run smoothly.
Start today and see your site online quickly.


