
Are you ready to get your website up and running with Namecheap? Whether you’re launching a personal blog or starting a business online, hosting your domain is the first step to establishing your presence on the web.
Namecheap is known for its user-friendly interface and affordable pricing, making it a favorite choice for many. But if you’re new to the process, it might seem overwhelming. Don’t worry; we’ve got you covered. This guide will walk you through each step, ensuring you can effortlessly host your domain on Namecheap.
You’ll discover how easy it is to navigate their platform and make your website accessible to the world. Let’s dive in and make sure you get the most out of your domain hosting experience!
Choosing The Right Domain Name
Choosing the right domain name is crucial for establishing an online presence. To host a domain on Namecheap, start by registering your desired domain name. Then, easily manage and set up hosting through their user-friendly interface.
Choosing the right domain name is a crucial step in establishing your online presence. It’s not just about picking a name; it’s about crafting a brand identity. Your domain name will be your digital address, and it should resonate with your audience and reflect your mission. But how do you make sure it’s the right fit for you? ###Tips For Selecting A Domain
Consider your brand identity and goals. Your domain name should be easy to remember and spell. Aim for simplicity. Avoid complex words or unusual spellings that might confuse visitors. Think about longevity. As trends change, your domain should remain relevant. Choosing a name that reflects your core values and offerings can ensure long-term relevance. Be unique. With millions of websites, standing out is essential. A unique name can help you avoid blending in with the crowd. It also makes it easier for potential customers to find you online. ###Checking Domain Availability
Once you’ve brainstormed a few ideas, it’s time to see if they’re available. Namecheap offers an easy-to-use search tool. Simply enter your desired domain name and see if it’s taken. Consider different domain extensions. If your preferred name is unavailable, explore options like .net, .co, or .io. They can offer flexibility while maintaining your brand’s integrity. Be prepared with alternatives. If your first choice isn’t available, have backup options ready. This way, you can quickly secure a domain that fits your needs without losing momentum. Choosing the perfect domain can be challenging, but it’s worth the effort. Have you ever wondered how your domain name might evolve with your brand? Take a moment to envision the future of your online presence.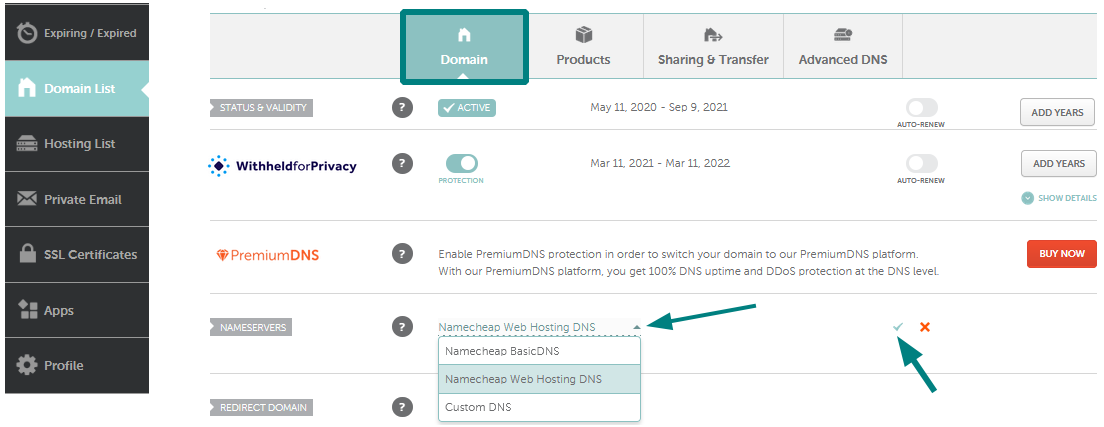
Credit: www.namecheap.com
Setting Up A Namecheap Account
Setting up a Namecheap account is your gateway to a smooth domain hosting experience. Whether you’re a beginner or have a few domains under your belt, Namecheap offers a user-friendly platform that caters to everyone’s needs. Let’s take a closer look at how you can create an account and navigate the dashboard effortlessly.
Creating An Account
Starting your journey with Namecheap is straightforward. Begin by visiting the Namecheap website and clicking on the “Sign Up” button. It’s typically located in the upper right corner of the homepage. You’ll be prompted to enter your details, such as your name, email, and a password.
Choose a strong password that includes a mix of letters, numbers, and symbols for added security. Once you’ve filled in your details, click on “Create Account”. Within seconds, you’ll receive a confirmation email. Follow the link in the email to verify your account. You’re officially part of the Namecheap community!
Understanding Account Dashboard
The Namecheap dashboard is your control center. Once logged in, you’ll find everything you need to manage your domain efficiently. The interface is clean and intuitive, making it easy for users of all experience levels.
Here, you can view your purchased domains, update your contact information, and access support. The left-hand menu provides quick links to various sections like ‘Domain List’, ‘Account Settings’, and ‘Billing’. Familiarize yourself with these sections to streamline your domain management.
Wondering how to keep track of your domain’s expiration date? The dashboard displays this information clearly, ensuring you never miss a renewal. Plus, you can set automatic renewal to avoid any service interruption.
Have you ever struggled to find help when facing an issue? Namecheap’s dashboard includes a dedicated support section. It connects you directly with their customer service team, ensuring you get the assistance you need without delay.
As you explore the dashboard, consider what features you find most useful. Are there tools that can simplify your domain management tasks? Engaging with the platform will help you discover unexpected insights and make the most of your Namecheap experience.
Registering Your Domain
Hosting a domain on Namecheap involves simple steps. First, purchase your domain. Then, navigate to your Namecheap dashboard and select the domain. Finally, follow the instructions to connect it to your web hosting. This process ensures your website is live and accessible.
Registering your domain is the first step to hosting a website. Namecheap offers a simple platform for this purpose. It’s user-friendly and cost-effective. This section will guide you through the domain registration process on Namecheap. Let’s dive into the details.Domain Registration Process
Search for your desired domain name on Namecheap’s homepage. The platform will show available options. Choose the one that fits your needs. Click the “Add to Cart” button. Proceed to checkout. You will need to create an account if you’re a new user. Enter your personal details. Ensure your information is accurate. Complete the payment process. Namecheap accepts various payment methods. Once payment is confirmed, the domain is yours.Selecting Registration Period
Decide how long you want to register your domain. Namecheap offers different registration periods. You can choose from one to ten years. Think about your long-term plans. Longer periods offer stability. They often come with discounts. If unsure, start with a shorter period. You can always renew later. Keep an eye on renewal reminders. This ensures you don’t lose your domain.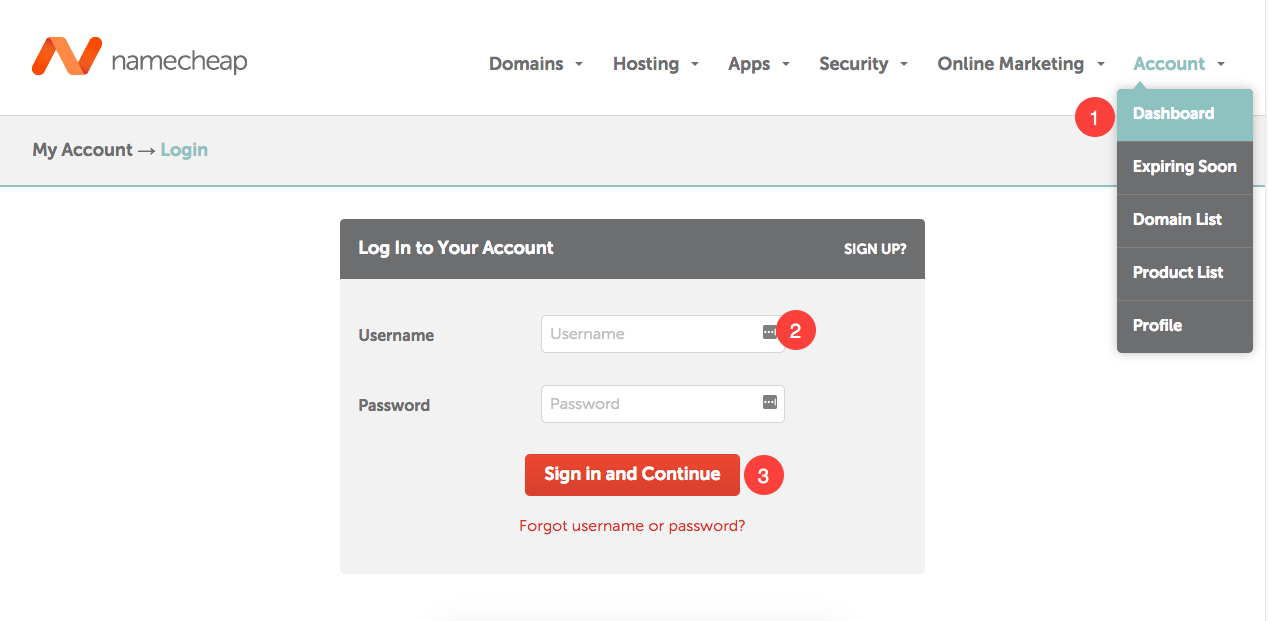
Credit: help.pixpa.com
Configuring Domain Settings
Easily host your domain on Namecheap by configuring domain settings in a few steps. Start by logging into your Namecheap account. Then, navigate to the Domain List and select your domain. Adjust the DNS settings to point to your hosting provider’s servers.
Configuring domain settings on Namecheap is a crucial step in making sure your website is accessible and functions as intended. Whether you’re launching a personal blog or a small business site, understanding how to adjust these settings can make a significant difference in your online presence. Let’s dive into the essentials of DNS Management and Domain Forwarding to ensure your domain is set up correctly.Dns Management
Managing DNS (Domain Name System) settings might sound intimidating, but it’s simpler than it seems. DNS is essentially the phonebook of the internet, translating human-friendly domain names to IP addresses. On Namecheap, you can easily access these settings from your account dashboard. Once you’re in, you’ll see options to add or modify DNS records. These records include A, CNAME, MX, and TXT records. Each serves a specific function, like pointing your domain to a web server or verifying domain ownership. Here’s a quick tip: Always double-check your entries. A small typo can lead to big headaches like downtime or email disruptions. If you’ve ever wondered why your site isn’t loading, a DNS error might be the culprit.Setting Up Domain Forwarding
Domain forwarding is a handy feature when you want to redirect visitors from one domain to another. Let’s say you have multiple domain variations and want them all to point to a primary site. Namecheap makes this process straightforward. In your domain settings, locate the ‘Domain Forwarding’ section. Here, you can set up a simple redirect by entering the destination URL. This is especially useful if you’ve acquired multiple domains and want to consolidate traffic. Consider this: Why let your additional domains sit idle when they can help boost your main site’s visibility? With domain forwarding, you can ensure no potential visitor is lost. Configuring these domain settings not only optimizes your website’s functionality but also enhances the user experience. Have you explored all the settings available in your Namecheap dashboard? It’s time to take control and make your domain work for you.Connecting Domain To Hosting
Connecting your domain to your hosting service is a crucial step in website setup. This process allows your website to go live on the internet. Namecheap offers user-friendly tools to make this process simple. Understanding how to link your domain to hosting ensures your site runs smoothly.
Choosing A Hosting Plan
Before connecting, choose the right hosting plan. Namecheap provides various options like shared, VPS, and dedicated hosting. Consider your website needs when selecting a plan. Shared hosting is affordable and suitable for small sites. VPS hosting offers more control and resources. Dedicated hosting provides maximum power for large sites.
Linking Domain To Hosting Service
Once you have a hosting plan, link your domain. Log into your Namecheap account. Navigate to the domain management section. Select your domain and find the option to connect it to your hosting. Input the nameservers provided by your hosting provider. Save the settings and wait for the changes to propagate.
This process can take a few hours. Once complete, your domain points to your hosting service. Check your website by entering your domain in a web browser. If everything is correct, your site should be visible to the world.
Managing Domain Renewals
Managing domain renewals on Namecheap is crucial for maintaining your online presence. Forgetting to renew your domain can lead to losing it. This section covers how to manage domain renewals effectively. Learn how to keep your domain active without hassle.
Renewal Options
Namecheap offers several renewal options for your domains. You can choose manual renewal or opt for auto-renewal. Manual renewal requires you to renew your domain each time it expires. This option is suitable for those who like control over the process. Auto-renewal ensures your domain renews automatically before it expires. It’s convenient and prevents accidental expiration.
Setting Up Auto-renewal
Setting up auto-renewal on Namecheap is simple. Log in to your Namecheap account. Go to the “Domain List” section. Click on the domain you want to auto-renew. Find the “Renewal Options” tab. Enable auto-renewal by toggling the switch. Your domain will now renew automatically at the end of its term. Check your payment method is up-to-date. Auto-renewal won’t work with outdated payment info.
Troubleshooting Common Issues
Hosting a domain on Namecheap can sometimes present challenges. Common issues include DNS settings errors and domain propagation delays. Ensure correct DNS configuration and allow time for changes to take effect.
When hosting a domain on Namecheap, everything might not always go as planned. Sometimes, you might encounter issues that leave you scratching your head. The good news is that most problems can be resolved with a bit of troubleshooting. Let’s dive into some of the most common issues you might face and how to fix them. ###Domain Not Accessible
One of the most frustrating problems is when your domain isn’t accessible. You’ve set everything up, but when you type your domain into the browser, nothing happens. First, check if your domain is expired or inactive. Log into your Namecheap account, and verify the status of your domain. If it’s expired, renew it immediately. Next, clear your browser cache or try accessing the domain from a different browser or device. Sometimes, cached data can prevent you from seeing updates. If the problem persists, you may need to wait for DNS propagation, which can take up to 48 hours. ###Dns Configuration Errors
DNS configuration errors can prevent your website from showing up online. This issue often arises from incorrect DNS settings. Ensure that your domain’s DNS settings point to the correct server. You can do this by logging into your Namecheap account and checking the DNS settings for your domain. Make sure the nameservers match those provided by your hosting service. If you recently changed your DNS settings, remember that changes can take some time to propagate. Patience is key here. Consider this: Did you double-check the spelling in your DNS entries? A tiny typo can cause major headaches. By paying attention to details, you can save yourself a lot of trouble. What experiences have you had with domain hosting issues? Share in the comments below!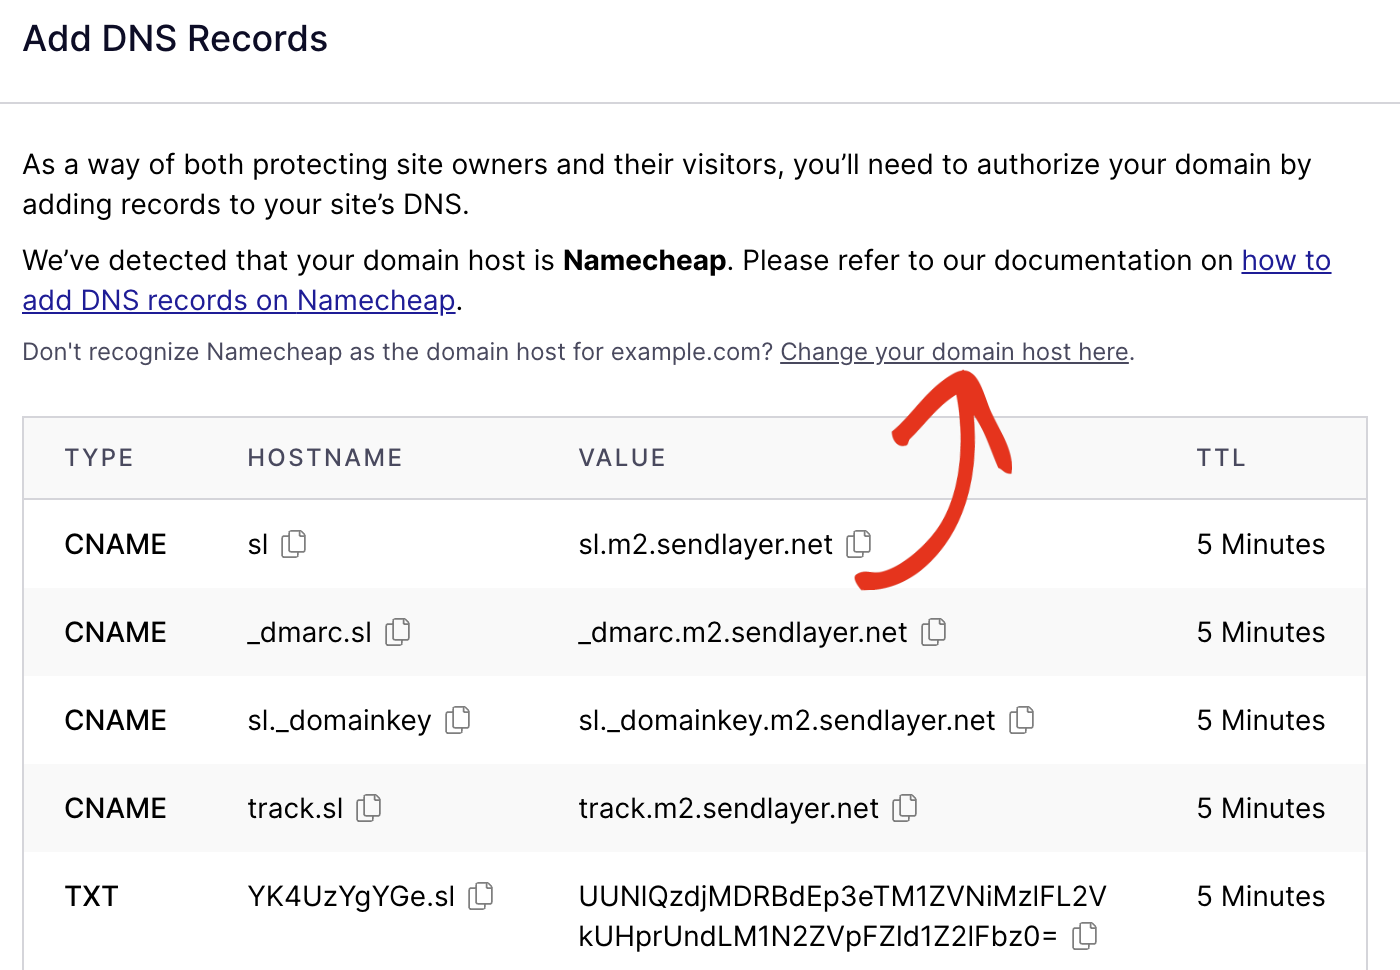
Credit: sendlayer.com
Frequently Asked Questions
How To Host A Domain In Namecheap?
To host a domain on Namecheap, log into your account. Select “Hosting” from the dashboard. Choose a plan, then follow the setup instructions. Update the DNS settings to point to Namecheap’s servers. Your domain will be successfully hosted.
How Long Does Namecheap Hosting Take?
Namecheap hosting setup is typically instant. Once payment is confirmed, access to your hosting account is granted immediately.
How Do I Add A New Domain In Namecheap?
Log into Namecheap, go to the dashboard, and select “Domain List. ” Click “Add New Domain” and follow prompts.
How Do I Manage My Domain On Namecheap?
Log into Namecheap. Navigate to ‘Domain List’ in your dashboard. Select your domain. Use the ‘Manage’ button to edit settings like DNS, WhoisGuard, and renewal options. Save changes to finalize your domain management.
Conclusion
Hosting a domain on Namecheap is simple and efficient. With clear steps, you can secure your online presence. Start by choosing the right domain name. Next, follow Namecheap’s easy registration process. Update DNS settings to point your domain correctly. Use their friendly interface for smooth management.
Namecheap offers great support if you need help. Hosting your domain on Namecheap saves time and effort. Enjoy a reliable platform for your website. Begin your journey with Namecheap today. Let your ideas grow online. Namecheap makes it easy and straightforward.
Your domain adventure starts now.


