
Are you finding it tricky to access your cPanel on Namecheap? You’re not alone.
Navigating the digital world can sometimes feel like a maze, but don’t worry—you’re in the right place. Unlocking the door to your website’s control panel is simpler than you might think, and we’re here to guide you every step of the way.
Imagine the ease and confidence you’ll feel once you master this skill. Whether you’re a newbie or have some experience, this guide is crafted to make your journey smooth and stress-free. Ready to take control of your online presence with confidence? Let’s dive in and explore how you can easily get to your cPanel on Namecheap.

Credit: www.namecheap.com
Accessing Your Namecheap Account
Accessing your Namecheap account is the first step in managing your domain and hosting services. It’s crucial to know how to navigate through your account efficiently. Familiarity with your dashboard will empower you to make necessary changes. Understanding your account interface can save time and effort.
Logging Into Namecheap
Begin by visiting the Namecheap website. Look for the login option at the top right corner. Click on it to open the login page. Enter your username or email and password. Ensure your credentials are correct. Click on the login button to access your account.
Finding Your Product List
Once logged in, locate your dashboard. Your product list is usually visible there. It contains all your domains and hosting plans. Click on ‘Manage’ next to the product you wish to handle. Accessing your product list is essential for updates. It helps in managing DNS settings and renewals.
Navigating To Cpanel
Accessing cPanel with Namecheap is straightforward. Log into your Namecheap account, go to your dashboard, and select “Hosting List. ” Then click “Go to cPanel” next to your domain name. This direct route simplifies managing your website settings and files efficiently.
Navigating to cPanel can seem daunting, especially if you’re new to web hosting. But with Namecheap, the process is straightforward, and you’ll be managing your website in no time. Whether you’re setting up your first site or tweaking an existing one, understanding how to access cPanel is crucial. ###Locating Hosting Packages
Start by logging into your Namecheap account. Once you’re in, head to the “Dashboard” section. Here, you’ll find a summary of all your products, including domain names and hosting packages. Look for the “Hosting List” or “Products” section. This is where all your hosting packages are displayed. If you have multiple packages, ensure you’re selecting the correct one for the domain you want to manage. Click on the “Manage” button next to your chosen package. This action will take you to a detailed view of your hosting plan and its features. It’s like opening a toolbox with all the tools you need to manage your website. ###Accessing Cpanel Directly
In the detailed view of your hosting package, look for the “cPanel” button or link. It’s usually prominently displayed for easy access. Clicking this link will take you directly to the cPanel login page. Often, you’re logged in automatically, but if not, you’ll need your cPanel username and password. This information is usually provided in the welcome email from Namecheap when you first set up your hosting package. Once in cPanel, you’ll have access to all the tools you need to manage your website. From setting up emails to installing WordPress, everything is at your fingertips. Remember the first time you rode a bike? It seemed tricky at first, but once you got the hang of it, it felt like second nature. Accessing cPanel is similar—it’s all about practice. Have you ever wondered how efficient it could be to manage your website without hassle? With direct access to cPanel, you’re equipped to handle your site’s needs effectively. Don’t let the fear of the unknown keep you from exploring the possibilities within cPanel. Dive in and start managing like a pro!Using The Namecheap Dashboard
Accessing cPanel through the Namecheap Dashboard is straightforward. First, log into your Namecheap account. Then, find the “Hosting List” tab and click on “Manage” next to your domain. Finally, select “cPanel” from the options to open it easily.
Navigating the Namecheap dashboard is your first step toward accessing cPanel, the powerhouse behind your website management. It might seem a bit daunting at first, especially if you’re new to web hosting. But understanding its layout can make accessing cPanel much simpler and more intuitive.Understanding The Dashboard Layout
When you log into your Namecheap account, the dashboard is your control center. It’s where all the magic happens. On the left side, you’ll find a menu with various options like Dashboard, Domain List, and Apps. Focus on the Domain List. This is where your domains are showcased. Each domain has a set of actions available, like managing DNS settings, renewing your domain, or, most importantly, accessing cPanel. The dashboard is designed to be user-friendly. But if you’re like me, the first time might feel like stepping into a control room. Spend a few minutes exploring the menu. Knowing where things are can save you time and effort later on.Quick Links To Cpanel
One of the best features of Namecheap is the quick access to cPanel. Once you’re in the Domain List, find the domain you want to manage. Next to your domain name, you’ll see a button labeled Manage. Click it. A new page will appear with several tabs. Look for the one that says Hosting. Under this tab, there’s a section called cPanel. Here, you’ll find a button that takes you directly to your cPanel login page. It’s a shortcut that eliminates the need for additional navigation or remembering URLs. Accessing cPanel this way is a breeze. It’s like having a remote control for your website. You don’t have to juggle multiple windows or tabs. Just a few clicks, and you’re there. Think about it. How much time could you save by mastering these quick links? Time is precious, especially when managing a website. Streamlining your process can make a huge difference. In your experience, have you found any other hidden gems in the Namecheap dashboard? Share your insights. Your tips could help others navigate with ease.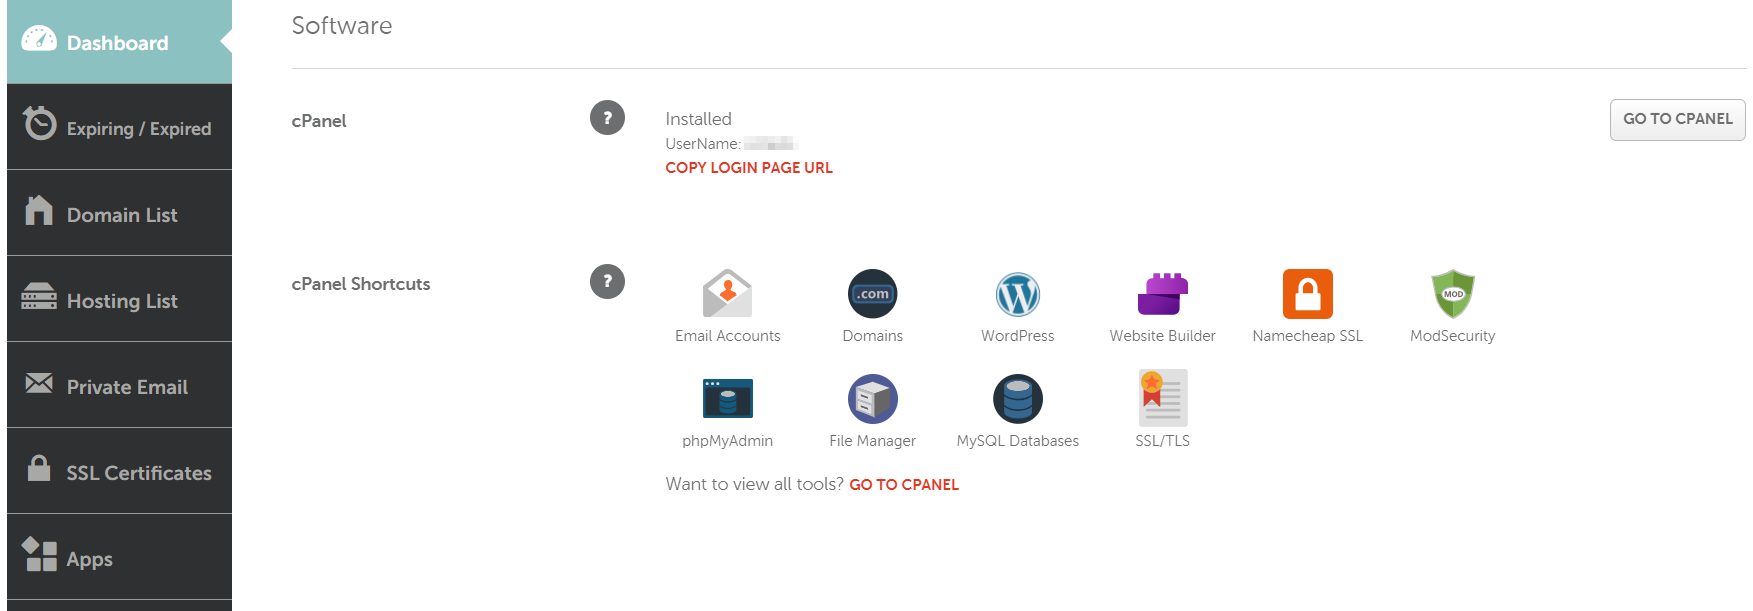
Credit: www.namecheap.com
Troubleshooting Access Issues
Accessing your Namecheap cPanel should be simple. Yet, sometimes issues arise. Troubleshooting access issues can help you quickly regain control. This guide covers common problems and effective solutions. It also offers advice on contacting support.
Common Login Problems
Forgotten passwords are a frequent issue. Use the “Forgot Password?” link on the login page. Follow the instructions to reset your password.
Another problem is incorrect username entry. Double-check your username for any typos. Ensure you use the correct email address linked to your account.
Browser issues can also prevent access. Clear your browser cache and cookies. Try logging in using a different browser or device.
Internet connectivity problems might affect access. Ensure your internet connection is stable and working properly.
Contacting Support For Help
If login issues persist, contact Namecheap support. They offer 24/7 assistance for all users. Log in to your Namecheap account to open a support ticket.
Include detailed information about your issue. Mention any error messages you receive. This helps support staff understand and solve your problem faster.
You can also use the live chat feature. It’s convenient for quick responses and immediate help.
Support agents are trained to handle all types of issues. Don’t hesitate to reach out if you’re stuck.
Tips For Efficient Cpanel Use
Efficient use of cPanel can significantly enhance your web management experience. Whether you’re a beginner or a seasoned user, optimizing your cPanel usage can save time and reduce hassle. Dive into some key tips that can streamline your workflow and make navigation smoother.
Bookmarking Cpanel
Bookmarking your cPanel login page simplifies access. It saves time by eliminating the need to repeatedly type URLs. A simple bookmark allows quick entry, ensuring you can manage your website swiftly. This method is particularly useful for those with multiple sites. You can create a folder for all your cPanel bookmarks. Organize them for easy retrieval.
Utilizing Cpanel Features
cPanel offers numerous features designed to make website management easier. Explore file management options to upload, organize, and edit files directly. Use the database management tools to handle MySQL databases with ease. Email settings allow you to manage accounts and adjust configurations. Security features help protect your site from threats. Familiarize yourself with the backup options to secure your data. Each of these features plays a crucial role in maintaining a healthy website.

Credit: www.namecheap.com
Frequently Asked Questions
How Do I Access The Cpanel Of Namecheap?
Log into your Namecheap account. Click “Hosting List” in the sidebar. Find your domain and click “Go to cPanel”.
How Do I Access My Cpanel?
Access your cPanel by entering your domain followed by “/cpanel” in the browser. Use your login credentials. If unsure, check your hosting provider’s email for details or contact their support. Ensure you have the necessary permissions to log in successfully.
Does Namecheap Come With Cpanel?
Yes, Namecheap offers cPanel with its hosting plans. CPanel provides an easy interface for website management. It includes tools for email, databases, and site backups. Namecheap’s cPanel hosting is reliable and user-friendly, ideal for beginners and experienced users alike. Enjoy seamless website control with Namecheap’s cPanel.
How Do I Login To The Control Panel Of My Website?
Visit your website’s hosting provider. Enter your username and password to access the control panel. Look for the login option on their homepage. Ensure your credentials are correct for successful login.
Conclusion
Accessing your Namecheap cPanel is now straightforward. Follow the steps carefully. Start by logging into your Namecheap account. Navigate to the Dashboard. Select your domain. Click on “Go to cPanel. ” You’re in! Manage your hosting settings with ease. Remember, practice makes perfect.
Repeat these steps until familiar. Got questions? Namecheap’s support is always there. Feel empowered to explore and manage your web hosting. Happy hosting!


