
Are you ready to take your online presence to the next level? Web hosting is a crucial step in establishing your website, and Namecheap is a fantastic choice for getting started.
Imagine having a reliable, affordable, and user-friendly service that supports your website’s growth and success. With Namecheap, you can achieve all that and more. You’ll discover how easy it is to get started with web hosting on Namecheap. You’ll learn the ins and outs of setting up your hosting, selecting the perfect plan, and ensuring your site runs smoothly.
Dive in, and let’s unlock the potential of your website together!
Choosing The Right Hosting Plan
Shared hosting is a good choice for beginners. It is affordable and easy to use. Multiple websites share one server. This makes it cheaper. But, it can be slower if many sites get busy. It’s great for small sites or blogs. Many people start with shared hosting.
VPS hosting is a step up from shared hosting. Each site has its own space on the server. It is more powerful and faster. Suitable for growing websites. It costs more than shared hosting. But, you get more control and flexibility.
Dedicated servers offer full control. One server for one website. No sharing with others. Best for large websites with many visitors. It is the most expensive option. But, it provides the best performance and security.
Reseller hosting lets you sell hosting to others. You buy hosting and sell parts to others. Good for web designers and developers. They can host their clients’ sites. It is a way to earn extra money. Offers more control over resources.
Setting Up Your Namecheap Account
Visit the Namecheap website. Look for the Sign Up button. Click it. Enter your information. Use a strong password. Write it down safely. Press the Create Account button. Check your email for a confirmation.
Find the email from Namecheap. Click the verification link inside. This confirms your email. Without this step, you can’t use your account fully. It’s important. Make sure your email is correct.
Registering A Domain
Type your desired domain name in the search bar. Click the search button. Namecheap will show you available options. Choose a domain that fits your needs. A good domain is short and easy to remember. If your first choice is taken, try variations. You can add words or change the domain ending. Domains like .com, .net, or .org are popular. Once you find a perfect one, add it to your cart.
Review your selected domain in the cart. Check for any mistakes. Look for additional services like privacy protection. These keep your details safe. Proceed to checkout when ready. Fill in your details carefully. Choose a payment method. Options include credit card or PayPal. Click the purchase button to finish. You will get a confirmation email. Your domain is now yours.
Configuring Dns Settings
First, log into your Namecheap account. Find the Domain List and click on it. Choose the domain you want to manage. Click the Manage button next to your domain name. Look for the Advanced DNS tab. This area helps control DNS settings. Easy steps to follow. Simple clicks and changes.
In the DNS settings, locate the Nameservers section. Select the option to update. You can choose Namecheap’s servers or custom ones. For custom servers, input the new nameservers carefully. Always double-check your entries. Accurate nameserver details are crucial. Save changes after updating. Refresh the page to confirm. Your website will now use these new settings.
Installing A Content Management System
Softaculous is a tool that helps install WordPress easily. First, log into your Namecheap account. Find the Softaculous app. Click to open it. Search for WordPress. Press the install button. Follow the steps. Fill in your site information. This includes your site name and admin username. Choose a strong password. Make sure to remember it. Pick your site theme. Finally, click install. Your WordPress site is ready.
Manual setup needs more steps. Download WordPress from its official site. Save it to your computer. Open your Namecheap account. Go to the file manager. Upload the WordPress zip file. Extract the files. Create a database in cPanel. Note the database name and password. Edit the wp-config.php file. Add your database info. Save changes. Go to your site URL. Complete the setup. Add site name and admin info. Click install. Your site is now live.
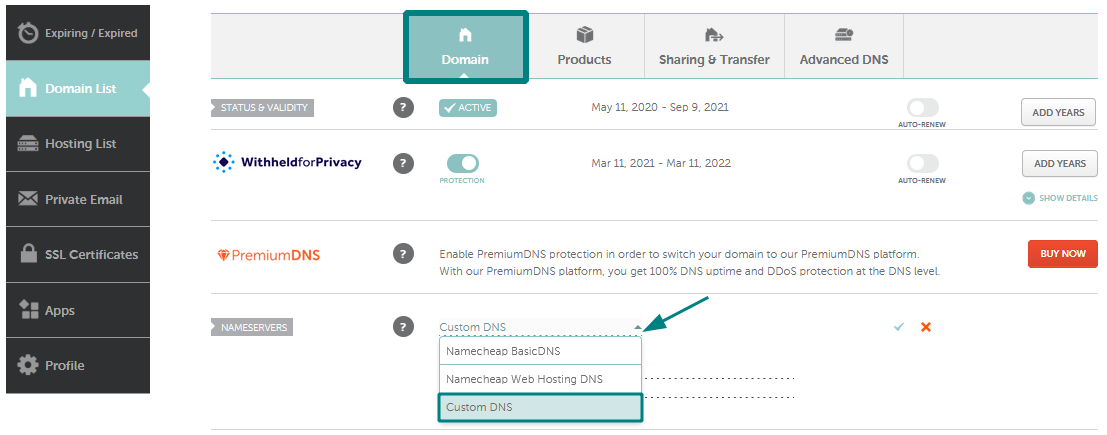
Credit: www.namecheap.com
Setting Up Email Accounts
Creating email accounts in Namecheap involves accessing the cPanel dashboard. Navigate to the Email Accounts section. Here, you can easily set up new addresses.
Creating A New Email Account
Start by logging into your Namecheap account. Navigate to the Email section. Click on Create New to add an email account. Choose a username and set a strong password. Ensure the password is hard to guess. Select the domain for the email address. Click Save to finish.
Configuring Email Clients
Open your email client. Go to Settings or Account section. Enter your new email address and password. Use Namecheap’s server settings. For incoming mail, use mail.yourdomain.com. For outgoing mail, use smtp.yourdomain.com. Enable SSL for security. Test by sending an email to yourself.
Securing Your Website
Discover the ease of web hosting with Namecheap. Secure your website by choosing affordable hosting plans. Namecheap offers reliable services to ensure your site runs smoothly.
Enabling Ssl Certificates
SSL certificates are very important. They make websites safe. Namecheap offers easy SSL setup. This keeps data private. Visitors will trust your site more. A green lock shows in the browser. This means your site is secure. Always check your SSL status. Renew it before it expires. Safety first!
Regular Backups
Backups save your data from loss. Namecheap offers easy backup options. Make backups often. Weekly is a good idea. Store backups in a safe place. Data loss can happen anytime. Be prepared. Restore your site quickly if needed. Backups give peace of mind.

Credit: www.youtube.com
Monitoring And Maintenance
Good tools keep your website fast and smooth. They check the website’s speed. They also check if it’s working well. Some tools are free. Others cost money. You can use tools like Google Analytics. Or even Pingdom. These tools help find problems. Fix issues fast before they get big. Keep your site in top shape.
Updates are very important. They keep your site safe. Hackers like old software. Updates fix bugs. They make the site better. Check for updates often. Do not wait too long. Updates can be for plugins. Or themes. Or even the server. Always back up before updating. This way, you can save your data.
Troubleshooting Common Issues
Facing issues with Namecheap web hosting? Learn to troubleshoot common problems easily. Follow simple steps to resolve connectivity and setup challenges effectively.
Fixing Dns Errors
DNS errors often cause website access problems. First, check your DNS settings in Namecheap. Make sure they match the hosting provider’s instructions. Use tools like DNS Checker to verify the DNS propagation. If issues persist, clear your browser’s cache and try accessing the site again. Sometimes, DNS changes take a few hours to update. Patience is key!
Handling Server Downtime
Server downtime can disrupt your website. First, check if the server is down for everyone. Use tools like Down For Everyone Or Just Me. If it’s just you, restart your router or modem. Also, check Namecheap’s status page for maintenance updates. If downtime continues, contact Namecheap’s support for help. Always keep a backup of your website to avoid data loss.
Credit: www.namecheap.com
Frequently Asked Questions
Is Namecheap Good For Web Hosting?
Yes, Namecheap offers reliable web hosting services with competitive pricing. Their plans include free domain, SSL, and 24/7 support. Users appreciate their user-friendly interface and uptime guarantee. Namecheap is ideal for small to medium-sized websites seeking affordable and efficient hosting solutions.
They consistently receive positive reviews for their performance.
How Do I Set Up A Web Hosting?
Choose a reliable hosting provider. Register a domain name. Select a hosting plan. Configure settings. Upload website files using a control panel or FTP.
Does Namecheap Have A Website Builder?
Yes, Namecheap offers a website builder called “EasyWP. ” It allows users to create websites easily. This tool provides customizable templates and user-friendly features. Perfect for beginners, it requires no coding skills. Namecheap’s website builder is an efficient option for starting your online presence quickly.
How Long Does Namecheap Hosting Take?
Namecheap hosting setup is usually instant. Account activation typically completes within a few minutes. For domain propagation, it may take up to 48 hours. Enjoy a seamless hosting experience with quick setup and reliable support.
Conclusion
Choosing Namecheap for web hosting simplifies your online journey. Their platform offers straightforward setup and reliable service. Easy navigation ensures you find the tools you need. Affordable plans make it accessible for all users. Whether you’re starting a blog or launching a business, Namecheap supports your goals.
Their customer support is responsive and helpful. You can focus on your content without technical worries. Namecheap’s features make hosting manageable, even for beginners. With Namecheap, hosting becomes less of a hassle. Start your web hosting adventure today and grow your online presence effortlessly.


