
Have you ever felt that the footer of your WordPress website just doesn’t quite reflect your brand’s personality? You’re not alone.
Many website owners overlook the potential of this crucial area. The footer may be at the bottom, but its impact is significant. It’s the perfect space to reinforce your brand, provide essential information, and even enhance navigation. In this guide, you’ll discover how to customize your WordPress theme footer to make a lasting impression on your visitors.
Unleash the full potential of your website with simple tweaks that can transform a standard footer into a powerful branding tool. Are you ready to elevate your site’s design and functionality? Let’s dive in!
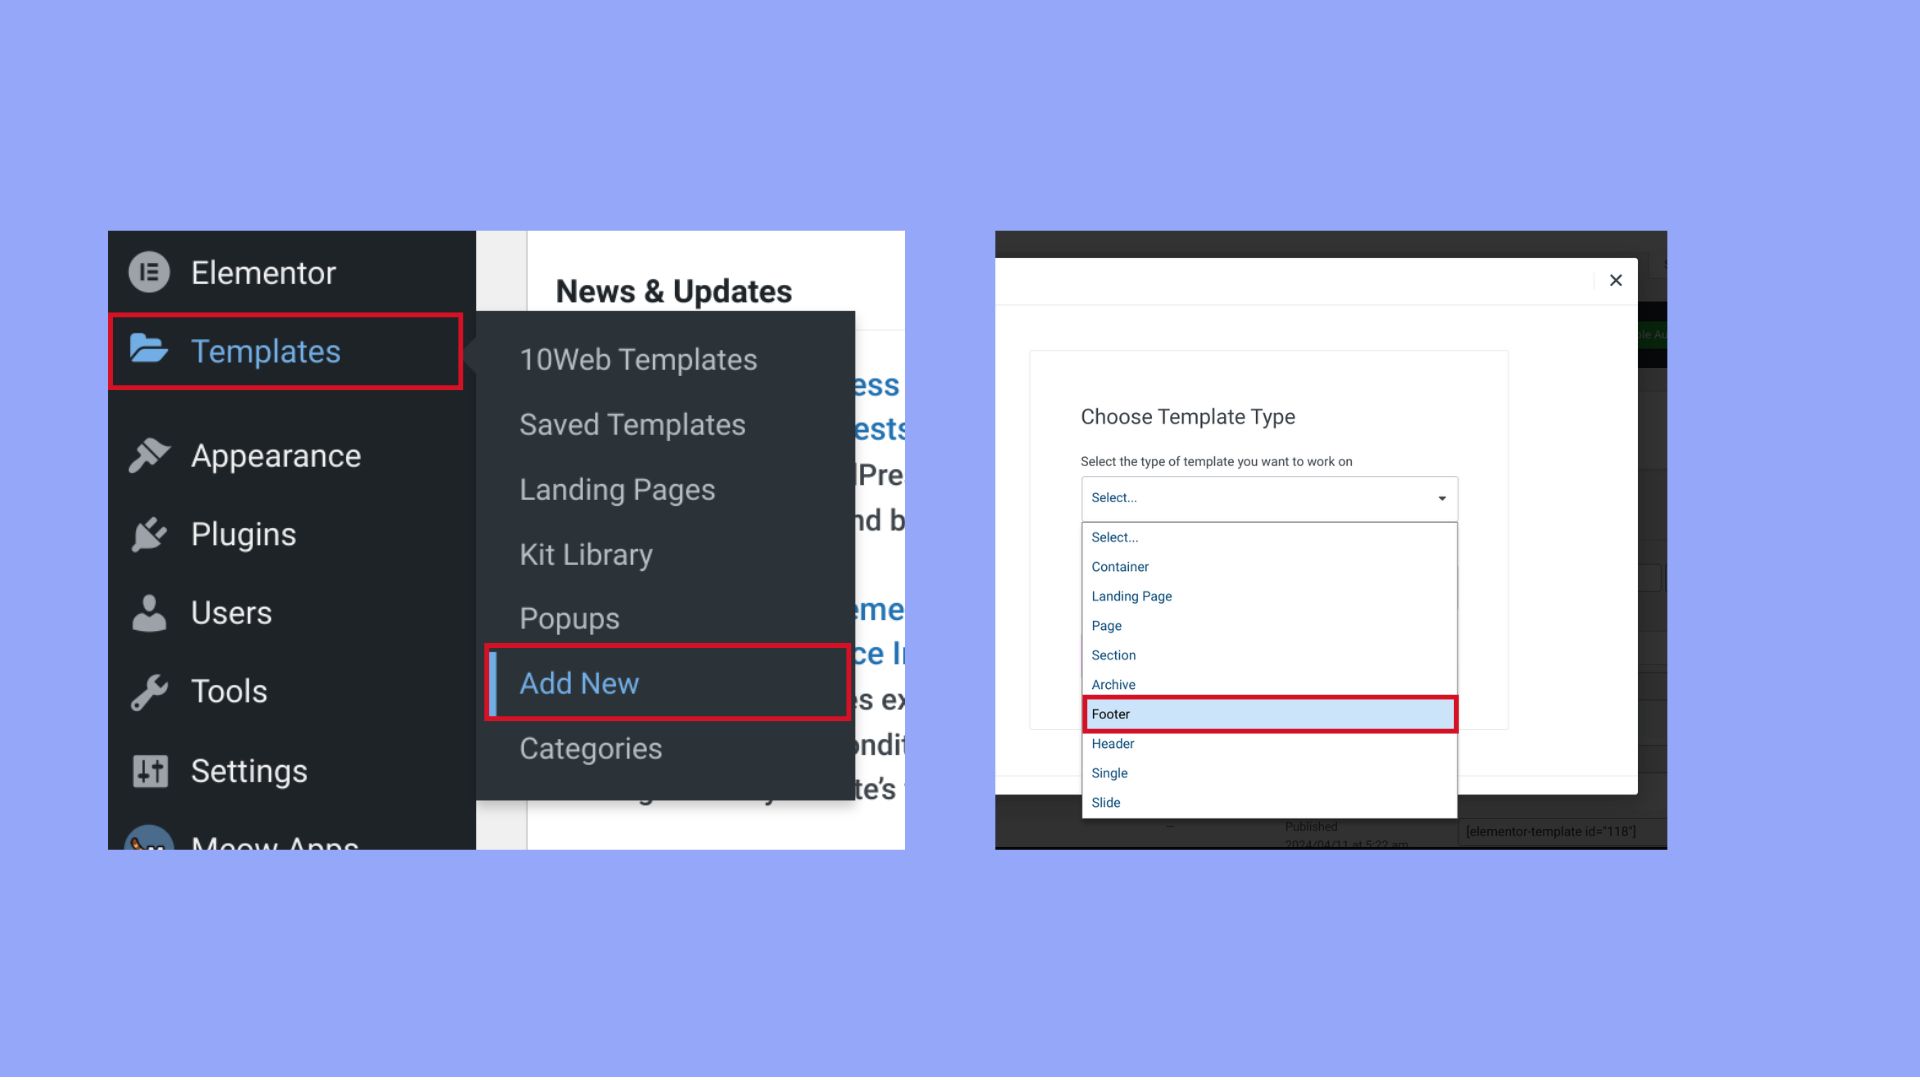
Credit: 10web.io
Understanding WordPress Themes
WordPress themes control how your website looks. They provide the design and style. Each theme has a footer section. This section is at the bottom of every page. You can add links, text, or images here. The footer helps visitors find important info. It often contains contact details. Sometimes, it has social media links. Themes make it easy to change the footer. You can do this without coding skills. Use the theme customizer to edit. Find the footer section. Add or remove widgets. This will change the footer’s look. Save your changes when done. Now, your footer is ready. It’s simple and fun to personalize. Make your website unique and engaging!
Importance Of Customizing Footers
Footers hold vital information for visitors. They show contact details and social media links. A well-designed footer can enhance user experience. It helps in navigation and boosts site credibility. Many users look at footers for quick info. A cluttered footer confuses them. Clear and simple footers make sites more trustworthy. They can also have copyright notices. This protects your content. Custom footers let you share your unique style. They make sites stand out. Use them to highlight important links. This keeps visitors engaged longer. Remember, a good footer is part of a successful site.
Accessing The WordPress Dashboard
First, open your web browser. Type in your WordPress website address. At the end, add “/wp-admin”. This takes you to the WordPress login page. Enter your username and password. Now, click the “Log In” button. After that, you see the WordPress dashboard. This is the control center of your site. It lets you make changes. Look on the left menu. Find the section named “Appearance”. Click it to open more options. This is where you can start customizing.
The dashboard is easy to use. Each section has a name. Names tell you what they do. Explore these sections. They help you change your site. Just click and look around. It’s simple and fun!
Using The Theme Customizer
First, log in to your WordPress dashboard. Find the Appearance tab on the left. Click on it. Next, click on Customize. This opens the theme customizer. You will see many options here.
Look for the Footer option in the customizer. It may be named differently. Some themes call it Footer Settings or Footer Widgets. Click on it to open. Here, you can change the footer settings. You can add or remove content. Try different settings to see what you like. Always remember to save your changes before leaving.
Editing Footer Widgets
Adding new widgets can make your footer more useful. Go to your WordPress dashboard. Click on “Appearance” and then “Widgets”. You will see different widget areas. Find the footer widget area. Drag your chosen widget there. You can add text, images, or links. Each widget has its own options. Click on a widget to edit its settings. Save changes when done. Your new widget will appear in the footer. Easy and quick.
Reordering and removing widgets is simple. Widgets are like blocks. You can move them up or down. Drag them to change the order. To remove a widget, click on it. Then, click “Delete”. It disappears from the footer. You can always add it back later. Keep your footer neat. Make sure it looks good and works well. Happy editing!

Credit: blog.hubspot.com
Customizing Footer Text
Many WordPress themes have a default copyright text. This text is often found at the footer of the site. Changing this text is simple. First, log into your WordPress dashboard. Next, navigate to Appearance and then Customize. In the customizer, find the Footer section. Here, you can change the copyright message. Make sure to save your changes. The new text will appear on your site.
Adding custom text to your footer can personalize your site. Begin by accessing your WordPress dashboard. Go to Appearance and click on Customize. Look for the Footer settings. You can add new text in this section. This text can be anything you choose. It could be a slogan or contact information. Remember to save your settings. Check your site to see the changes live.
Using Footer Menus
Customizing your WordPress theme footer enhances navigation. Add important links using footer menus for better site structure. This approach helps visitors find key pages quickly, improving user experience and site engagement.
Creating A Footer Menu
Click on the Appearance in the dashboard. Find the Menus option. You can create a new menu or choose an old one. Type the name of your menu in the box. Press the Create Menu button. Now add pages or links. Use the checkboxes to select items. Click Add to Menu. You can change the order of the items. Drag them up or down. Save your changes. Your menu is ready.
Assigning Menu To Footer
Go to the Manage Locations tab. Look for the Footer Menu option. Select your menu from the list. Assign it to the footer. Press Save Changes. Your menu will show in the footer now. Check your website to see it live. Adjust the menu items anytime. Use the same steps. Keep your footer tidy and useful. Visitors will find links easily.
Custom Css For Footers
Transform your WordPress theme footer with custom CSS. Adjust colors, fonts, and layout to suit your style. Enhance website aesthetics effortlessly, making your footer more engaging and visually appealing.
Accessing Additional Css
Open your WordPress dashboard. Find the Appearance section. Click on Customize. Look for Additional CSS in the menu. This is where you add custom styles. It changes the look of your footer. You can make it unique. Add your own colors and fonts. It’s like painting your footer. Make it match your website style. Keep your changes simple. Too much code can break things. Save your changes when done. Check how your footer looks. Enjoy your new style!
Writing Custom Css
CSS changes how things look. To change your footer, write code here. Type your new styles. Use the right code words. Like background-color for colors. Or font-size for text size. You can make your footer bigger. Or change its color. Add borders if you like. Make sure the code is correct. Wrong code can mess up your site. Try simple changes first. Test your code. See how your footer looks. Refresh the page to update it. Use CSS to make your footer special!
Plugins For Advanced Customization
Choosing a plugin is like picking the best tool. Look for plugins with good reviews. Check the number of installs. More installs mean more trust. Read the description carefully. Does it match your needs? A plugin should be easy to use. No need for coding skills. Make sure it is compatible with your WordPress version. Check for regular updates. This keeps your site safe.
First, go to the WordPress dashboard. Click on the Plugins menu. Then, click Add New. Search for your chosen plugin. Click Install Now. Once installed, click Activate. After activation, go to the plugin settings. Follow the on-screen instructions to configure. Each plugin has its own settings. Make sure you save changes. Test the footer to see changes.
Testing And Previewing Changes
Testing changes is important before making them live. Use the Preview Mode in WordPress to see how changes look. You can check different elements without publishing. This helps catch mistakes early.
Using Preview Mode
Preview Mode lets you view the site with new changes. It’s like a test run. You can see what works and what needs fixing. Make sure everything appears as expected. Check colors and texts. See if images are in the right place.
Ensuring Mobile Responsiveness
Many users visit sites using phones. Ensuring mobile responsiveness is crucial. Check how the footer appears on smaller screens. Use tools to simulate mobile view. Make sure texts are readable. Buttons should be easy to click. This enhances user experience.
Troubleshooting Common Issues
Struggling with WordPress theme footer customization? Easily tackle common issues by accessing the theme editor. Adjust styles, widgets, and copyright text with precision to create a personalized footer that enhances your website’s appearance.
Identifying Common Errors
Errors can happen in the footer. Many users find broken links. Check if links go to the right page. Another error is a missing copyright notice. Make sure it shows the current year. Sometimes, widgets disappear. Verify widget settings in the theme options. Fonts may appear different. Ensure font settings are correct. Make a checklist of common footer issues. This helps in quick identification.
Fixing Layout Problems
The footer layout may break on some screens. Use responsive design settings. Adjust the grid or columns for a better fit. Sometimes, images overlap text. Resize images for a cleaner look. Text alignment might not be right. Set text alignment in the theme settings. If colors look odd, check the color palette. Make sure it matches the rest of the site. This ensures a uniform look.
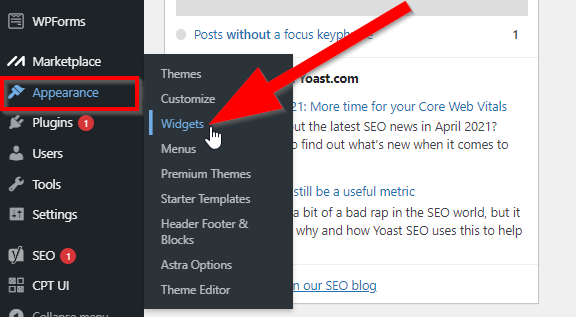
Credit: www.crazyegg.com
Frequently Asked Questions
How Do I Edit The Footer In WordPress?
To edit the footer in WordPress, go to Appearance, then Customize. Navigate to Footer settings and modify the text or widgets. You can also edit footer. php in the theme editor for advanced customization. Always back up your theme files before making direct edits.
Can I Add Widgets To The WordPress Footer?
Yes, you can add widgets to the WordPress footer. Go to Appearance, then Widgets. Select Footer Widget Area and add your desired widgets. Save your changes to update the footer. Widgets enhance footer functionality and design.
How To Change Footer Background Color In WordPress?
To change the footer background color, go to Appearance, then Customize. Select Additional CSS and add custom CSS code for the footer. Specify the desired background color. Preview changes before saving to ensure it matches your theme design.
Is It Possible To Remove WordPress Footer Credits?
Yes, removing footer credits is possible. Access the theme editor and locate the footer. php file. Search for the credit line and delete or modify it. Some themes offer options in the Customizer to remove or change footer credits.
Conclusion
Customizing your WordPress theme footer is simple and effective. Make your website unique. Improve user experience with a personalized touch. Follow these steps for a quick setup. Experiment with different styles and designs. Keep it clean and functional. Ensure important information is easy to find.
A well-designed footer enhances your website’s look. It adds value to your brand. Regular updates keep your footer relevant. Engage visitors through thoughtful design choices. A personalized footer reflects your brand identity. This small change makes a big impact. Start customizing today for a better web presence.


