
Are you eager to build your online presence with a reliable web hosting solution? Look no further than Amazon Web Services (AWS).
Imagine having the power to host your website with the same infrastructure that powers Amazon. com. You’re not just choosing a hosting service; you’re selecting a partner known for its speed, reliability, and scalability. With AWS, you gain access to advanced features that can help your website thrive.
But how do you start? The process might seem daunting at first, but don’t worry—this guide will simplify it for you. By the end, you’ll be equipped with the knowledge to create your very own web hosting setup on Amazon, effortlessly. Dive in to discover how you can leverage AWS to host your site like a pro!

Credit: www.amazon.com
Amazon Web Services Overview
Amazon Web Services (AWS) offers many benefits for web hosting. It provides flexible pricing, allowing you to pay only for what you use. This helps in saving money. AWS is reliable with a 99.9% uptime guarantee. Your website will stay online. Security is strong. AWS protects your data with tools and encryption. It is also scalable. You can easily add more resources if your site grows. AWS has a global reach. Your website can be fast anywhere in the world.
| Feature | Description |
|---|---|
| EC2 | Virtual servers for hosting websites. |
| S3 | Store data safely and retrieve it easily. |
| RDS | Database service for apps and websites. |
| CloudFront | Speeds up content delivery globally. |
Setting Up An Aws Account
Start by visiting the AWS website. Click on “Create an AWS Account”. Fill in your email, password, and account name. Next, provide your billing information. You need a credit card for this. Then, verify your identity. Enter your phone number. AWS will call or text you. Enter the code they send. Choose a support plan. The basic plan is free. Once done, click “Complete Sign Up”. Now, you have an AWS account.
Log in to your AWS account. You will see the AWS Management Console. This is where you manage everything. On the top, there’s a search bar. Use it to find services. The console shows different sections. Each section has various services. Click a service to explore it. Spend time here to understand the layout. This helps you find things quickly. The more you practice, the easier it gets.
Choosing The Right Hosting Solution
EC2 and Lightsail are both services by Amazon. EC2 offers more control and flexibility. It suits complex projects. Lightsail is easier for beginners. It offers simple setups. Choose based on your project’s needs.
Cost is a big factor. EC2 charges by the hour. It can become expensive. Lightsail offers fixed monthly pricing. It’s budget-friendly. Think about your budget before choosing.
Credit: medium.com
Launching An Ec2 Instance
Choose an Amazon Machine Image (AMI) to start your server. AMIs are like templates. They contain all the software you need. Some are free, others cost money. Make sure to pick the right one for your needs. Each AMI has different features. Check those features carefully before choosing.
Set the instance type to match your needs. Different types have different speeds. Some are faster, others save energy. Then, decide how much storage you need. More storage costs more money. Be sure to review your settings before moving on. You can always change them later.
Key pairs are like passwords. They keep your instance safe. You need a private key to connect to your instance. Amazon gives you the key when you create it. Save your key in a safe place. Without it, you can’t log in. Always protect your key.
Setting Up Security Groups
Setting up security groups is crucial for creating web hosting in Amazon. It controls the traffic to your servers, ensuring safety. Define rules for each group to manage access effectively and protect your web environment.
Configuring Firewall Rules
Security groups are important for your web hosting. They protect your server. Set firewall rules carefully. Allow only necessary traffic. Block unwanted access. Choose rules based on your needs. Use common ports like 80 and 443. These are for web traffic. Always keep your server safe. Review rules often. Make changes when needed. Security is a continuous process.
Managing Access Control
Access control is vital. Limit who can enter your server. Use access control lists. These lists decide who can come in. Only allow trusted users. Keep your data safe. Change permissions when needed. Regular checks are good. Security groups help manage access. They keep your server secure. Always be careful with access settings.
Deploying A Web Application
Discover how to create web hosting in Amazon effortlessly. Start by setting up an AWS account. Then, use EC2 instances to launch your web application securely and efficiently. Enjoy scalable and reliable hosting tailored for your needs.
Installing Software On Ec2
Start by launching an EC2 instance on Amazon Web Services. Select an instance type that fits your needs. Choose an operating system for your instance. A popular choice is Amazon Linux. Once your instance is ready, connect to it using SSH. Install necessary software, like Apache or Nginx, for serving your web application. Use simple commands to install these tools. Ensure each software is up-to-date. This keeps your server secure and efficient.
Uploading Website Files
Prepare your website files on your local computer. Use SCP or FTP to transfer files to your EC2 instance. Place them in the correct directory. For Apache, use the /var/www/html directory. This directory serves the files to the web. After uploading, verify each file. Make sure they are in the right place. Check file permissions. They should be readable by the web server. Your website is now ready to go live!
Using Elastic Load Balancing
First, open the AWS Management Console. Choose the EC2 option. Click on “Load Balancers” in the navigation pane. Then, click “Create Load Balancer”. Select the type of load balancer that suits your needs. Give it a name. Configure the listeners. Decide on the security settings. Finally, review and create your load balancer. Your load balancer is now ready.
Traffic can be heavy sometimes. Use health checks to monitor your targets. This ensures they are working. Set up stickiness if you need it. It helps keep sessions intact. Choose the right algorithm for traffic distribution. This can be round robin or least connections. The right choice ensures smooth traffic flow. Your applications will perform better.
Monitoring And Scaling
Amazon CloudWatch helps you see how your web hosting is working. It shows you data like CPU usage and memory. This helps you know if your server is doing well or not. You can set alerts for when things go wrong. This means you get a message if something needs fixing. CloudWatch also helps you keep track of changes. This means you know what happened on your server. Using CloudWatch is easy and helps keep your hosting running well.
Auto-Scaling helps your web hosting grow with more users. It makes more servers when needed. This keeps your website fast even with many visitors. You set rules for when to add more servers. For example, when CPU usage gets too high. This makes sure your site does not slow down. Auto-Scaling also removes extra servers when they are not needed. This helps save money. It is a smart way to manage web hosting.
Troubleshooting Common Issues
Connectivity issues can be tricky. First, check your internet cable. Sometimes, it’s loose. Restart your router. It helps refresh the connection. Use the command line to check your server’s IP. Ping the server to see if it responds. If it doesn’t, the server might be down. Contact your hosting provider for help. Make sure your firewall settings are correct. Firewalls can block connections. Ensure that firewall rules allow traffic. Update your DNS settings. Incorrect DNS can cause connection problems. Use a public DNS server for better reliability.
Performance issues slow down your site. Check your server’s CPU and RAM usage. High usage means the server is overloaded. Reduce the load by optimizing your code. Clean up unnecessary files. They take up space and slow things down. Use a content delivery network (CDN). CDNs help deliver content faster. Monitor your bandwidth. High bandwidth usage can indicate a problem. Consider upgrading your hosting plan for more resources. Regular updates and maintenance keep your server healthy.
Best Practices For Aws Hosting
Security is very important in AWS hosting. Always use strong passwords. Regularly update your software. Check for security patches. AWS offers tools for security. Use encryption to protect your data. Set up firewalls to block unwanted access. Create access controls for users. Only allow trusted users. Monitor your system for unusual activity. Report any suspicious activity quickly. Keep your security settings updated.
Optimizing costs helps save money. Choose the right instance type for your needs. Use AWS Cost Explorer to track spending. Avoid running unused instances. Turn off instances when not in use. AWS offers reserved instances for discounts. Use auto-scaling to manage resources. AWS pricing calculators can help. Review your bills regularly. Identify areas to cut costs. Choose the right storage option. Less storage costs less money.

Credit: www.youtube.com
Frequently Asked Questions
Does Amazon Offer Website Hosting?
Yes, Amazon offers website hosting through Amazon Web Services (AWS). AWS provides scalable, secure hosting solutions. It supports various platforms, including WordPress and Joomla. With AWS, users benefit from global data centers, ensuring reliability. Pricing is flexible, based on usage, making it suitable for businesses of all sizes.
Can You Host Your Own Website On Aws?
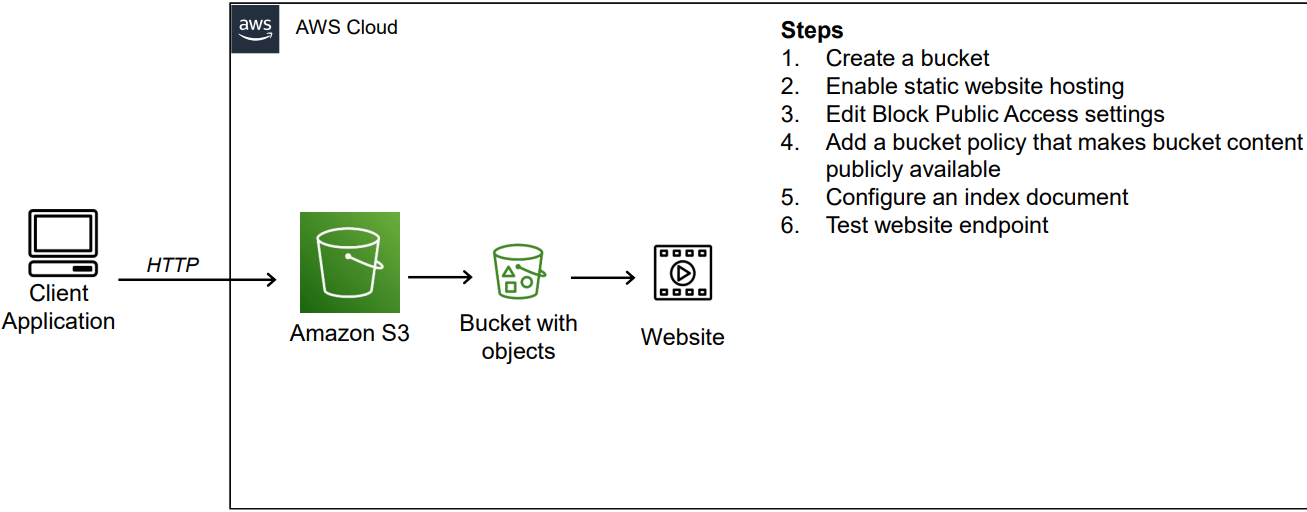
Yes, you can host your own website on AWS. AWS offers flexible and scalable hosting solutions. Services like Amazon EC2 and S3 help you easily manage your website infrastructure. AWS provides security, reliability, and global reach for your site. Utilize AWS’s tools for optimal performance and cost-effectiveness.
How To Create Amazon Web Server?
Sign up for AWS and log into the console. Navigate to EC2 service, launch a new instance, select desired configuration, and click “Launch. ” Set security settings, review options, and confirm to create your Amazon web server efficiently.
How Do I Start My Own Web Hosting?
Begin by selecting a reliable server and hosting software. Purchase a domain name and configure DNS settings. Set up billing and support systems to manage client accounts effectively. Ensure security measures are in place to protect data. Promote your services to attract customers.
Conclusion
Creating web hosting on Amazon is simple and efficient. Start with setting up an AWS account. Choose the right hosting package for your needs. Follow step-by-step guides to configure your server. Ensure you regularly update and secure your server. This keeps your website running smoothly.
Always monitor your site’s performance. Make adjustments as needed for optimal speed. A reliable host is key to online success. With Amazon, you get flexibility and control. Enjoy building and managing your website with ease. Your journey to web hosting mastery begins now.
Keep exploring and improving for the best results.


