
Are you looking to expand your online presence effortlessly? Creating a subdomain in cPanel on Namecheap is your gateway to achieving just that.
Whether you’re aiming to segment your site, launch a new project, or simply enhance your website’s organization, a subdomain can make it happen. Imagine having different sections of your website, each with its unique identity, all under the same main domain umbrella.
Sounds enticing, right? Don’t worry if you’re feeling overwhelmed by tech jargon. This article will guide you through the process with simple, straightforward steps, empowering you to take control of your digital space. Stick around, and you’ll be navigating cPanel like a pro in no time, ready to unleash the full potential of your website.
Getting Started With Namecheap And Cpanel
Creating a subdomain in Namecheap’s cPanel is simple. Log into cPanel, locate the “Subdomains” section, and click it. Enter your desired subdomain name, choose the main domain, and click “Create. ” Your new subdomain is ready to use.
Getting started with Namecheap and cPanel may seem daunting, but it’s simpler than you think. Whether you’re launching a blog or setting up an online store, Namecheap offers reliable hosting solutions that fit your needs. Paired with cPanel, managing your website becomes a breeze with its user-friendly interface. ###Understanding Namecheap And Cpanel
Namecheap is a popular domain registrar and web hosting provider known for its affordability and service. By choosing Namecheap, you gain access to cPanel, a powerful tool for managing your website. cPanel is where you handle everything from email creation to subdomain management. Think of it as your website’s command center, filled with tools to help you build and maintain your site effortlessly. ###Accessing Your Cpanel Account
First things first, you’ll need to log in to your Namecheap account. Once logged in, navigate to your hosting dashboard and locate the cPanel login link. It’s usually a simple click away. You’ll be greeted with a variety of icons once inside cPanel. These icons lead you to different functionalities, including file management, email settings, and subdomain creation. Take a moment to familiarize yourself with this interface. ###Preparing To Create A Subdomain
Have you ever wanted to create a unique section of your website? Subdomains are perfect for this. Before diving in, consider what purpose your subdomain will serve. Is it for a blog, a shop, or something else? Once you know what you want, head to the ‘Domains’ section in cPanel. Here, you’ll find the option to create subdomains. It’s straightforward, but having a clear goal in mind makes the process smoother. ###Step-by-step Subdomain Creation
Creating a subdomain is quick and easy. In the ‘Domains’ section, click on ‘Subdomains’. You’ll see fields to enter your desired subdomain name and the domain it should be associated with. For instance, if your main domain is ‘example.com’, you might choose ‘blog.example.com’. Enter this into the respective fields and click ‘Create’. Your subdomain is now live! ###Why Subdomains Matter
Subdomains offer a way to organize your site content without cluttering your main domain. They improve user experience and can boost SEO if used wisely. Think about it—would you rather navigate through a single crowded page or have specific areas tailored to your needs? Subdomains help achieve that by giving you the flexibility to design distinct sections for different purposes. ###Common Pitfalls And How To Avoid Them
Creating subdomains isn’t without its challenges. A common mistake is not linking your subdomain properly, leading to broken links and confused visitors. Make sure each subdomain is functional and accessible. Another issue is overloading your site with too many subdomains. This can dilute your brand and confuse visitors. Focus on quality over quantity—only create subdomains that serve a clear purpose. ###Your Next Steps
Now that you know how to create a subdomain in Namecheap cPanel, consider what areas of your website could benefit from this feature. Could a separate space for customer support or a members-only section enhance your site? Remember, the key is to make it easy for your visitors to navigate your site. By strategically using subdomains, you can offer them a seamless experience. So, what’s your plan for your next subdomain?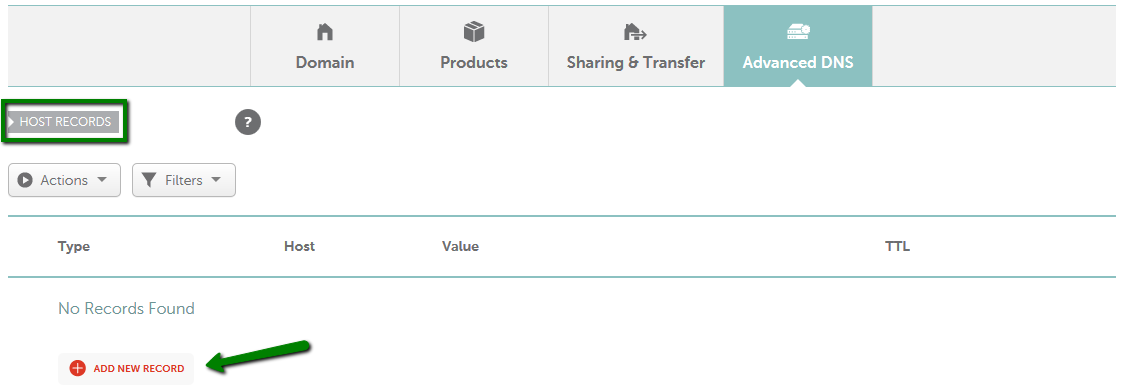
Credit: www.namecheap.com
Accessing Cpanel From Namecheap Account
Creating a subdomain in cPanel through your Namecheap account is straightforward. Log in to cPanel, navigate to the “Domains” section, and select “Subdomains. ” Enter your desired subdomain name and choose the main domain. Click “Create” to finalize. Your subdomain is now ready for use.
Accessing your cPanel from your Namecheap account is the first step to creating a subdomain. It’s the gateway to managing your website, and knowing how to navigate this space can save you a lot of time. Whether you’re setting up a new project or organizing your existing site, accessing cPanel efficiently ensures you have control at your fingertips. ###Log In To Your Namecheap Account
To start, you need to log in to your Namecheap account. Make sure you have your username and password handy. If you’ve forgotten them, use the ‘Forgot Password’ feature to reset it quickly. ###Navigate To The Dashboard
Once logged in, head to the dashboard. This is your control center where you can manage your domains, hosting, and much more. Look for the ‘Account’ tab at the top of the page to access your dashboard efficiently. ###Select The Domain
In the dashboard, locate the domain you want to create a subdomain for. Click on the ‘Manage’ button next to it. This will open up a new panel with various domain management options. ###Access The Cpanel
In the domain management panel, find the ‘cPanel’ option. Clicking this will redirect you to your cPanel login page. If you’re already logged in, you’ll be taken directly into the cPanel interface. ###Why This Matters
Getting used to accessing cPanel through your Namecheap account enhances your ability to manage your website effectively. It’s like having a key to your digital house, where you can tweak and customize to your heart’s content. What would you do if you could easily manage all aspects of your site from one place? These steps might seem simple, but they pave the way for efficient website management. Remember, every journey begins with the first step, and accessing your cPanel is that crucial starting point.Navigating To Subdomains Section
Exploring the subdomains section in Namecheap’s cPanel is essential for creating a subdomain. Locate the subdomains icon, click to access options, and follow the prompts. This user-friendly interface simplifies subdomain creation, making website management more efficient.
Navigating through cPanel might seem daunting at first, but once you know your way around, creating a subdomain becomes a breeze. Think of it like finding the right aisle in your local grocery store; once you know where to look, everything falls into place. This section will guide you through locating the subdomains section in your Namecheap cPanel account, so you can add those subdomains with ease. Ready to dive in and make your website more organized and professional? ###Locating The Cpanel Dashboard
First things first, you need to log into your Namecheap account. Once logged in, find the “Hosting List” under the “Account” tab. Click on “Manage” next to the domain you wish to modify. This action will take you to the cPanel dashboard where the magic happens. ###Finding The Subdomains Section
On your cPanel dashboard, look for the “Domains” section. Here, you will see a variety of options, such as “Addon Domains” and “Redirects.” Your target is “Subdomains,” which is usually represented with a small globe icon. Click on it, and you’ll be taken to the subdomains interface. ###Understanding The Interface
Once you’re in the subdomains section, you’ll notice a simple form. It asks for the name of your subdomain, the main domain you want to associate it with, and the document root. It’s like filling out a form at the doctor’s office—straightforward and necessary for organizing your website. ###Personal Insights On Subdomains
Creating subdomains can initially be intimidating, but once you see how organized your website becomes, you’ll wonder why you didn’t do it sooner. I remember my first subdomain for a blog section; it made managing content so much easier and gave my site a professional edge. How might subdomains streamline your site’s navigation and content? ###Thoughts On Streamlining Your Website
Consider this: a well-organized website isn’t just about aesthetics; it’s about enhancing user experience. With subdomains, you can categorize different sections of your site, making it easier for visitors to find what they need. What sections of your site could benefit from this organization?
Credit: www.youtube.com
Creating A New Subdomain
Accessing Namecheap’s cPanel allows you to create a subdomain easily. Navigate to the “Subdomains” section. Enter your desired subdomain name, select the domain, and click “Create. “
Creating a new subdomain in cPanel with Namecheap is easy. It’s a useful way to organize your website content. Subdomains help in separating different sections of a website. This can make management easier. Follow the steps below to create a subdomain.Choosing A Subdomain Name
Select a clear and concise subdomain name. It should reflect the purpose of the new section. For instance, use “blog” for a blog section. Avoid using complex or long words. Ensure the name is easy to remember. Check for availability to avoid conflicts.Setting Document Root
The document root is where files for the subdomain are stored. Choose a folder that matches the subdomain name. This helps in keeping the files organized. A separate folder prevents confusion with other site files. Ensure the path is correct to avoid errors. After setting the root, your subdomain is ready.Verifying Subdomain Creation
Creating a subdomain in Cpanel Namecheap involves accessing the Cpanel dashboard. Locate the “Subdomains” section, then enter your desired name and choose the main domain. Confirm the creation, and your subdomain will be ready. Verifying ensures functionality and correct setup.
Verifying the creation of a subdomain is an essential step. This ensures your online presence is functioning as intended. After setting up your subdomain in cPanel on Namecheap, it’s crucial to confirm its successful creation. This process involves checking DNS settings and testing the subdomain’s accessibility. Both steps are vital for a seamless user experience.Checking Dns Settings
First, log in to your Namecheap account. Navigate to the “Domain List” section. Find your main domain and click “Manage.” Go to the “Advanced DNS” tab. Here, you should see your new subdomain listed. Ensure the DNS records are correct. The record type should be “A” or “CNAME.” Check the IP address or target destination matches your server’s details. Incorrect DNS settings can cause access issues.Testing Subdomain Accessibility
Open a web browser and enter your subdomain URL. Check if the page loads correctly. If it does, your subdomain is active. If not, revisit the DNS settings. Ensure there are no typos or errors. Sometimes, DNS changes take time to propagate. It may take a few hours. Patience might be needed. If issues persist, contact Namecheap support for assistance. They can help troubleshoot and resolve any problems.
Credit: www.youtube.com
Managing Subdomains In Cpanel
Creating a subdomain in cPanel with Namecheap is simple. First, log into your cPanel account. Then, locate the “Subdomains” section and enter your desired subdomain name. Choose the domain to attach it to, and click “Create”. Your subdomain is now ready for use.
Managing subdomains in cPanel can be a breeze if you know your way around. Whether you’re a beginner or have some experience, it’s crucial to master the basics of subdomain management to enhance your website’s functionality and organization. Have you ever thought about how subdomains can streamline your site’s navigation or improve your SEO? Let’s dive into the nitty-gritty of modifying and deleting subdomains using cPanel on Namecheap.Modifying Subdomain Settings
Fine-tuning subdomain settings allows you to customize your website effectively. Access your cPanel dashboard and head over to the “Subdomains” section. Here, you’ll see a list of your current subdomains. Need to change the document root? Simply click on the “Edit” icon next to the subdomain you wish to modify. Adjust the document root directory to ensure your subdomain points to the right files. This is particularly useful if you’ve moved files or reorganized your directories. Remember to save your changes and test the subdomain to confirm everything is working smoothly. Have you ever modified a subdomain setting and instantly improved your site’s organization?Deleting Unwanted Subdomains
Clutter can slow down your workflow, and unwanted subdomains are no exception. To delete a subdomain, navigate to the “Subdomains” section in cPanel. Locate the subdomain you want to remove and click the “Remove” link. You’ll be prompted to confirm the deletion. Once confirmed, the subdomain will be deleted, freeing up your resources and simplifying your domain management. But think twice before deleting—could this subdomain be repurposed for a future project or test environment?Troubleshooting Common Issues
Creating a subdomain in Namecheap’s cPanel involves a few straightforward steps. Begin by logging into your cPanel account, then locate the “Domains” section and select “Subdomains. ” Fill in the desired name, choose the domain, and set the document root.
When creating a subdomain in cPanel with Namecheap, you might encounter some common issues that can be frustrating. These problems often stem from minor oversights or technical hiccups, but don’t worry—most of them have straightforward solutions. Let’s dive into some of the typical problems you might face and how to fix them efficiently.Resolving Dns Propagation Delays
DNS propagation delays can be a real test of patience. After creating a subdomain, it’s not unusual to find that it doesn’t appear online immediately. This delay is because DNS changes can take up to 48 hours to update across the internet. While waiting, ensure that your DNS records are correctly configured. Double-check the settings in your Namecheap account to confirm that the subdomain is pointing to the right server. If you’re unsure, a quick chat with Namecheap’s support might provide clarity. Have you ever wondered if there’s a way to speed this up? Sometimes, flushing your local DNS cache can help. This ensures your computer gets the most recent DNS data. On Windows, you can do this by opening Command Prompt and typing `ipconfig /flushdns`.Fixing Subdomain Access Errors
Access errors can be unsettling, especially when you’re eager to see your subdomain live. A common cause for access problems is incorrect directory configuration. Make sure the subdomain is linked to the correct folder in your hosting account. Check if there are any typing mistakes in the subdomain URL. A simple typo can lead to a 404 error. Also, ensure that your web server settings allow the subdomain access. Have you checked your firewall settings? Sometimes, a firewall might inadvertently block access to your new subdomain. Adjusting these settings can often resolve the issue. These troubleshooting steps should help you address most common subdomain issues effectively. Remember, a little patience and careful checking can save a lot of frustration. Have you encountered a different issue? Sharing experiences can often lead to new solutions!Frequently Asked Questions
How To Create A Subdomain On Namecheap?
Log into your Namecheap account, access “Domain List,” and click “Manage. ” Select “Advanced DNS,” then click “Add New Record. ” Choose “A Record” or “CNAME Record,” enter your subdomain’s name, and save changes. Your subdomain is now created.
How To Create A Subdomain With Cpanel?
Log in to cPanel and navigate to the “Domains” section. Click “Subdomains,” enter your desired name, and select the parent domain. Click “Create” to finalize. Your subdomain is now ready for use.
Why Are Subdomains Bad For Seo?
Subdomains can hinder SEO because search engines treat them as separate entities from the main domain. This division dilutes authority and backlinks, making it harder to rank. Centralizing content on a single domain strengthens visibility, authority, and ranking potential, enhancing overall SEO performance.
How To Add Domain In Cpanel Namecheap?
Log into your Namecheap cPanel. Select “Addon Domains” under the Domains section. Enter your new domain name. Fill in the Subdomain and Document Root fields. Click “Add Domain” to finish. Your domain is now added to cPanel.
Conclusion
Creating a subdomain in cPanel with Namecheap is straightforward. Follow simple steps. First, log into your Namecheap account. Navigate to cPanel. Locate the Subdomains section. Enter your desired subdomain name. Choose the domain you want to associate. Click on Create.
Your subdomain is ready to use. Quick and easy, right? Now, manage your online presence better. Experiment with multiple subdomains. Organize your content efficiently. Enhance user experience. Subdomains open new possibilities. Perfect for blogs, shops, or portfolios. Enjoy the flexibility they offer.
Start creating today and see the difference it makes.


