
Creating a new file in a Genesis Child Theme on WordPress can feel like a daunting task, especially if you’re diving into it for the first time. But what if I told you that with just a few simple steps, you could unlock endless customization possibilities for your website?
Imagine having the power to tailor your site exactly to your vision, enhancing its functionality and design to captivate your audience. You’re not just crafting a website; you’re building an experience that can set you apart from the competition. In this guide, we’ll walk you through the process, breaking it down into easy-to-follow steps so you can confidently take control of your WordPress site.
Ready to transform your website? Let’s get started!
Genesis Framework Basics
The Genesis Framework is a popular choice for WordPress users. It offers a solid and flexible base for creating websites. Child themes are used to customize the Genesis Framework. They allow changes without affecting the core files. This keeps your site updated and secure.
Building a new file in a Genesis child theme is easy. First, access your WordPress dashboard. Go to Appearance > Editor. Here, you can see your theme files. Choose the child theme you want to edit. Click Create New File to begin. Name your file and add your code. Save the changes. Now, your new file is part of the child theme.
Choosing A Base Theme
Genesis is a popular choice for WordPress users. It offers a solid foundation. Many developers use Genesis for creating child themes. A child theme lets you make changes. It keeps the base theme safe and updates easy. Start by picking a base theme you like. It’s the first step in theme creation. Look at the features it offers. Make sure it has what you need. Genesis has good options to explore.
Choose a theme that suits your site’s needs. It’s important to check its compatibility. Look for user reviews and feedback. A theme with good reviews is usually reliable. Compare different themes. Check the design and layout. A clean design is always better. Pay attention to support and updates. A theme that gets regular updates is safer. Genesis themes often get updates and support.
Setting Up A Local Development Environment
First, download and install XAMPP or MAMP. These tools help you create a local server. They are free and easy to use. Next, install WordPress on your computer. It will let you test your theme. Get the latest version from the WordPress website.
Install a text editor like Sublime Text or Visual Studio Code. These editors help you write code. They are user-friendly and have many features. Make sure your editor has syntax highlighting. It makes coding easier and less stressful.
Organize your files into folders. Name them clearly. For example, use “themes” for themes. Use “plugins” for plugins. This helps you find files quickly. Set up your text editor. Customize settings to fit your needs. Adjust font size, color, and layout. Make your workspace comfortable.
Connect your editor to your local server. This lets you test changes live. Use FTP or direct connection. Keep your workspace tidy. It saves time and avoids confusion.
Creating The Child Theme Folder
First, go to your WordPress directory. Find the wp-content folder. Inside, locate the themes folder. Now, create a new folder. Name it anything you like. Make sure the name is unique. This will be your child theme folder.
Your new folder must have specific files. A style.css and a functions.php file are needed. These files help your theme work right. Open a text editor. Save a new file as style.css. Then, save another file as functions.php. Put these files in your child theme folder.
Adding A Style.css File
The style.css file needs a special header. This header tells WordPress about your theme. It includes the theme name, author, and version. Write this at the top of the file. Use clear and simple words. Make sure the header is correct. Errors can cause problems.
You can change how your site looks. Use the style.css file for this. Add new CSS rules to change colors and fonts. Start with small changes. Test each change to see the effect. This helps avoid big mistakes. Keep your styles neat and tidy.
Building The Functions.php File
Start by creating a functions.php file. This file controls your theme. Link your parent and child styles. This is called enqueuing. Use wp_enqueue_style in your file. First, add parent styles. Then, add child styles. Always ensure the correct order. Parent styles come first. Child styles come second. This keeps your site looking good.
Enqueuing Parent And Child Styles
Use get_template_directory_uri(). This function finds your parent theme. For child styles, use get_stylesheet_directory_uri(). Remember to enqueue scripts too. Use wp_enqueue_script. Keep your code organized. This helps manage your theme. Check your theme in a browser. Ensure styles load correctly.
Adding Theme Support Features
Your theme needs extra features. Add support for custom logos. Use add_theme_support('custom-logo'). Enable post thumbnails. Add add_theme_support('post-thumbnails'). This helps with images. Include HTML5 support. Use add_theme_support('html5'). It supports modern web standards. Check your site. See if features work well. Adjust as needed.
Modifying The Theme Template Files
To change your page look, use custom page templates. Copy the existing template file. Save it with a new name in your child theme folder. Use comments at the top to name the template. This helps WordPress recognize it. Now, find the page you want to change in WordPress. Choose your new template from the dropdown menu.
Customizing Page Templates
Create a new file in your theme’s folder. Name it clearly. Start by copying the code from an existing template. Make changes to the HTML and PHP code. Save the file in your child theme. Apply the new template to specific pages. This changes how the page looks.
Adjusting Theme Hooks And Filters
Hooks and filters change how your site works. Hooks let you add new code without editing the core files. Filters change data before it is shown. Use hooks to add custom features. Find existing hooks in the theme files. Write functions to add with hooks. Apply filters to change displayed data. Hooks and filters are powerful tools.

Credit: crunchify.com
Testing And Debugging
Creating a new file in a Genesis Child Theme involves accessing your WordPress dashboard. Navigate to the theme editor and select the child theme. Carefully add your new file, ensuring it follows proper naming conventions and structure for seamless integration.
Checking For Errors
Creating a new file might cause errors. Always check for these issues. Use the WordPress debug mode. It shows error messages on the screen. This helps find the problem quickly. A small mistake can break the theme. So, fixing errors is very important.
Ensuring Compatibility
Ensure your file works with other WordPress plugins. Some plugins may not work together. Check the theme on different devices. Use mobiles, tablets, and computers. This makes sure your site looks good everywhere. Update your plugins and themes often. This helps with compatibility and keeps your site safe.
Deploying The Child Theme
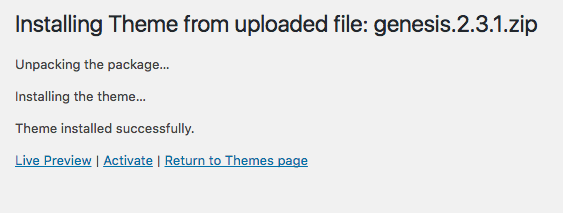
First, access your WordPress dashboard. Find the “Appearance” tab. Click on “Themes” under it. Next, locate the “Add New” button. It’s at the top. Click on it. Then, press “Upload Theme”. Choose the Genesis child theme file from your computer. Hit “Install Now” to start the upload. Wait for it to finish.
Go back to the Themes section. Look for your uploaded Genesis child theme. Click on “Activate” to make it live. The site will now use the new theme. Check your site to ensure it looks right. If needed, adjust settings. Make sure everything works smoothly. Enjoy your new theme design!
Credit: wpbeaches.com
Maintaining And Updating
Creating a new file in a Genesis child theme for WordPress involves specific steps. First, access your WordPress dashboard, then navigate to the theme editor. Add your new file under the child theme directory, ensuring it follows the correct naming conventions.
Keeping Files Updated
Files in your Genesis Child Theme need regular updates. Updates help them work well. Without updates, files may break. Broken files cause problems. Problems can make your site slow. Slow sites are not good. Users leave slow sites quickly.
To keep files updated, check them often. Checking files helps find issues early. Early fixes save time. Fixes make the site run better. Always keep a backup. Backups are important. They protect your work. If files break, use the backup. Backups bring files back to life.
Monitoring For Changes In The Parent Theme
Parent themes change often. Changes can affect your child theme. It’s important to watch for changes. Watch carefully. Changes can cause errors. Errors are bad for sites. They can confuse users. Confused users don’t stay long.
Check the parent theme often. Checking helps catch changes fast. Make adjustments as needed. Adjustments keep your site safe. Safe sites are trusted. Trusted sites have more visitors. More visitors are good for your site.
Credit: www.youtube.com
Frequently Asked Questions
How Do I Start A Genesis Child Theme?
Start by installing Genesis Framework on WordPress. Create a child theme folder in wp-content/themes. Add style. css and functions. php files. Activate your child theme through the WordPress dashboard. Customize your theme using code snippets or plugins. Ensure your design is responsive and SEO-friendly for optimal performance.
What Files Are Needed In A Genesis Child Theme?
Essential files include style. css and functions. php. Style. css holds your design rules, while functions. php contains code to modify theme functionality. You can also add other template files like header. php or footer. php for specific customizations. Ensure each file is properly coded to avoid theme errors.
Can I Customize Genesis Child Theme Easily?
Yes, customization is straightforward. Use the Genesis Sample Theme as a starting point. Modify style. css for design changes. Use functions. php for functionality tweaks. Genesis offers hooks and filters for advanced customization. Use Genesis plugins to enhance features without coding.
Always back up your site before making changes.
Is Genesis Child Theme Seo-friendly?
Absolutely, Genesis is designed with SEO in mind. Its clean code and fast loading speed improve search rankings. You can add SEO plugins for enhanced optimization. Customize meta tags and headings within your child theme. Always ensure responsive design to improve user experience across devices.
Conclusion
Creating a Genesis child theme file in WordPress is straightforward. Start by understanding your site’s needs. Use simple tools and follow the steps carefully. Customize with patience to achieve desired results. This process enhances your site’s flexibility and design. Remember, practice makes perfect.
Explore and experiment with different features. Always back up your work. Stay organized and keep learning new techniques. With these tips, you will manage your theme files effectively. Enjoy creating a unique and functional website that meets your goals.


