

Creating a clear and easy-to-navigate menu on your WordPress site can make all the difference in keeping visitors engaged. If you want your audience to find what they need quickly, building the right menu is key.
You’ll learn simple, step-by-step instructions to create a menu that fits your website perfectly. By the end, you’ll have a menu that not only looks great but also helps your visitors explore your content with ease. Ready to make your site more user-friendly?
Let’s get started!
Credit: www.probewise.com
Choosing The Right Menu Type
Choosing the right menu type is key to a clear website. It helps visitors find pages fast. The menu guides users through your site’s content. Picking the right style keeps your site neat and easy to use.
Primary Vs Secondary Menus
The primary menu is the main navigation bar. It usually appears at the top of your site. This menu shows the most important pages. Visitors use it to explore your website easily.
The secondary menu is smaller and less visible. It often holds extra links like contact info or policies. This menu supports the primary menu without crowding it. Use it for less critical pages or links.
Custom Menus For Different Pages
Custom menus let you show unique links on certain pages. You can change the menu based on the page topic. This helps visitors find related content quickly.
For example, an online store can have a shop menu on product pages. A blog can show categories on its posts. Custom menus make your site feel more organized and user-friendly.
Credit: www.wpexplorer.com
Accessing The Menu Settings
Accessing the menu settings is the first step to organizing your website’s navigation. Menus help visitors find pages quickly. WordPress makes it simple to create and manage menus in just a few clicks.
This section explains how to reach the menu settings. Follow these easy steps to get started.
Navigating To WordPress Dashboard
Start by logging into your WordPress account. Use your username and password on the login page. After logging in, you land on the WordPress Dashboard. This is the main control panel for your website. It has all the tools you need to manage your site.
Opening The Menus Section
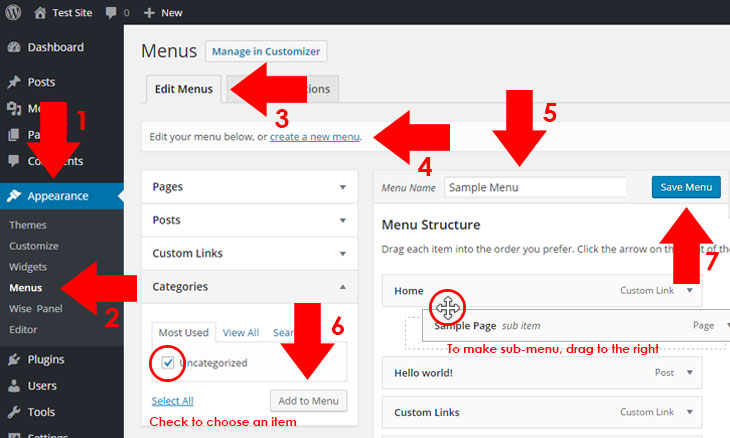
On the left side of the Dashboard, find the “Appearance” option. Click on it to open a submenu. Here, select “Menus.” This opens the menu settings page. You can create new menus or edit existing ones here. This area controls what visitors see in your site’s navigation.
Creating A New Menu
Creating a new menu in WordPress is simple and fast. Menus help visitors find pages and important links on your site. This guide shows how to start a menu from scratch. Follow each step carefully to build a menu that fits your website.
Naming Your Menu
First, give your menu a clear name. The name helps you find it later in the dashboard. Choose a simple name like “Main Menu” or “Footer Links.” Avoid long or complicated names. A clear name keeps your menus organized.
Adding Menu Items
Next, add items to your menu. WordPress lets you add pages, posts, categories, or custom links. Check the boxes next to the items you want. Then click “Add to Menu.” You can drag and drop items to change the order. Arrange them to match your website’s structure.
Organizing Menu Structure
Organizing your menu structure helps visitors find pages easily. A clear menu makes your site user-friendly and neat. WordPress offers simple tools to arrange your menu items.
Reordering Items
Drag and drop menu items to change their order. Place the most important links at the top. This guides visitors to key pages quickly. You can reorder items anytime without hassle.
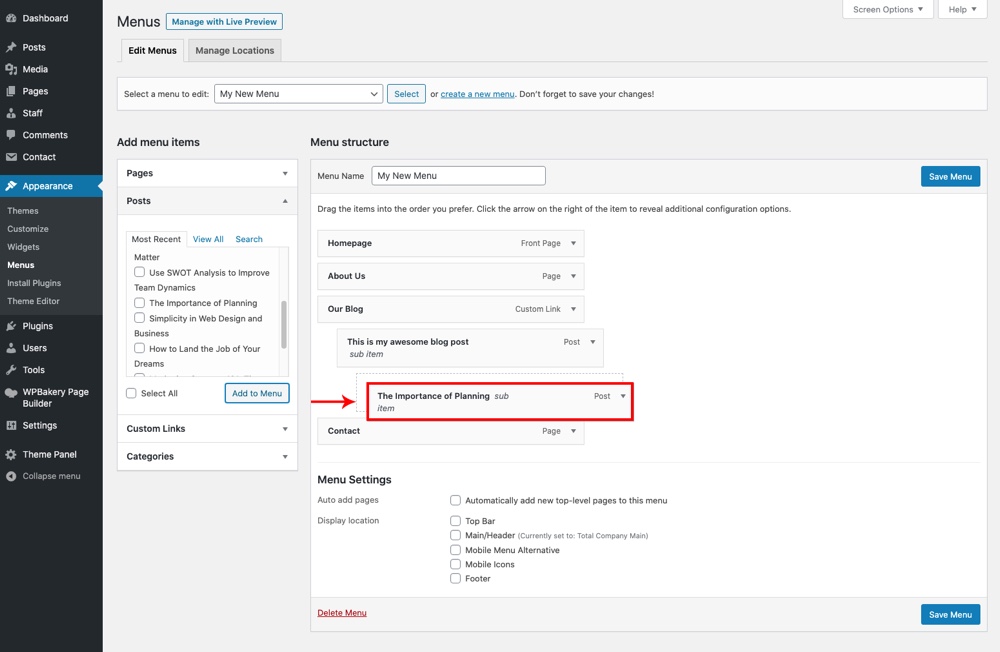
Creating Submenus
Submenus group related pages under one main item. Drag a menu item slightly to the right under another. This creates a dropdown menu for better organization. Submenus keep your menu clean and easy to scan.
Assigning Menu Locations
Assigning menu locations is a key step in setting up your WordPress menu. This step decides where your menu will appear on your website. Menus can show up in different spots like the header, footer, or sidebar. Choosing the right location makes your site easier to navigate.
Selecting Display Areas
WordPress lets you pick where your menu will display. You can assign a menu to the main navigation area or other theme spots. Usually, themes support several menu locations. Check your theme’s options to see available areas. Assign menus to places that fit your site’s style and purpose.
Using Theme Menu Positions
The theme controls menu positions on your site. Some themes offer many menu slots; others have just one or two. Look at your theme settings to find these positions. Assign menus by selecting the desired position from the menu settings page. This step links your menu to the chosen spot on your website.
Credit: www.youtube.com
Customizing Menu Appearance
Customizing your WordPress menu appearance helps match your website style. It makes navigation clear and attractive. A well-designed menu improves user experience and keeps visitors engaged.
WordPress offers easy ways to change menu look. You can use built-in tools or add custom styles. These methods work without complex coding skills.
Using Theme Customizer
The Theme Customizer lets you change menu colors, fonts, and layout. Access it from the WordPress dashboard under Appearance > Customize. Select the Menu or Header section to start.
Adjust colors to fit your brand. Change font size for better readability. Some themes allow menu spacing and alignment changes. Preview changes live before saving. This tool is simple and fast.
Adding Css For Styling
Adding CSS gives more control over menu design. Use this for unique fonts, hover effects, or background changes. Find the Custom CSS area in the Customizer or use a child theme.
Write CSS rules targeting menu classes or IDs. For example, change link colors or add borders. Keep code small and clear for easy updates. Test on different devices to ensure it looks good everywhere.
Making Menus Mobile Friendly
Making menus mobile friendly is essential for a good user experience. Mobile users need menus that are easy to find and simple to use. A cluttered or hard-to-navigate menu can drive visitors away. Designing menus that fit small screens helps keep visitors engaged. It also improves site performance and search rankings.
Responsive Design Tips
Use a responsive theme that adjusts menus automatically. Choose menu styles that collapse into a hamburger icon on small screens. Keep menu items short and clear. Limit the number of menu items to avoid overcrowding. Use large, tappable buttons for easy clicking. Avoid dropdown menus that require hover actions. Use spacing to separate links and prevent wrong taps.
Testing On Different Devices
Check your menu on various mobile devices. Test on smartphones of different sizes and tablets. Use browser tools to simulate mobile views. Look for any cut-off text or overlapping elements. Ensure the menu opens and closes smoothly. Verify that all links work well on touchscreens. Fix any issues found before going live.
Using Plugins For Advanced Menus
Plugins offer powerful tools to create advanced menus in WordPress. They help add features that basic menus do not provide. With plugins, menus can become more interactive and user-friendly. These tools also save time and effort while designing navigation.
Many plugins allow drag-and-drop menu building. Others support mega menus or mobile-friendly designs. Choosing the right plugin depends on the website’s needs and style.
Popular Menu Plugins
Several plugins stand out for creating advanced menus. “Max Mega Menu” lets you build large, multi-column menus. “WP Mega Menu” offers icons and custom layouts. “UberMenu” is known for its flexibility and ease of use. These plugins are easy to install and configure. They fit most WordPress themes smoothly.
Enhancing Navigation Features
Plugins add many useful navigation features. Sticky menus keep navigation visible while scrolling. Responsive menus adapt to different screen sizes. Some plugins support icons and images in menu items. Others include animation effects for better user experience. These features make websites easier to explore and more attractive.
Troubleshooting Common Menu Issues
Creating menus on WordPress can sometimes bring small problems. These issues can stop your menu from showing or cause broken links. Fixing these problems quickly keeps your site user-friendly and professional. This section helps you solve common menu troubles with easy steps.
Menu Not Showing
Menus may not appear due to theme settings or wrong locations. Check if you assigned the menu to the correct display area. Sometimes, the menu is created but not set to show on the site.
Clear your website cache and browser cache. Cached pages can stop new menus from showing. Also, deactivate plugins one by one to find conflicts. Some plugins can block menus from displaying properly.
Broken Links And Errors
Broken links confuse visitors and hurt SEO. Check every menu link to ensure it leads to the right page. Edit or remove links that show errors or dead pages.
Use the WordPress editor to update URLs quickly. Avoid copying links from unreliable sources. Test your menu on different devices to spot any errors early. Fixing broken links improves your site’s trust and usability.
Frequently Asked Questions
How Do I Create A Menu In WordPress?
To create a menu, go to Appearance > Menus in your dashboard. Click “Create New Menu,” name it, then add pages or links. Finally, save your menu and assign it to a location like header or footer.
Can I Customize My WordPress Menu Items?
Yes, you can customize menu items by editing their labels, adding custom links, or rearranging their order. Use drag-and-drop to reorder items and add submenus for better navigation.
How Do I Assign A Menu To My WordPress Site?
After creating a menu, assign it by selecting a display location under “Menu Settings. ” Locations vary by theme, commonly header, footer, or sidebar.
What Types Of Menu Items Can I Add In WordPress?
You can add pages, posts, custom links, categories, and tags to your WordPress menu. This flexibility helps create a user-friendly navigation structure.
Conclusion
Creating a menu on WordPress is simple and quick. You can organize your site’s pages with just a few clicks. Menus help visitors find information easily. Remember to keep your menu clear and easy to use. Update it often to match your site’s needs.
This way, your website looks neat and works well. Start building your menu today and improve your site’s navigation. It makes your website friendlier for all users.


