Are you looking to expand your online presence or organize your website content more effectively? Creating a subdomain can be a game-changer.
With Namecheap, the process is straightforward, and you’ll be able to tailor your web experience like never before. Imagine having a dedicated space for your blog, shop, or portfolio, all under your main domain. This guide will walk you through every step, ensuring you can set up your subdomain quickly and easily.
Discover how you can unlock new possibilities for your website today—keep reading to empower your digital space!

Credit: hostadvice.com
Accessing Namecheap Dashboard
Accessing the Namecheap Dashboard is your first step to creating a subdomain. This dashboard lets you manage your domain settings effortlessly. With easy navigation, it provides tools to customize your domain experience.
Accessing Your Account
Start by visiting the Namecheap website. Click on the “Sign In” button at the top right corner. Enter your login credentials to access your account. Once logged in, you will see the dashboard.
Finding Your Domain List
After logging in, locate the “Domain List” tab. This tab usually appears on the left side of the dashboard. Click on it to view all your registered domains.
Selecting The Desired Domain
From your domain list, choose the domain for the subdomain. Click on the “Manage” button next to your selected domain. This action takes you to the domain management page.
Navigating To Advanced Dns Settings
On the domain management page, find the “Advanced DNS” tab. This tab helps you manage DNS settings. Click on it to proceed with subdomain creation.
Understanding Dns Options
The Advanced DNS section provides various options. Here, you will find settings related to DNS records. Familiarize yourself with these settings for a smoother process.
Navigating To Domain List
Creating a subdomain in Namecheap is a straightforward process. Navigating to the Domain List is the first step. This section guides you through accessing your domain list on Namecheap. Follow these easy steps to get started.
Accessing Your Namecheap Account
First, log into your Namecheap account. Use your username and password. Ensure your credentials are correct to avoid login issues.
Locating The Dashboard
Once logged in, you’ll see the dashboard. The dashboard is your main control panel. Look for the ‘Domain List’ option on the dashboard.
Finding The Domain List
In the dashboard, find the ‘Domain List’ tab. It’s usually on the left side. Click on it to view all your domains.
Selecting Your Domain
In the domain list, find the domain for your subdomain. Click on the domain name. This will open the domain settings.
Exploring Domain Options
After selecting your domain, explore the options available. Look for settings related to subdomains. These settings will help you create a new subdomain.
Configuring Subdomain Settings
Configuring subdomain settings in Namecheap is a straightforward process. It allows you to personalize your online presence. Once you’ve created a subdomain, setting it up is the next vital step. Proper configuration ensures your subdomain functions smoothly. This process involves several key steps. Each step is crucial for optimal performance.
Step-by-step Guide To Access Subdomain Settings
Log into your Namecheap account. Navigate to the “Dashboard” section. Find your domain list. Click on “Manage” next to your chosen domain. Look for the “Advanced DNS” tab. This is where subdomain settings reside.
Understanding Dns Records For Subdomains
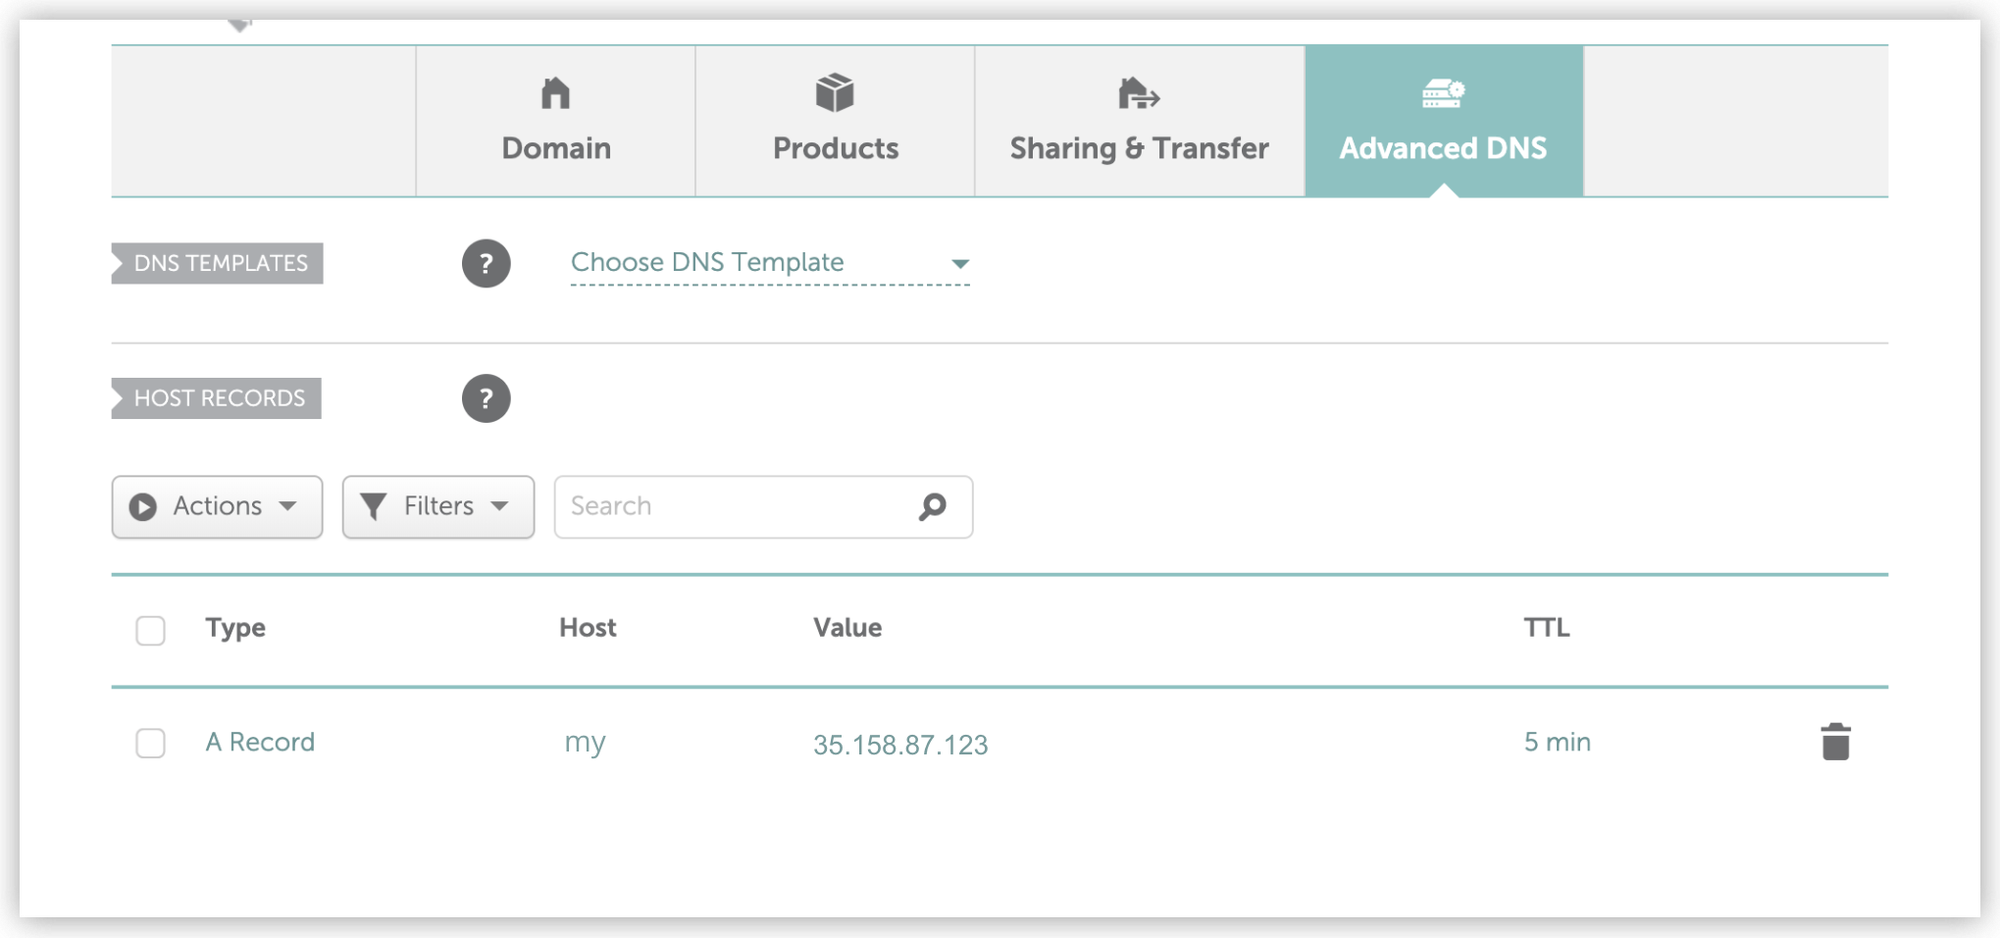
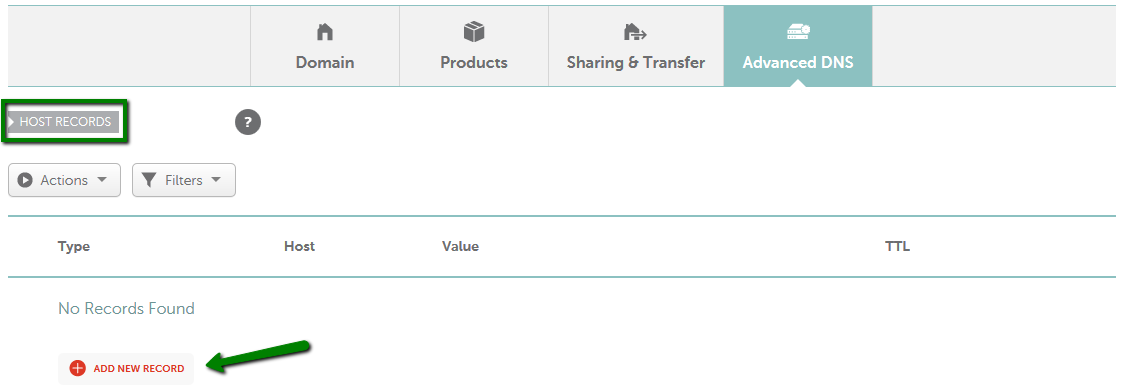
DNS records are essential for subdomain functionality. They direct traffic to your subdomain. In the DNS settings, find the “Host Records” section. Here, you can add new records. Use the “Add New Record” button. This is crucial for subdomain setup.
Setting Up A Records For Subdomains
Click “Add New Record” and choose “A Record.” Enter your subdomain name. Input the IP address you want it to point to. Save changes to activate your A Record. This connects your subdomain to your website’s server.
Configuring Cname Records For Subdomains
CNAME records link subdomains to main domains. Select “Add New Record” and choose “CNAME Record.” Enter your subdomain and main domain names. This ensures the subdomain points correctly. Save your changes to finalize the setup.
Verifying Subdomain Configuration
After setting DNS records, verify them. Open your web browser. Enter your subdomain URL. Check if it redirects correctly. A successful redirect means proper configuration.
Credit: docs.softr.io
Credit: www.namecheap.com
Frequently Asked Questions
How Do I Create A Subdomain In Namecheap?
Log into your Namecheap account. Go to the “Domain List” section. Click “Manage” next to your domain. Select “Advanced DNS” tab. Scroll to “Host Records” and click “Add New Record. ” Choose “A Record” or “CNAME Record,” enter subdomain name and IP address, then save changes.
How Do I Create My Own Subdomain?
Log into your hosting account’s control panel. Navigate to the “Domains” section and select “Subdomains. ” Enter your desired subdomain name and choose the primary domain. Click “Create” to finalize.
Why Are Subdomains Bad For Seo?
Subdomains can dilute SEO efforts by splitting domain authority and making it harder for search engines to index content efficiently. They also may lead to increased competition between the main domain and subdomains, potentially impacting overall search rankings negatively.
Is Creating Subdomains Free?
Creating subdomains is usually free with most hosting providers. They often include it in your hosting plan. Always check your provider’s terms for specific details. Subdomains help organize website content effectively. Use them strategically to enhance your site’s navigation and SEO.
Conclusion
Creating a subdomain in Namecheap is simple and straightforward. Follow the steps to set it up quickly. Subdomains help organize your website content better. They make navigation easier for users. Think of subdomains as a separate room in your digital house.
With Namecheap, the process is user-friendly and efficient. You now have the tools to enhance your website’s structure. Remember, a well-organized site can improve user experience. Start creating subdomains today. Enjoy the benefits of a more organized online presence. Your website visitors will appreciate the clarity and ease.