
Are you looking to customize your WordPress site without losing your changes with every update? Creating a parent theme might just be the solution you need.
Imagine having the power to mold your website exactly how you envision while keeping its core intact. In this blog post, you’ll discover the step-by-step process of developing a parent theme in WordPress. This will not only safeguard your customizations but also give you the creative freedom to tailor your site to perfection.
Stay with us, and by the end of this guide, you’ll have the know-how to enhance your site’s functionality and design like a pro. Let’s dive into the world of WordPress and unlock the potential of your website!
Credit: learn.wordpress.org
Understanding Parent Themes
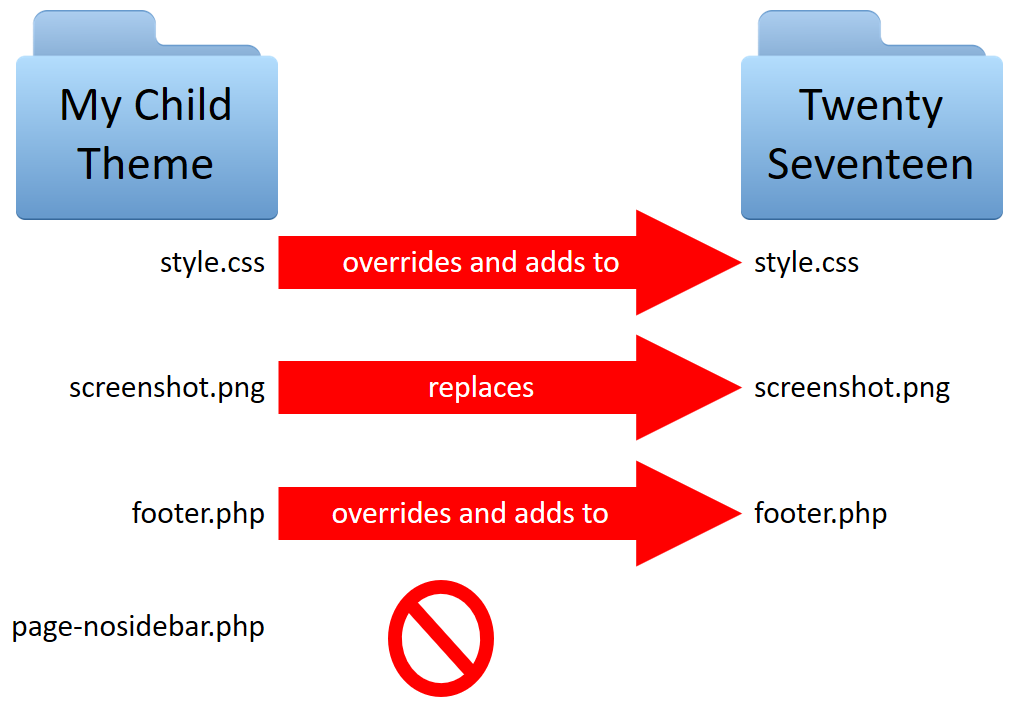
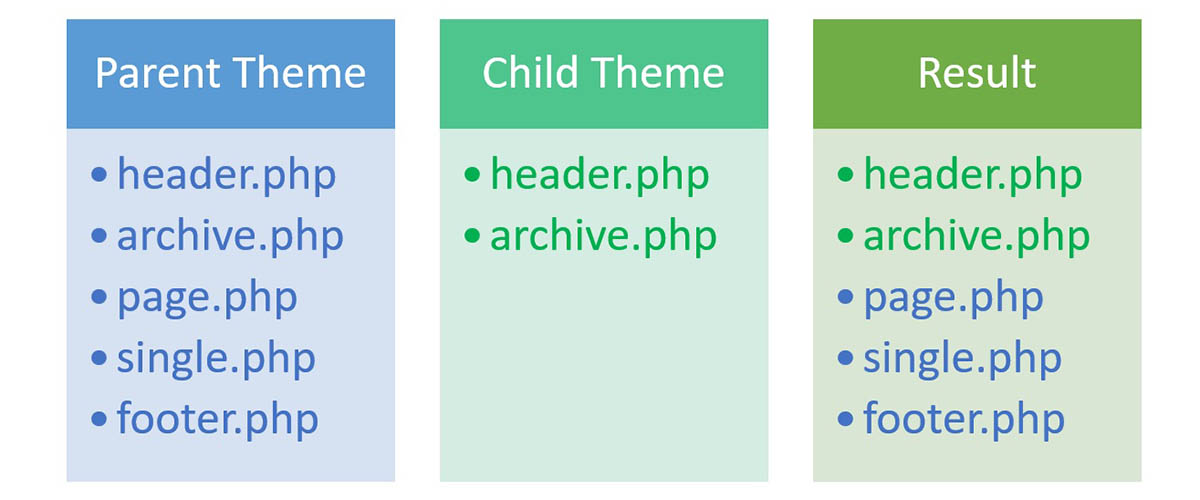
A parent theme is a base for other themes. It holds the main files and functions. Child themes use these files to make changes. The purpose is to keep code organized. It helps in making updates easier. Developers use parent themes to save time. They don’t start from scratch every time. Instead, they build on the existing code. This makes development efficient and consistent.
Parent themes offer many advantages. They help in maintaining your site. Updates become simpler and safer. There is no risk of losing customizations. They also allow more flexibility in design. You can change child themes without altering the main code. This ensures your site stays up-to-date. Developers can also share and use them easily. It’s a great way to learn from others’ work.
Credit: thimpress.com
Choosing The Right Theme
Crafting a parent theme in WordPress offers flexibility and control over design. Start with a solid framework to ensure your site is adaptable. Choose elements that enhance user experience and site functionality.
Factors To Consider
Picking a parent theme is important. Compatibility matters. It should work well with plugins. Updates are crucial. A theme must receive regular updates. Support is essential. Check if there is help available. Speed affects user experience. A fast theme is better. Design can make or break a site. Choose something visually pleasing.
Popular Parent Themes
| Theme Name | Features |
|---|---|
| Twenty Twenty-One | Clean design, flexible layout |
| GeneratePress | Lightweight, fast performance |
| Neve | Easy customization, mobile ready |
Setting Up Your Development Environment
Start with a good code editor. Options include Visual Studio Code or Sublime Text. Next, install WordPress on your computer. This helps you test changes before going live. Use XAMPP or MAMP to create a local server. These tools are free and easy to use.
You need a web browser for testing. Google Chrome or Firefox are good choices. Also, install Node.js if you plan to use tools like npm. These help manage packages and dependencies.
First, download and install XAMPP or MAMP on your computer. These programs create a local server for you. Open the program and start the server. Next, download the WordPress files from its official site. Extract the files into the server’s htdocs folder.
Open your web browser and type localhost/wordpress in the address bar. Follow the setup instructions to install WordPress locally. Now, you have a local development site. It’s ready for creating and testing your parent theme.
Credit: www.hostitsmart.com
Creating The Theme Folder
Choose a simple name for your theme folder. The name should be unique. Avoid spaces in the folder name. Use hyphens or underscores instead. For example, use my-theme or my_theme. Names should be all lowercase. Avoid special characters. This makes it easy to remember and use.
Create a folder for your theme. Inside, add the following files:
- style.css – This file is for your theme’s styles.
- index.php – This file is your theme’s main template.
- functions.php – This file holds your theme’s functions.
Optional folders include:
- images/ – For images used in the theme.
- js/ – For JavaScript files.
- css/ – For additional CSS files.
Building Essential Files
Start with style.css. This file is vital. It controls your theme’s look. Write CSS rules here. Make your site pretty. Style headings, paragraphs, and lists. Colors, fonts, and sizes belong here.
Next, create functions.php. This file adds features. Use PHP code. Add widgets. Customize menus. Add theme support. This file is powerful. Make your theme unique with functions.
| File | Purpose |
|---|---|
| index.php | Main template file. Displays content. |
| header.php | Top part of your site. Contains logo. |
| footer.php | Bottom part. Shows copyright info. |
| sidebar.php | Shows widgets. Located on the side. |
Customizing The Theme
Custom functions make your theme unique. They add special features. Start by opening the functions.php file. Write your code there. Use simple code to avoid errors. Test your functions after adding them. This ensures they work well.
Custom templates give you more control. They change how your site looks. To create one, copy an existing template file. Rename it to your liking. Make changes to fit your needs. Save it in your theme folder. Select this template when creating a page.
Testing And Debugging
Creating a parent theme in WordPress involves testing and debugging to ensure functionality. Start with a clean code structure. Check for errors by activating the theme and observing its behavior. Adjust code as needed for smooth operation.
Tools For Testing
Testing tools help catch errors early. Firebug is great for checking code. Chrome DevTools allows easy inspection. PHPUnit tests PHP code for bugs. W3C Validator checks HTML correctness. These tools ensure your theme works well.
Common Issues And Fixes
Broken links are a frequent problem. Update or remove them. Slow loading times frustrate users. Optimize images and scripts. CSS issues can break layout. Debug using browser tools. PHP errors may appear on screen. Check error logs to find causes. Missing files lead to broken pages. Ensure all files are uploaded correctly. Regular testing helps keep your theme smooth.
Documenting Your Theme
Good documentation helps others understand your theme. It makes it easier to use. Always include a readme file. This file provides a summary of your theme. Write in simple language. Use short sentences. Explain how to install the theme. Describe each feature. Mention any special requirements. This helps users know what to expect.
Create a clear directory structure. Use folders for CSS, JS, and images. Organize files logically. This makes navigation easy. It also helps in troubleshooting. Add a changelog. It shows updates and fixes. Users can see changes over time. Keep the documentation updated. This is important as themes evolve.
Adding comments in code is crucial. They explain what the code does. This helps others understand it better. Use simple words. Keep comments short. Avoid technical jargon. Place comments above the code they describe. This makes it easier to read. Use comments to note changes or fixes. It helps track the evolution of the theme.
Remember to comment complex code sections. This aids in understanding difficult parts. Consistent commenting style is key. It makes the code look neat. Comments are not just for others. They also help you remember why you wrote certain code. Regularly review comments. Ensure they match with the current code.
Deploying The Parent Theme
First, open your WordPress dashboard. Go to the Themes section. Click on Add New. Then, select Upload Theme. Choose your parent theme file. This file should be in a ZIP format. Once you select it, click Install Now. Wait for the upload to finish. You will see a success message.
Click on the Activate button. Your theme will become live. Visit your site to see changes. Check if all parts work well. Look at the menu, widgets, and posts. Ensure everything displays correctly. If there are issues, return to the dashboard. Look for fixes in the Theme Options. Make adjustments as needed.
Frequently Asked Questions
What Is A Parent Theme In WordPress?
A parent theme in WordPress is a fully functional theme. It serves as a foundation for child themes. Developers use it to ensure a consistent look and feel. Parent themes provide the core design and functionality. They allow customization without altering the original codebase.
Why Use A Parent Theme In WordPress?
Using a parent theme ensures stability and updates. It allows developers to build child themes for customization. This approach maintains the original theme’s integrity. Developers can update the parent theme without losing custom changes. It’s an efficient way to manage WordPress theme development.
How To Select The Right Parent Theme?
Choose a parent theme with good reviews and support. Ensure it aligns with your design needs and functionality. Look for regularly updated themes to ensure compatibility. Test the theme’s performance and responsiveness. A well-documented theme helps in easy customization and troubleshooting.
Can I Customize A Parent Theme Directly?
It’s not recommended to customize a parent theme directly. Direct changes can be overwritten with updates. Instead, create a child theme for customizations. This approach preserves the original theme’s updates. It ensures your customizations remain intact and organized.
Conclusion
Creating a parent theme in WordPress can be simple. Start with a clear plan. Use clean code for better results. Choose reliable resources to guide you. Test your theme thoroughly. Ensure it is user-friendly. Keep your design flexible and adaptable.
A well-crafted parent theme enhances your website. It boosts functionality and appearance. Remember, patience and practice lead to success. Keep learning and improving your skills. Your theme can grow with your needs. Enjoy the process and watch your site evolve.
Happy designing!


