
Creating a new web hosting account in cPanel might seem daunting at first, but it’s simpler than you think. Whether you’re launching your first website or expanding your online presence, cPanel offers a user-friendly interface that makes the process straightforward and efficient.
Imagine having full control over your website’s files, databases, and email accounts—it’s all possible with a few clicks. You’ll learn step-by-step how to set up your web hosting account in cPanel. By the end, you’ll feel empowered to manage your web space like a pro, ensuring your site runs smoothly and securely.
Let’s dive in and get your web hosting up and running!
Credit: www.hostgator.com
Choosing The Right Hosting Provider
Choosing the right plan is very important. Look at your budget first. Check what features you need. Some plans offer more storage. Others have better support. Compare prices and features.
Always read user reviews. They tell you a lot. Find out if the hosting is fast. Slow websites are bad. See if there is a money-back guarantee. This is good to have.
Think about your website’s purpose. Is it for a blog? Or a shop? Different sites need different features. Know how much traffic you expect. More traffic needs more power. Decide on the type of hosting. Shared hosting is cheaper but limited. Consider if you need email accounts too.
List your needs clearly. This helps in picking the right plan. Don’t forget security. Good hosting keeps your site safe. Choose a plan that suits your goals.
Preparing For Account Setup
Collect all necessary details for your new web hosting account. Ensure you have your email address and a strong password. Keep your credit card ready for payment. Write down any special instructions your hosting provider gives. This will help you later.
Choose a domain name for your website. Make sure it is easy to remember and spell. Check if your preferred domain name is available. You can use domain check tools online. Register your domain with a reliable provider. Keep a note of your domain registration details. You will need them for setting up your hosting account.
Accessing Cpanel
First, visit your web host’s website. Find the login page for cPanel. Enter your username and password. Click the Login button. Now, you are inside cPanel. Ensure your details are correct. Passwords are case-sensitive.
The dashboard is full of tools. Look for icons and labels. Each icon has a name. Use these to find what you need. The File Manager is for files. Email Accounts helps manage emails. Explore each section. Try not to change settings you do not understand. Always look for Help if stuck.
Creating A New Account
Choose a unique domain name for your website. This name will be your site’s address online. Check if the name is available. Use a domain checker tool. Once chosen, enter it in the domain field in Cpanel. Ensure you spell it right. Mistakes can cause problems later. Confirm your choice before moving on.
Fill in the account details carefully. Provide your name, email, and password. Choose a strong password. It keeps your account safe. Select the right hosting plan. Some plans offer more space. Others offer more speed. Pick what suits your needs best. Double-check all details. Then, click the submit button to finish.
Managing Dns Settings
Navigating DNS settings is crucial for creating a web hosting account in Cpanel. Start by accessing the DNS editor, where you can add records to point your domain to the server. Understanding DNS settings ensures your website connects properly, enhancing visibility and performance.
Updating Name Servers
Changing name servers links your domain to a host. Go to your domain registrar. Find the DNS settings section. Enter the new name servers there. Save changes. Changes may take up to 48 hours to update. Remember to check back after this time. Make sure the new settings are correct.
Configuring Dns Records
DNS records control how your website works. They include A, CNAME, and MX records. A records point your domain to an IP address. CNAME records link to another domain. MX records manage email delivery. Check each record for accuracy. Errors can cause website issues. Review settings carefully. Save each change you make.
Setting Up Email Accounts
Begin by logging into your Cpanel account. Find the Email Accounts section. Click on it. You will see a button labeled “Create”. Click it to start. Enter the desired email name. Choose a domain if you have many. Set a strong password. Make sure it’s easy to remember. Click “Create” to finish. Your email is ready now!
Go to the Email Forwarders option in Cpanel. Click “Add Forwarder”. Enter the source email. This is where emails will forward from. Then, enter the destination email. This is where emails will go. Click “Add Forwarder” to set it up. Now, your emails will be forwarded as you set.
Installing Applications
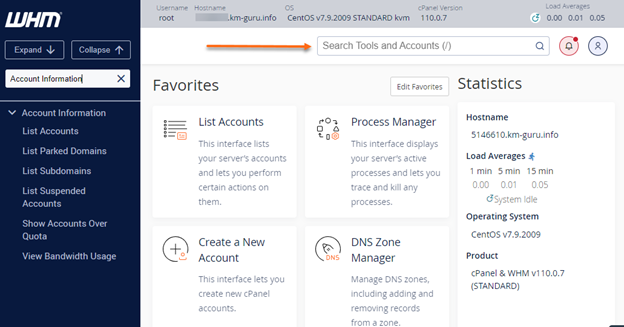
Creating a new web hosting account in cPanel is simple. Navigate to the hosting dashboard, select ‘Create New Account’, and enter your domain details. This straightforward process ensures your site is up and running quickly.
Using Auto Installers
Auto installers make adding apps easy. Cpanel has several choices. They help you set up new apps quickly. No need for coding skills. Follow simple steps to use them. Pick the app you want. Click to start the installation. Wait for it to finish. Check if everything works. Auto installers save time. They avoid mistakes. Great for beginners. Useful for experts too. Enjoy a smooth experience.
Setting Up WordPress
WordPress is popular for websites. Installing WordPress in Cpanel is easy. Use the auto installer for WordPress. Find the WordPress option. Click to begin setup. Enter your site name. Choose a username and password. Wait for installation to finish. You can now start using WordPress. Customize your site as you like. Add themes and plugins. Make it personal. WordPress is great for blogs and sites.
Enhancing Security
Creating a new web hosting account in Cpanel boosts security by setting strong passwords and enabling two-factor authentication. Regularly updating passwords and using SSL certificates further enhance protection against threats.
Enabling Ssl Certificates
SSL certificates keep websites safe. They encrypt data. This means that hackers cannot read it. It’s important to enable SSL on websites. It protects users’ information. It also builds trust with visitors. Most web hosts offer free SSL certificates. Install them through Cpanel. It’s a simple process. Look for the SSL/TLS option. Choose the right domain. Follow the instructions. Your site will be secure.
Implementing Security Best Practices
Strong passwords are key. Use a mix of letters, numbers, and symbols. Change them often. This helps keep hackers away. Two-factor authentication adds extra security. It requires a code sent to your phone. Always update software. This fixes security holes. Back up data regularly. Store backups safely. Protect your website from threats. Follow these steps. Keep your web hosting account safe.
Troubleshooting Common Issues
Having trouble with login? First, double-check your username and password. They must be correct. Check the Caps Lock key. It can cause errors. Still can’t login? Try resetting your password. Use the “Forgot Password” link. Follow the steps carefully. You will get an email. Use it to reset your password. If issues persist, contact support. They will help you.
DNS conflicts can cause big issues. Check your DNS settings first. Make sure they are correct. Use tools like WHOIS for checking. Ensure your domain points to the right server. Update DNS records if needed. Sometimes DNS changes take time. Be patient. Wait for propagation. This may take up to 48 hours. If problems continue, get help from hosting support. They can guide you.

Credit: www.interserver.net
Credit: www.godaddy.com
Frequently Asked Questions
How To Create A New Account In Cpanel?
Log into your cPanel dashboard. Navigate to “Account Functions. ” Click “Create a New Account. ” Fill in required details like domain name, username, and password. Select package and settings. Click “Create” to finalize. Your new account is ready.
How To Create A Web Hosting Account?
Choose a reliable web hosting provider. Register on their website. Select a hosting plan. Enter domain details. Complete payment.
Can We Host Multiple Websites On One Cpanel?
Yes, you can host multiple websites on one cPanel. Use the “Addon Domains” feature for this purpose. Ensure your hosting plan supports multiple domains. This is a cost-effective way to manage several sites from a single account.
How To Create Another User For Cpanel?
Log into cPanel. Go to “User Manager” under “Preferences. ” Click “Add User. ” Fill in the required details. Set permissions and click “Create. “
Conclusion
Setting up a web hosting account in Cpanel is straightforward. Follow simple steps. Choose a hosting plan that suits your needs. Use Cpanel to manage your website easily. Navigate through its user-friendly interface. Remember to secure your website with strong passwords.
Regularly update your site for better performance. Explore Cpanel’s features to enhance your site’s functionality. Enjoy managing your site with ease and efficiency. With practice, you’ll become more comfortable. Start today and watch your website grow.


