
Are you looking to fine-tune your website’s DNS settings but not sure where to start? Creating a CNAME record in Namecheap might seem daunting, but it’s actually a straightforward process.
This simple yet powerful tool can significantly enhance your website management, allowing you to alias one domain name to another. Imagine seamlessly redirecting traffic or efficiently managing subdomains without breaking a sweat. Whether you’re a seasoned webmaster or just starting out, mastering this skill can elevate your online presence.
Stick with us, and you’ll discover how to create a CNAME record in Namecheap effortlessly, unlocking the potential to streamline your site’s functionality and improve its performance. Ready to boost your website’s capabilities? Let’s dive in and get started!
What Is A Cname Record
Understanding CNAME records is crucial for website management. In Namecheap, creating one involves accessing the DNS settings, selecting your domain, and entering the desired alias and target domain. This process helps redirect traffic effectively while maintaining your site’s integrity.
Creating a CNAME record in Namecheap can be a straightforward task, but understanding what a CNAME record is will make the process much easier. A CNAME record, or Canonical Name record, is used in the Domain Name System (DNS) to map an alias name to a true or canonical domain name. It’s like setting up a nickname for your website, allowing you to use different domain names for the same website without having to set up multiple servers. This is particularly useful when you want to point multiple domain names to a single website or need to set up subdomains for your main domain. But why would you need to do this? Imagine you have an online store that offers both products and services. You could create subdomains like products.yourstore.com and services.yourstore.com, both pointing to the main website. ###Understanding Cname Records
A CNAME record is essentially a type of DNS record that links one domain name to another. It allows you to redirect traffic from one domain to another without affecting the main DNS settings. Think of it as a way to manage different entry points to your website. This can be invaluable if you’re running marketing campaigns or have multiple regional versions of your website. ### CNAME records simplify the process of managing your domain’s DNS settings. You don’t need to update multiple records if your server’s IP address changes. This means less hassle and fewer chances for errors. It also enhances flexibility, allowing you to quickly set up new services or change hosting providers without major disruptions. ###Common Uses For Cname Records
One of the most common uses for CNAME records is to point a subdomain to a service provider’s server. This is often seen in email services or content delivery networks. You might also use CNAME records to create easy-to-remember URLs for marketing campaigns. For instance, using promo.yourstore.com instead of a long, complicated URL. ###Personal Experience With Cname Records
I remember the first time I set up a CNAME record. I was trying to connect my blog to a new domain. It felt overwhelming at first, but understanding the purpose of CNAME records made it much clearer. Once I realized it was like giving my blog a new address without moving the actual content, it was easier to manage. Have you ever had to make your digital life simpler? CNAME records might just be the tool you need. ###Conclusion: Your Next Steps
Now that you know what a CNAME record is, consider how it might simplify your web presence. Are there subdomains you could create to enhance user experience? Take a moment to assess your current domain setup. You might find opportunities to streamline and improve your online strategy by using CNAME records effectively.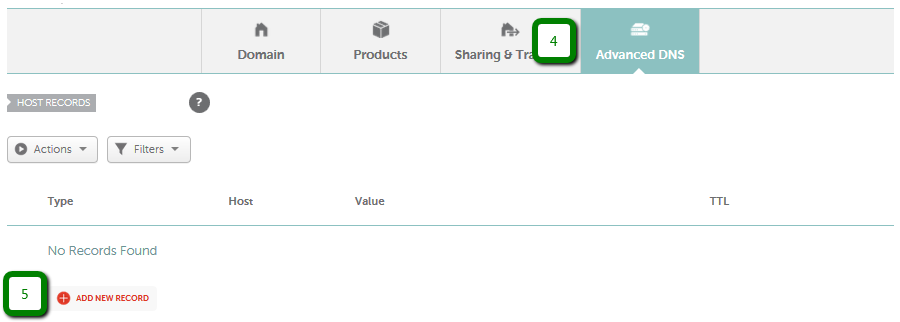
Credit: www.namecheap.com
Benefits Of Using Cname Records
Creating a CNAME record in Namecheap enhances domain management. It redirects subdomains to other URLs, simplifying web navigation. This technique helps in maintaining a consistent domain structure across different services.
Creating a CNAME record in Namecheap can be a straightforward process, but understanding why you should do it is crucial. CNAME records offer various benefits, especially if you’re managing multiple domains or subdomains. They simplify domain management, making it easier for you to redirect traffic and manage your online presence effectively. Let’s dive into the benefits of using CNAME records and how they can streamline your web management tasks.Understanding Cname Records
A CNAME record, short for Canonical Name, allows you to map an alias domain to a true domain. This means you can direct traffic from a secondary domain to your main domain seamlessly. Instead of juggling multiple IP addresses or URLs, a CNAME record lets you point everything to one primary location.Ease Of Domain Management
Imagine you’re running a website with several subdomains—blog.yourwebsite.com, shop.yourwebsite.com, etc. With CNAME records, you don’t have to manually update each subdomain’s DNS settings. You just update the main domain, and every subdomain follows suit. This not only saves time but also reduces the risk of errors.Flexibility In Hosting Options
CNAME records provide flexibility, allowing you to switch hosting providers without having to change your domain’s DNS settings. If you decide to move your website to a different server, you simply update the main domain’s address. This ensures a smooth transition with minimal downtime.Personal Experience: Streamlining Subdomain Management
I once managed a website with several subdomains and faced constant issues with IP changes. Implementing CNAME records changed everything. Suddenly, redirecting traffic and updating settings became a breeze. It felt like a weight lifted off my shoulders, knowing I had one less technical hurdle to overcome.Improved Seo Practices
Did you know that using CNAME records can indirectly boost your SEO? By pointing multiple domains to a single canonical domain, you help search engines understand which URL is your main site. This can prevent duplicate content issues and improve your site’s credibility in search results.Enhanced User Experience
Think about your visitors. When they land on your site, they expect a smooth experience. CNAME records help ensure that all subdomains are correctly routed, reducing the chances of broken links or inaccessible pages. A streamlined user experience keeps visitors happy and more likely to return. Are you ready to simplify your domain management? Consider integrating CNAME records into your Namecheap setup for a more efficient web presence. How might your website benefit from this approach?Accessing Your Namecheap Account
Creating a CNAME record in Namecheap is straightforward. Log into your account, navigate to the “Domain List,” and select “Manage” next to your domain. Under the “Advanced DNS” tab, you can easily add a new CNAME record by filling in the required fields and saving your changes.
Accessing your Namecheap account is the first step in creating a CNAME record. It’s like opening the door to a world of possibilities for your domain management. Whether you’re setting up a new website or tweaking your existing domain settings, knowing how to navigate your Namecheap account is crucial. Let’s dive into the step-by-step process that will help you access your account with ease and confidence. ###1. Logging Into Your Namecheap Account
Start by visiting the Namecheap homepage. Look for the “Sign In” button located at the top right corner of the page. Click on it, and you’ll be prompted to enter your credentials. Use your registered email and password. If you’ve forgotten your password, don’t worry. Namecheap provides a straightforward password recovery option. ###2. Navigating To The Dashboard
Once logged in, you’ll find yourself on the Namecheap dashboard. This is your control center, where you can manage all aspects of your domain portfolio. Take a moment to familiarize yourself with the layout. Notice the menu options on the left side that offer quick access to various features. ###3. Locating Your Domain List
On the dashboard, look for the “Domain List” tab. Click on it to view all the domains you own. This list is your gateway to managing individual domain settings. Scroll through the list to find the domain for which you want to create a CNAME record. ###4. Selecting The Right Domain
Once you’ve identified your domain, click on the “Manage” button next to it. This will lead you to the Domain Management page. Here, you can adjust various settings, but for now, focus on the DNS settings. Are you feeling more comfortable navigating through your account? ###5. Accessing Advanced Dns Settings
In the Domain Management page, locate the “Advanced DNS” tab. Click on it to access the DNS settings for your domain. This section allows you to add, edit, and manage DNS records, including the CNAME record. Make sure you are in the right place before proceeding. By understanding each of these steps, you are well on your way to efficiently managing your Namecheap account. Each click brings you closer to customizing your domain settings just the way you want them. Do you feel empowered to take control of your domain management journey?Navigating To The Domain List
Accessing the domain list in Namecheap is the first step to create a CNAME record. Locate your domain, then click ‘Manage’ to proceed with the setup.
Creating a CNAME record in Namecheap can initially seem daunting, especially if you’re not familiar with domain management. However, the process is quite straightforward once you know where to start. The first step is navigating to the Domain List within your Namecheap account, which serves as the gateway to managing your domain settings. This section will guide you through accessing the Domain List, ensuring you have the foundation to add your CNAME record with confidence. Start by logging into your Namecheap account. You probably have your login details handy, but if not, take a moment to retrieve them. Once logged in, you’ll be greeted by the dashboard, a space where all your domains are listed.Finding The Domain List
On the dashboard, look for the ‘Domain List’ tab. It’s usually located in the left-hand menu. Clicking on it will take you to a page displaying all the domains you currently own. A personal tip: I once spent several minutes searching through the dashboard, overlooking the ‘Domain List’ tab. It’s a reminder to check the menu thoroughly before assuming something is missing.Selecting The Correct Domain
In the Domain List, identify the domain for which you need to create a CNAME record. Click on that domain name to access its settings. Consider this: Are you managing multiple domains? Pay attention to the domain name you select, ensuring it’s the correct one for your CNAME record. Once you’ve selected your domain, locate the ‘Advanced DNS’ tab. This is where you’ll find all the DNS settings, including CNAME records. Navigating here is crucial for proceeding with your task. Reflect for a moment: What purpose does your CNAME record serve? Knowing this can help you stay focused and ensure accuracy in your DNS configurations. By understanding how to navigate to the Domain List, you’ve completed a significant step in managing your domain. This knowledge empowers you to make further changes with confidence, allowing you to adapt your domain settings as needed.Selecting The Domain
Creating a CNAME record in Namecheap involves selecting the correct domain. This step is crucial for ensuring your DNS settings are applied to the right domain. Choose a domain you own or manage within your Namecheap account. Make sure the domain is active and not expired. Selecting the domain correctly can prevent many common DNS issues.
Selecting The Domain In Your Namecheap Account
Log into your Namecheap account. Navigate to the dashboard. Find the Domain List section. This area contains all domains registered under your account. Make sure the domain you want is listed here.
Identifying The Correct Domain
Look for the domain you need to modify. Confirm its name to avoid errors. Double-check your selection. Ensure it matches the intended domain for your CNAME record.
Checking Domain Status
Verify the domain is active. Expired domains cannot be modified. Check the domain’s renewal status. Active domains are ready for DNS changes.
Accessing Domain Management
Click on the Manage button next to your domain. This opens the domain management page. Here, you can adjust DNS settings and create records.

Credit: www.youtube.com
Accessing Advanced Dns Settings
Accessing the Advanced DNS settings in Namecheap is a crucial step. This allows you to manage your domain’s DNS records with precision. Navigating these settings might seem complex at first. But it’s easier once you know where to go. Below, we will guide you through accessing these settings with ease.
How To Log Into Your Namecheap Account
First, visit the Namecheap website. Enter your username and password to log in. Once logged in, find the dashboard. It shows all your purchased domains.
Locating Your Domain List
On your dashboard, click on the ‘Domain List’ tab. This displays all your domains. Choose the domain you want to edit. Click on the ‘Manage’ button beside it.
Accessing The Advanced Dns Tab
Once on the domain management page, look for the ‘Advanced DNS’ tab. It’s usually next to the ‘Domain’ and ‘Sharing & Transfer’ tabs. Click on ‘Advanced DNS’. This opens up the DNS settings for your domain.
Understanding The Advanced Dns Interface
The Advanced DNS interface shows various DNS records. Each record type has a specific purpose. You’ll find options for A records, CNAME, MX, and more. To create or modify records, use the respective fields provided.
Ensuring Changes Are Saved
After making changes, scroll down and click the ‘Save’ button. This ensures all your changes are applied. Without saving, changes won’t take effect. Always double-check for errors before saving.
Adding A New Cname Record
Creating a CNAME record in Namecheap is straightforward. Access your domain’s settings, navigate to the DNS section, and add the CNAME record by specifying the host and target. This process helps in redirecting your domain to another URL efficiently.
Adding a CNAME record in Namecheap is a straightforward process that can streamline your web management tasks. Whether you’re pointing a subdomain to an external site or creating an alias for your domain, understanding how to add a CNAME record is essential. Let’s dive into the steps to ensure you can efficiently navigate this task. ###Choosing The Host
First, consider what host you want your CNAME record to represent. This is typically the subdomain you’re redirecting. Imagine you’re setting up blog.yourdomain.com to point to your hosted blog. Enter “blog” as your host. Have a clear idea of your site’s structure. This helps avoid confusion when choosing a host name. Are you linking to a service or another site? Choose a host that accurately reflects its function. ###Entering The Target Domain
Next, input the target domain you want your CNAME record to point to. This is the destination URL, such as yourbloghost.com. Accuracy is crucial here. A simple typo can lead to downtime or misdirection. Double-check the target domain before saving. ###Configuring Ttl Settings
Lastly, configure the TTL (Time To Live) settings for your CNAME record. This determines how long the record stays cached before refreshing. For most users, the default TTL setting suffices. However, if changes are frequent, a shorter TTL may be beneficial. Consider your site’s update frequency and adjust accordingly. Adding a CNAME record might seem technical, but it’s all about precision and clarity. Have you ever encountered a CNAME record setup that didn’t work as expected? It often boils down to small mistakes in these settings. A careful approach ensures your site functions seamlessly, enhancing user experience.Verifying The Cname Record
Once you’ve created a CNAME record in Namecheap, the next step is verification. This ensures that your changes are effective and your domain points correctly. Verifying a CNAME record is crucial for maintaining website functionality and avoiding potential errors. Follow these steps to confirm your CNAME record is correctly set.
Check Dns Settings
First, log into your Namecheap account. Navigate to the domain list. Click on the domain you modified. Access the DNS settings section. Review your CNAME record details carefully. Confirm the host and target match your requirements.
Utilize Online Tools
Use online DNS lookup tools to check your CNAME record. Websites like MXToolbox offer free services. Enter your domain name and select CNAME lookup. These tools provide detailed results. See if your CNAME points correctly.
Browser Testing
Open a web browser and type your domain name. Ensure your website loads as expected. If it redirects properly, your CNAME is verified. If errors occur, revisit your DNS settings.
Wait For Propagation
DNS changes may take time. Wait 24 to 48 hours for full propagation. Recheck your settings if issues persist. Patience is key during this process.
Common Issues And Troubleshooting
Creating a CNAME record in Namecheap can be straightforward. Yet, users often face issues. Understanding these common problems can save time and frustration. Below, we delve into some usual hurdles and how to address them.
Propagation Time
After setting up a CNAME record, it might not work immediately. This delay is known as propagation time. It can take up to 48 hours for changes to spread across the internet. Patience is key during this period. Avoid making additional changes that could further delay the process.
Incorrect Domain Entry
A common mistake is entering the wrong domain name. Double-check the spelling of the domain and subdomain. Ensure there are no extra spaces or characters. This can prevent the CNAME record from functioning correctly. Correcting this error can often resolve connectivity issues.
Ttl Configuration Problems
TTL, or Time to Live, settings can affect how quickly changes take effect. A very high TTL value means slower updates. Adjust the TTL to a lower setting for quicker propagation. This helps in testing changes more efficiently. Remember to reset it to a standard value once testing is complete.
Credit: documentation.unbounce.com
Additional Tips For Managing Dns Records
Managing DNS records effectively is crucial for website performance. It ensures your site runs smoothly. Mismanagement can lead to downtime. Here are some tips for managing DNS records. They will help you maintain a stable online presence.
Regularly Update Dns Records
Check your DNS records often. Make sure all entries are current. Outdated records can cause issues. They may lead to site unavailability. Schedule regular reviews to keep everything updated.
Back Up Your Dns Settings
Always have a backup of your DNS settings. Save them before making changes. This helps prevent data loss. If something goes wrong, you can restore the original settings. It saves time and reduces stress.
Use Descriptive Labels
Label your DNS entries clearly. Use meaningful names. Descriptive labels make management easier. They help you identify records quickly. This is useful in troubleshooting or making updates.
Limit Dns Record Changes
Minimize changes to your DNS records. Frequent changes can cause instability. Plan updates carefully. Only make necessary modifications. This keeps your site reliable and secure.
Monitor Dns Propagation
Keep an eye on DNS propagation. It may take time to spread changes globally. Use online tools to check propagation status. This ensures changes are applied everywhere.
Secure Your Dns Records
Protect your DNS records from unauthorized access. Use strong passwords. Enable two-factor authentication if available. This ensures your DNS settings are safe and secure.
Frequently Asked Questions
How Do I Add A Cname To A Namecheap Domain?
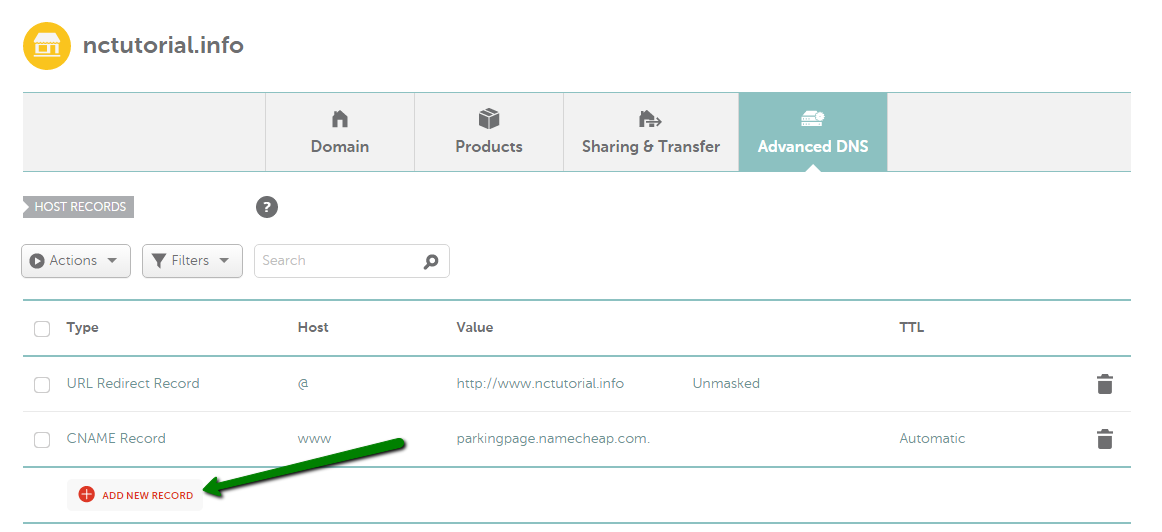
Log in to your Namecheap account. Navigate to “Domain List” and click “Manage” next to your domain. Go to the “Advanced DNS” tab. Click “Add New Record,” select “CNAME Record,” and enter your desired settings. Save changes to complete the CNAME addition.
How Do I Create A Cname Record?
Log into your DNS management platform. Find the DNS settings. Select “Add Record” and choose CNAME. Enter the desired alias and target domain. Save the changes.
How To Create A New Dns Record On Namecheap?
Log into Namecheap, go to “Domain List”, select your domain, and click “Advanced DNS”. Click “Add New Record”, choose the record type, and enter the details. Save changes to create the DNS record.
What Is An Example Of A Cname Dns Record?
A CNAME DNS record example is: “www. example. com CNAME example. com. ” It directs “www” traffic to the main domain.
Conclusion
Creating a CNAME record in Namecheap is straightforward. Follow the steps carefully. First, log into your Namecheap account. Next, navigate to the “Domain List. ” Then, select “Manage” for your domain. Access the “Advanced DNS” tab. Add a new CNAME record there.
Enter the host name and target URL. Save the changes. That’s it! Your CNAME record is now set up. This process enhances your domain management. Always double-check your entries to avoid errors. With practice, it becomes second nature. Happy domain managing!


