
Are you ready to launch your WordPress site but feeling stuck on how to connect your Namecheap domain? You’re not alone!
Many new website owners find this step a bit tricky, but it’s essential for getting your site up and running. Imagine your domain as the address of your new digital home. Without connecting it, your visitors won’t know where to find you.
The good news? It’s easier than you think. In this guide, we’ll walk you through the process step-by-step, ensuring your domain and WordPress site are perfectly linked. By the end, you’ll be confident in your ability to manage your online presence, making it easier for your audience to find and connect with you. Ready to dive in? Let’s turn your domain into a thriving digital space!

Credit: wordpress.com
Understanding Domain And Hosting
Understanding how your domain and hosting work together is crucial when connecting your Namecheap domain to WordPress. Whether you’re launching your first blog or setting up a site for a small business, knowing these basics can save you time and frustration. Let’s dive into the details of what a domain and hosting mean and how they play a role in your website’s success.
Domain Basics
Your domain is your website’s address on the internet, like a street address for your home. It’s what people type into their browser to find your site. Think of it as your online identity. Namecheap is a popular choice for purchasing domains because it’s user-friendly and offers affordable options.
Picking the right domain can be challenging. You want something memorable and easy to spell. If you’re stuck between options, ask yourself what reflects your brand best. Your domain should resonate with your audience and make it easy for them to remember your site.
Hosting Essentials
Hosting is like renting a space on the internet for your website. Without hosting, your domain is just a name without a home. It stores all your site’s files and makes it accessible to users worldwide. Think of hosting as the land your house (website) sits on.
Choosing the right hosting is crucial. You need reliability and speed, especially if you’re planning on growing your site. Many beginners opt for shared hosting due to its affordability, but as traffic increases, you might consider upgrading to a VPS or dedicated server. Are you ready to make that decision?
Understanding these concepts will empower you to connect your Namecheap domain to WordPress seamlessly. Each step you take brings you closer to creating a thriving online presence. So, what’s stopping you from setting up your website today?
Preparing Namecheap Domain
Connecting your Namecheap domain to WordPress involves a few straightforward steps. First, log into your Namecheap account and locate your domain settings. Next, update the DNS settings to point to your WordPress hosting provider.
Preparing your Namecheap domain is essential for connecting it to WordPress. This process involves a few simple steps. It’s important to ensure everything is set up correctly. Let’s dive into the process.Logging Into Namecheap
First, access the Namecheap website. Use your login credentials. If you’ve forgotten your password, use the “Forgot Password” option. Once logged in, you’ll see your dashboard. This is where all your domains are listed.Accessing Domain Settings
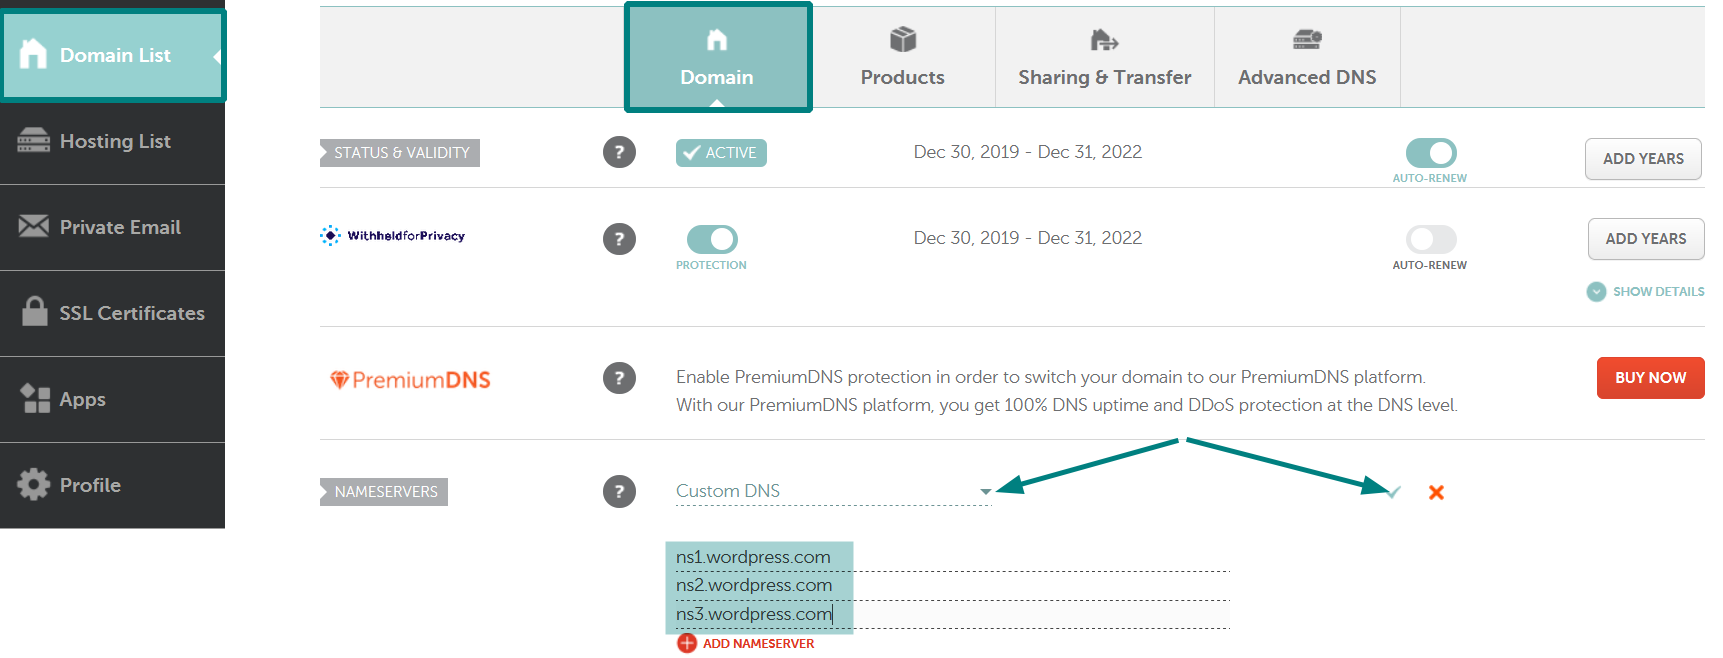
Now, find the domain you want to connect. Click on the domain name. This will take you to the domain settings page. Here, you can manage various domain configurations. Ensure your domain is unlocked. This is crucial for making changes. Look for the “Domain Lock” option. If it’s locked, switch it to unlocked. Next, navigate to the “Nameservers” section. This is where you’ll update the DNS settings. You’ll need to change these to connect with WordPress. Remember to save any changes you make. This ensures your settings are updated correctly. With these steps, your Namecheap domain is ready for WordPress.Setting Up Dns Records
Setting up DNS records is crucial for linking your Namecheap domain to WordPress. DNS, or Domain Name System, acts like the internet’s phonebook. It connects your domain name with your website. Proper configuration ensures your site loads seamlessly. Follow these steps to set up your DNS records efficiently. Keep it simple and precise.
Locating Dns Settings
First, log in to your Namecheap account. Go to the dashboard. Find the “Domain List” section. Click on “Manage” next to your domain. Here, you will see the “Advanced DNS” tab. This is where you configure DNS settings. Take your time. Ensure you are in the right place.
Configuring A Records
A Records point your domain to an IP address. In the “Advanced DNS” tab, look for “Host Records.” Find the A Record entry. If none exists, click “Add New Record.” Select “A Record” from the drop-down menu. Enter “@” in the “Host” field. In the “Value” field, input your WordPress server’s IP address. Save the changes to apply settings.
Adding Cname Records
CNAME Records map your domain to another domain. In the “Host Records” section, click “Add New Record.” Choose “CNAME Record” from the options. Enter “www” in the “Host” field. For the “Value” field, use your main domain name. For example, “yourdomain.com.” Save the changes. This directs subdomains to your main domain.
Credit: www.namecheap.com
Configuring WordPress Hosting
Connecting a Namecheap domain to WordPress hosting involves updating DNS settings. Access Namecheap’s account dashboard and locate DNS settings for your domain. Insert WordPress hosting server details in the DNS fields. Save changes to complete the setup.
Configuring WordPress hosting can seem daunting, especially if you’re new to the world of website management. However, with a few simple steps, you can easily link your Namecheap domain to your WordPress site. This process ensures that your website is live and accessible, allowing you to share your content with the world. Let’s break down the steps to make this task straightforward and stress-free.Navigating Hosting Provider
Begin by logging into your hosting provider’s dashboard. This is your command center, where you’ll manage your website’s files and settings. If you’re using a popular hosting service, you’ll find that the interface is designed to be user-friendly. Take a moment to familiarize yourself with the main sections like the control panel and domains section. This knowledge will come in handy as you proceed. Once you’re comfortable navigating the dashboard, locate the section where you can add a new domain. This is typically found under a ‘Domains’ or ‘My Sites’ tab. The exact name might vary, but the function remains the same. This is where you’ll connect your Namecheap domain to your hosting account.Connecting Domain To Hosting
To connect your domain, you need to update the DNS settings. Think of DNS as the internet’s phonebook that tells browsers where to find your website. Head over to your Namecheap account and find the ‘Domain List’ tab. Select the domain you wish to connect, then click on ‘Manage’. In the DNS settings, you’ll have the option to change the nameservers. Replace the existing nameservers with those provided by your hosting provider. This step is crucial as it directs web traffic to your WordPress hosting. It’s like giving your website a home address on the internet. Once you’ve updated the nameservers, it might take a few hours for the changes to propagate. During this time, you can grab a coffee or work on your site’s content. Don’t worry if your site isn’t immediately live; this delay is normal. Isn’t it exciting to see your website coming together? You’re not just connecting a domain; you’re building an online presence. As you wait, think about the possibilities your new WordPress site will bring. What will you share with your audience?Verifying Domain Connection
Linking your Namecheap domain to WordPress involves simple steps. Update your domain’s DNS settings in Namecheap. Then, configure them in WordPress to ensure a seamless connection. This process ensures your site is live and accessible to users.
Connecting your Namecheap domain to WordPress is just the beginning. Ensuring that your domain is properly linked and functional is equally crucial. Verifying the connection between your domain and WordPress can save you from potential headaches down the road. It’s not just about the technical setup; it’s about making sure everything works seamlessly. Imagine spending hours setting up your website, only to discover that visitors can’t access it. Frustrating, right? Don’t worry; verifying your domain connection is simpler than you think.Testing Domain Link
Once you’ve connected your domain, the first step is to test the link. Type your domain into a browser and see if your WordPress site loads correctly. This simple test can reveal if the connection is successful. If your site appears as expected, your domain connection is likely solid. However, if you encounter an error, it’s time to check your settings. Verify that your DNS records are correctly pointing to WordPress.Troubleshooting Common Issues
What if your site doesn’t load? It’s time to troubleshoot. Common issues include DNS propagation delays. This can take up to 48 hours, so patience is key. Another issue could be incorrect DNS settings. Double-check that your Namecheap DNS settings match those required by WordPress. Are you using the correct nameservers? WordPress usually provides specific nameservers to use, so ensure these are set correctly in Namecheap. Consider asking yourself: Is my site’s downtime affecting my audience? If yes, immediate troubleshooting is critical. Reach out to Namecheap’s support if you encounter persistent issues. They can offer specific insights tailored to your setup. Remember, your site is your online presence. Ensuring it’s accessible is paramount.Updating Domain Settings
Updating your domain settings is a crucial step in connecting Namecheap to WordPress. It ensures your domain points to your WordPress site. This process involves changing DNS records and making necessary adjustments. These settings help direct internet traffic correctly to your site.
Ensuring Dns Propagation
After updating DNS settings, propagation begins. DNS propagation can take up to 48 hours. During this period, changes spread across the internet. Check your site intermittently to see if changes reflect. Patience is key as this is a global update process.
Final Adjustments
Once DNS propagation is complete, verify your site. Ensure everything loads correctly and functions smoothly. Check links, images, and plugins for any issues. Troubleshoot errors to ensure a seamless user experience. This final step is essential for a professional website presence.
Credit: wordpress.com
Frequently Asked Questions
How To Connect Domain To WordPress Namecheap?
Log in to Namecheap, navigate to “Domain List,” select your domain, then click “Manage. ” Set Nameservers to “Custom” and enter WordPress nameservers. Save changes. Verify domain connection in WordPress settings.
How Do I Connect My Domain To My WordPress?
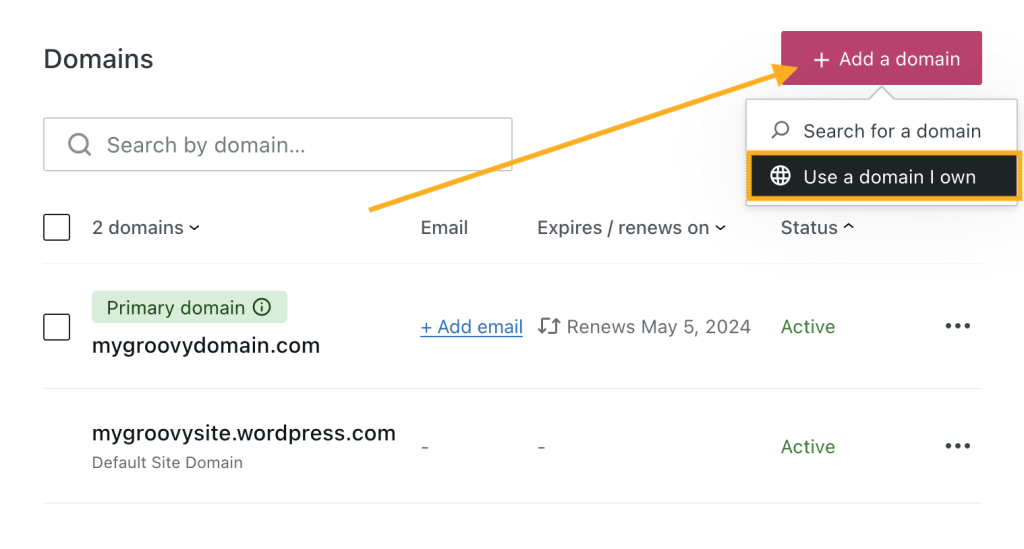
Log in to your domain registrar and locate DNS settings. Update the nameservers to your WordPress hosting provider’s. Verify the connection in WordPress by navigating to “Domains” under the “Settings” tab. Ensure DNS propagation, which might take up to 48 hours.
How Do I Connect My Namecheap Domain To My Website?
Log in to Namecheap, go to your domain list, and select “Manage. ” Update DNS settings to point to your website’s server IP or hosting nameservers. Save changes and wait for DNS propagation, which may take up to 48 hours.
Your domain will then connect to your website.
Does Namecheap Support WordPress?
Yes, Namecheap supports WordPress hosting. They offer easy WordPress installation and management. Their plans include features like free SSL and backups. Namecheap provides reliable performance and excellent customer support for WordPress users.
Conclusion
Connecting your Namecheap domain to WordPress is straightforward. Follow the steps carefully. Start by logging into your Namecheap account. Adjust DNS settings with precision. Use WordPress dashboard for integration. Changes may take a few hours. Patience is key. Check your website’s functionality after the updates.
Troubleshoot any issues promptly. Seek help from forums if needed. Your online presence is now stronger. Remember, consistent updates enhance performance. Keep learning for better results. Your website is now ready to engage visitors. Enjoy your seamless domain connection with WordPress.
Happy blogging!


