
Are you ready to take your website to the next level with a custom domain? Connecting your Namecheap domain to Squarespace is easier than you might think, and it’s a crucial step in building a strong online presence.
Imagine your website as your digital storefront; a personalized domain is the elegant sign above the door that invites people in. With so many businesses competing for attention online, having your own domain can significantly enhance your credibility and brand recognition.
This guide will walk you through every step, ensuring you feel confident and empowered in making this essential change. Ready to transform your online identity? Let’s dive in and get your domain connected seamlessly!
Choosing The Right Domain
Easily connect your Namecheap domain to Squarespace by updating your domain’s DNS settings. Log into Namecheap, access the DNS settings, and enter the provided Squarespace records. Save the changes and allow some time for the connection to take effect. Enjoy seamless integration for your website.
Choosing the right domain is like picking the perfect name for your baby; it’s the identity your site will carry forward. You want it to resonate with your brand and stick in the minds of your visitors. Selecting a domain isn’t just about availability; it’s about strategy and foresight. So, how do you make the best choice? ###Factors To Consider
When selecting your domain, think about simplicity and memorability. Choose a name that’s easy to spell and pronounce. Complex names can confuse visitors, leading them elsewhere. You want them to remember it without struggle. Relevance to your business is crucial. A domain should reflect what your site is about. If you’re selling organic teas, a name like “TeaHaven.com” speaks directly to your audience. It’s precise and gives visitors an immediate sense of your offerings. Consider the length. Short domains are not only easier to remember but also faster to type. Keep it concise, ideally under 15 characters. Longer names can be cumbersome and increase the risk of typos. Think about keywords. Including a relevant keyword can boost your site’s visibility in search engines, giving you an SEO edge. But don’t overdo it; keyword stuffing can appear spammy. ###Benefits Of Namecheap Domains
Opting for Namecheap offers a treasure trove of advantages. Affordability is a key benefit. Namecheap provides competitive pricing without compromising on quality. You save money while securing a credible domain name. User-friendly interface makes managing your domain a breeze. Even if you’re not tech-savvy, Namecheap’s dashboard is intuitive. You can easily configure settings and make changes when necessary. Namecheap’s customer support is top-notch. Imagine running into an issue at midnight and needing immediate help. Their support team is responsive and knowledgeable, ready to assist you around the clock. Free privacy protection is another perk. Protecting your personal information is crucial in today’s digital world. Namecheap offers free WHOIS privacy to keep your details safe from prying eyes. Choosing the right domain is a pivotal step in building your online presence. Have you thought about what your domain says about your brand? Let it be a reflection of your business’s identity and values.Setting Up Your Squarespace Account
Easily connect your Namecheap domain to Squarespace by accessing your domain settings. Update the DNS records to point to Squarespace. Then, verify the connection within your Squarespace account. Enjoy seamless integration for your website.
Setting up your Squarespace account is the first crucial step in connecting your Namecheap domain. This process is straightforward and user-friendly, designed to get your website up and running in no time. Whether you’re launching a blog, portfolio, or online store, Squarespace makes it easy with its intuitive platform. Let’s dive into creating your account and selecting the perfect template for your needs.Creating A Squarespace Account
Starting your journey with Squarespace involves creating an account, which is as simple as signing up with your email. Head over to the Squarespace website and click on the “Get Started” button. You’ll be prompted to enter your email address, create a password, and fill in some basic information. Once you’ve completed these steps, you’ll have access to Squarespace’s dashboard. This is where the magic happens. Take a moment to explore the interface. It’s designed with simplicity in mind, making navigation a breeze. Have you ever found yourself lost in a new online platform? Squarespace is here to change that experience for you.Selecting Your Website Template
Choosing the right template for your website is like picking the perfect outfit for an occasion. It sets the tone and gives your site its first impression. Squarespace offers a wide variety of templates tailored to different website needs, from blogs to e-commerce sites. Browse through the template gallery and preview a few options. Consider your site’s purpose and choose a design that aligns with your vision. Are you showcasing photography or selling products? Squarespace has you covered with specialized templates. Each template is fully customizable, allowing you to modify layouts, fonts, and colors. This flexibility ensures your website reflects your unique style and brand. Don’t be afraid to experiment with different looks. You’ll know when you’ve found the right fit. Setting up your Squarespace account is just the beginning. With these steps, you’re well on your way to connecting your Namecheap domain and bringing your online presence to life. Are you ready to take the next step in your website journey?Accessing Namecheap Domain Settings
Access Namecheap domain settings to connect your domain to Squarespace easily. Navigate to the DNS settings and update the records. Follow Squarespace’s guide for specific steps to ensure a smooth connection.
Accessing your Namecheap domain settings is a crucial step in connecting your domain to Squarespace. It might seem daunting at first, but with a little guidance, you can navigate through the process effortlessly. Imagine the satisfaction of seeing your custom domain live on your beautifully crafted Squarespace site. Let’s dive into the steps to access your Namecheap domain settings. ###Logging Into Namecheap
To start, you’ll need to log into your Namecheap account. Head over to [Namecheap’s website](https://www.namecheap.com) and click on the “Sign In” button at the top right corner. Enter your username and password, then click “Sign In” again. If you’ve forgotten your password, don’t worry. There’s a “Forgot your password?” link right below the sign-in box to help you out. Once logged in, you will see your account dashboard, a central hub for all your domain management needs. ###Navigating To Domain Management
From your dashboard, click on “Domain List” on the left sidebar. This will show you all the domains you’ve registered with Namecheap. Do you see the domain you want to connect to Squarespace? Click on the “Manage” button next to it. You’ll be taken to the domain management page, where you can modify DNS settings, update contact information, and more. Here’s where the magic happens. By adjusting the DNS settings, you can point your domain to Squarespace, making your site accessible via your chosen URL. Remember, precision is key—ensure you’re modifying the correct domain. Accessing and managing your domain settings might sound technical, but it’s a skill that pays off. Have you ever wondered how seamless your online presence could become with the right tweaks? Take charge of your domain settings today and witness the transformation.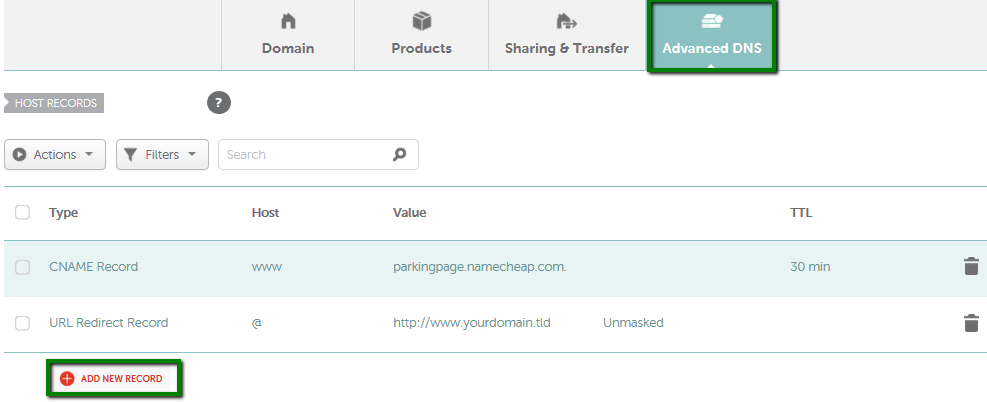
Credit: www.namecheap.com
Configuring Dns Settings
Configuring DNS settings is crucial for connecting your Namecheap domain to Squarespace. This step ensures your domain correctly points to your Squarespace site. Misconfigured DNS settings can lead to website downtime. It’s important to set them up accurately.
Understanding Dns Basics
DNS stands for Domain Name System. It translates domain names to IP addresses. This allows browsers to load Internet resources. Think of DNS as the Internet’s phone book. It helps computers find websites using domain names. Understanding DNS basics aids in domain configuration.
Adding Squarespace Dns Records
First, log in to your Namecheap account. Go to the ‘Domain List’ section. Click ‘Manage’ next to your domain. Navigate to the ‘Advanced DNS’ tab. Here, you’ll add the necessary DNS records.
Squarespace requires specific DNS records. Start by adding ‘CNAME’ records. These direct your domain to Squarespace servers. Next, add ‘A’ records. These ensure your root domain points to Squarespace. Follow Squarespace’s DNS record instructions closely.
After adding the records, save your changes. DNS changes can take time to update. It might take up to 48 hours to propagate fully. Check your domain periodically to ensure it points correctly.
Connecting Domain To Squarespace
Connecting a Namecheap domain to Squarespace can enhance your online presence. It gives your site a professional touch and makes it memorable. The process involves a few key steps to ensure a seamless connection. With the right guidance, anyone can do it. Follow the steps below to connect your domain to Squarespace efficiently.
Squarespace Domain Connection Steps
First, log into your Squarespace account. Navigate to the ‘Home Menu’ and select ‘Settings’. Click on ‘Domains’ and then choose ‘Use a Domain I Own’. Enter your Namecheap domain name. Click ‘Next’ to proceed.
Squarespace will provide you with DNS settings. These are essential for the connection. Keep this tab open as you will need this information soon.
Open a new tab and log into your Namecheap account. Go to ‘Domain List’ and find your domain. Click ‘Manage’ next to your domain. Choose the ‘Advanced DNS’ tab.
Add the DNS records from Squarespace here. Input the provided information accurately. Save these changes and return to your Squarespace tab.
Verifying Domain Connection
After updating the DNS settings, return to Squarespace. Click ‘Verify’ to check the domain connection. This process might take some time. Usually, it completes within 24 to 48 hours.
Once verified, your domain will show as connected in Squarespace. You can now manage your domain directly from Squarespace. It’s a simple process that enhances your site’s credibility.

Credit: rebekahreadcreative.com
Troubleshooting Common Issues
Connecting your Namecheap domain to Squarespace can sometimes be tricky. Even with clear instructions, issues can arise. This guide helps with common problems. You’ll find solutions to smooth your domain connection process.
Dns Propagation Delay
DNS changes can take time to update. This delay is called DNS propagation. It might take up to 48 hours for changes to spread. Patience is key here. Check back later if your domain isn’t working yet.
During this time, your site may not be accessible. Keep monitoring for updates. Use online tools to check DNS status. These tools show if changes have taken effect.
Resolving Connection Errors
Sometimes, connection errors occur. Double-check your DNS settings first. Ensure you’ve entered the correct records. These records must match those provided by Squarespace.
If errors persist, clear your browser’s cache. This can help resolve many issues. Also, try accessing your site from a different network. This checks if the problem is local.
Contact Namecheap or Squarespace support if problems remain. They offer guidance and help resolve issues. Providing them with details speeds up the process.
Enhancing Your Squarespace Site
Connecting a Namecheap domain to Squarespace is only the beginning. To make your website truly shine, you must enhance its design and functionality. This ensures your visitors have the best experience. Let’s explore ways to optimize your Squarespace site.
Optimizing Site Design
Your site’s design affects first impressions. Use clean, modern templates from Squarespace. Customize colors and fonts to match your brand. Ensure images are high-quality and relevant. Keep navigation simple and intuitive. Mobile responsiveness is crucial. Test how your site looks on smartphones and tablets. A well-designed site keeps visitors engaged.
Adding Custom Features
Squarespace offers many features out of the box. But you can add more. Integrate third-party apps to enhance functionality. Consider adding social media buttons for easy sharing. Use contact forms to gather visitor information. Include a blog to share news and updates. Custom features make your site interactive and user-friendly.

Credit: www.youtube.com
Frequently Asked Questions
How Do I Connect My Squarespace Domain To Namecheap?
Connect your Squarespace domain to Namecheap by updating DNS settings. Log into Namecheap, go to ‘Domain List,’ select your domain, and click ‘Manage. ‘ Under ‘Advanced DNS,’ add Squarespace’s DNS records. Verify connection in Squarespace under ‘Domains. ‘ Ensure records match Squarespace’s guidelines for successful linkage.
How Do I Connect My Domain To Squarespace?
Log into your Squarespace account and go to Settings. Select Domains and choose “Connect Domain. ” Enter your domain name and follow the prompts to complete the setup. Check Squarespace’s support for specific instructions if needed. Ensure DNS settings are correctly configured with your domain provider.
How Do I Connect My Namecheap Domain To My Website?
Log in to Namecheap, navigate to Domain List, and click Manage. Under Nameservers, choose Custom DNS. Enter your hosting provider’s DNS details and save changes. Allow up to 48 hours for DNS propagation. Ensure your website is correctly configured on your hosting server.
How Do I Access My Domain On Squarespace?
Log into your Squarespace account and navigate to the “Domains” section. Select your domain to access settings.
Conclusion
Connecting your Namecheap domain to Squarespace is easy and rewarding. Follow the steps. Start by logging into your Namecheap account. Adjust the DNS settings. Next, verify your domain in Squarespace. This ensures everything works smoothly. Your website will look more professional.
Visitors will recognize your brand instantly. This process boosts your site’s credibility. Remember, patience is key. Changes might take time to update. Now, your domain and website work together seamlessly. Enjoy showcasing your work online. Happy building and connecting!


