Are you ready to take your online store to the next level? Connecting your Namecheap domain to Shopify is a crucial step in establishing your brand’s identity and ensuring a seamless shopping experience for your customers.
Imagine the thrill of seeing your unique domain name appear in the browser, proudly representing your business. It’s easier than you think, and this guide will walk you through each step, ensuring you feel confident and empowered. Whether you’re a seasoned entrepreneur or just starting your e-commerce journey, you’ll find that connecting your domain is a game-changer.
Let’s dive in and make your online store shine!
Domain Settings In Namecheap
Domain settings in Namecheap are crucial for connecting your domain to Shopify. These settings allow you to manage DNS records and control how your domain functions. Understanding these settings can simplify the process of linking your domain to Shopify.
Understanding Namecheap’s Domain Dashboard
The domain dashboard is your control center. Here, you can view all your domains in one place. It provides access to settings that affect your domain’s behavior. Navigate easily to the domain you want to connect.
Accessing Dns Settings
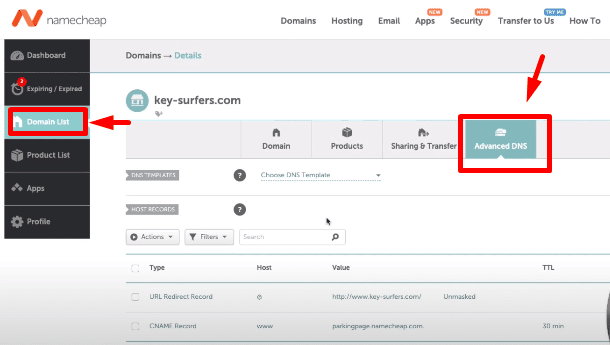
DNS settings determine how your domain connects to web services. In Namecheap, these settings are accessible under the ‘Domain List’ section. Click on ‘Manage’ next to your domain to access DNS settings.
Updating Dns Records
DNS records are essential for directing web traffic. To connect your domain to Shopify, update these records. Use the DNS settings page to modify or add new records. Shopify requires specific DNS configurations for seamless integration.
Changing Name Servers
Name servers control the routing of your domain. For Shopify integration, you might need to change these. On the DNS settings page, find the option to update name servers. Follow Shopify’s instructions for the correct configuration.
Verifying Domain Ownership
Verification confirms you own the domain. It is a crucial step in connecting to Shopify. Namecheap provides simple methods to verify ownership. Check the domain settings for verification options.
Credit: www.namecheap.com
Shopify Domain Integration
Shopify Domain Integration can seem complex at first. But with a step-by-step approach, it becomes manageable. Shopify allows you to connect external domains, like those from Namecheap, to your store. This integration enhances your brand’s identity and online presence. Customers will easily find your store with a custom domain. Let’s explore the process in detail.
Understanding Shopify Domain Settings
Navigate to your Shopify admin panel. Find the “Domains” section under “Online Store.” This is where you’ll manage your domains. You can either buy a new domain or connect an existing one. Click “Connect existing domain” to start linking your Namecheap domain.
Updating Dns Settings On Namecheap
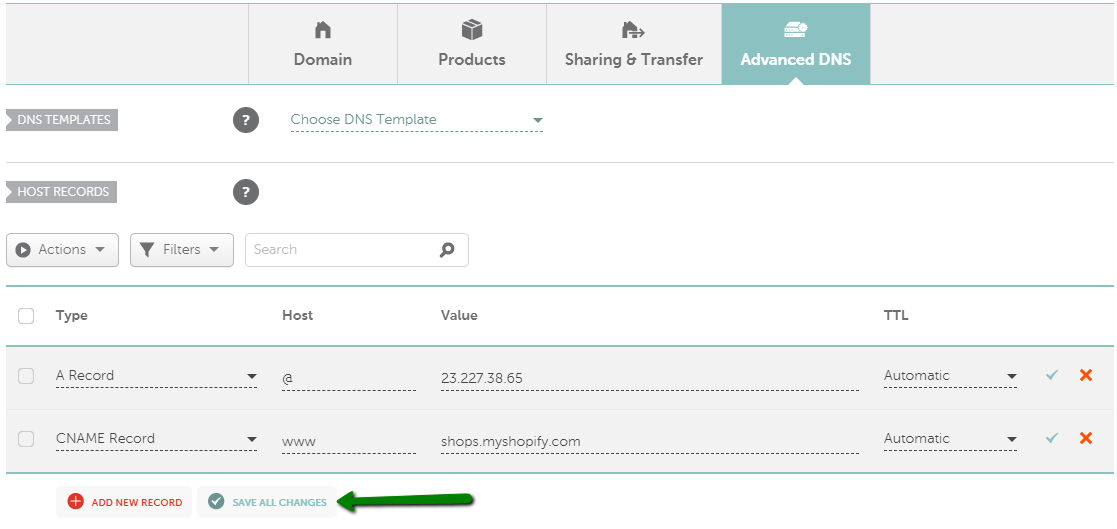
Log into your Namecheap account. Go to the “Domain List” tab. Click “Manage” next to your domain. Find the “Advanced DNS” tab. You’ll need to update a few records here. First, add a new “CNAME” record. Set the host as “www” and the value as “shops.myshopify.com.” Save these changes.
Setting Up A Record
In the same “Advanced DNS” section, locate the “A Record.” Set the host to “@” and the value to Shopify’s IP address. Save this configuration. It directs users to your Shopify store when they enter your domain.
Verifying Domain Connection In Shopify
Return to your Shopify admin. Enter your domain name and click “Next.” Shopify will verify the connection. This might take some time. Once verified, your domain status will show as “Connected.” Your Namecheap domain is now linked to Shopify.
Testing Your Domain Connection
Open a new browser window. Enter your custom domain URL. Ensure it directs to your Shopify store. If everything is set correctly, your store should appear. This step ensures your setup is successful.
Troubleshooting Connection Issues
Connecting your Namecheap domain to Shopify can sometimes be tricky. Issues may arise during the process. But don’t worry. This section guides you through common problems and their solutions.
Incorrect Dns Settings
Check your DNS settings in Namecheap. Ensure they match Shopify’s recommended settings. The CNAME and A records are crucial. Double-check these entries for typos or errors.
Domain Propagation Delays
Domain changes may take up to 48 hours to propagate. Patience is key. If changes don’t appear immediately, wait a little longer. Refresh your browser and clear cache for updates.
Ssl Certificate Issues
Shopify provides SSL certificates automatically. If the SSL is not working, verify domain settings. Ensure DNS records are correct. SSL issues often resolve once settings align.
Incorrect Domain Name
Ensure the domain name entered in Shopify matches exactly. Even minor errors can cause issues. Double-check spelling and extensions like .com or .net.
Contacting Support
If issues persist, reach out to support. Namecheap and Shopify support teams can help. They provide guidance and troubleshoot specific problems.
Credit: keycommerce.com

Credit: help.shopify.com
Frequently Asked Questions
How To Connect Namecheap Domain On Shopify?
To connect Namecheap domain to Shopify, log into Namecheap, select the domain, and update DNS settings. Set the CNAME record to point to shops. myshopify. com. Verify the domain in your Shopify admin under Settings > Domains. Save changes and allow time for propagation.
How Do I Connect My Domain To My Shopify Website?
Go to Shopify admin, click “Domains”. Select “Connect existing domain”. Enter your domain, click “Next”. Follow the instructions to update DNS settings with your domain provider. Once verified, set the domain as primary in Shopify.
Is Namecheap Compatible With Shopify?
Yes, Namecheap is compatible with Shopify. You can use Namecheap domains with Shopify stores seamlessly. Connect your domain by updating DNS settings. This integration helps boost your online presence. Namecheap provides affordable domain registration and reliable hosting, enhancing your Shopify store’s functionality and visibility.
How Do I Verify Domain Ownership On Shopify Namecheap?
To verify domain ownership on Shopify using Namecheap, add the TXT record provided by Shopify to your domain’s DNS settings. This confirms your ownership and allows you to proceed with Shopify integration. Ensure the record is correctly entered in Namecheap’s DNS management section for successful verification.
Conclusion
Connecting your Namecheap domain to Shopify is straightforward. You now know the steps. Start by accessing your Shopify dashboard. Then, configure your Namecheap settings. Ensure DNS settings are accurate. This allows smooth integration. Enjoy improved online presence. Your store becomes more accessible.
Customers find you easily. Your brand gains visibility. Online sales can increase. Take advantage of this setup. Keep your domain secure. Regularly update settings. Stay informed with Shopify resources. Success is within reach. Build your business confidently. You’re set up for growth.
Embrace the digital world. Happy selling!