
You’ve got your perfect domain name and signed up for Namecheap hosting. Now, the next step is connecting the two so your website can go live.
It might sound tricky, but you’re closer to making your site visible than you think. In this guide, you’ll learn exactly how to link your domain name to your Namecheap hosting account—step by step and without confusion. By the end, you’ll have your website ready for visitors, with no guesswork or tech headaches.
Let’s get started and make your online presence real!
Choose Your Domain And Hosting
Choosing the right domain and hosting is the first step to connect your website. Your domain is your website’s address on the internet. Hosting is where your website lives online. Both must work well together for your site to load fast and stay online.
Pick a domain name that is short, easy to remember, and matches your brand. Your hosting plan should fit your website’s needs and traffic size. Namecheap offers many options for both domains and hosting.
Choose A Domain Name
Think about words that describe your site or business. Use simple and clear language. Avoid numbers and special characters. Make sure the domain name is easy to spell and pronounce. Check if the name is available on Namecheap’s domain search.
Select A Hosting Plan
Choose a hosting plan based on your website’s size and visitor numbers. Shared hosting is good for small sites and beginners. VPS or dedicated hosting works well for bigger sites or more traffic. Namecheap offers plans with good speed and security.
Match Domain And Hosting
Buying domain and hosting from the same provider simplifies connection. Namecheap allows easy management of both in one place. This reduces setup time and avoids extra steps. Ensure your domain and hosting are active and ready.
Access Namecheap Dashboard
Accessing your Namecheap dashboard is the first step to connect your domain to hosting. The dashboard is where you manage domains, hosting, and other services. A clear and simple interface helps you control your account easily.
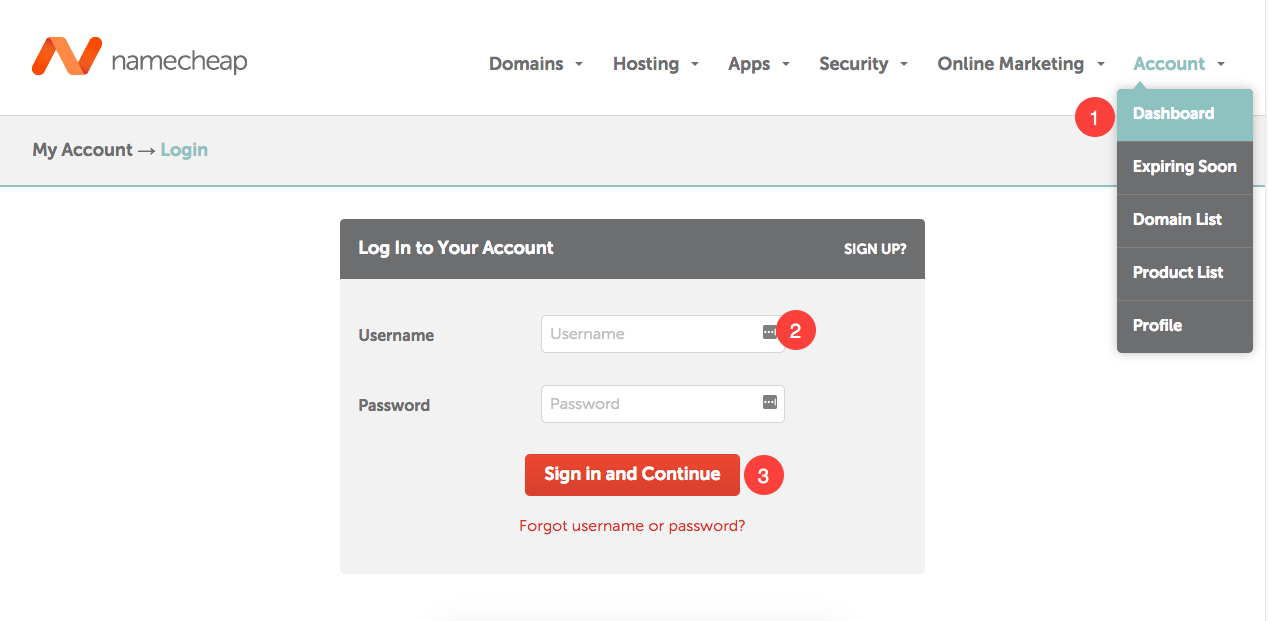
Start by logging in to your Namecheap account. Use your registered email and password. This secure login protects your personal and website data.
How To Log In To Namecheap
Go to the Namecheap website. Click the “Sign In” button on the top right corner. Enter your email address and password. Click “Sign In” to open your dashboard.
Finding The Dashboard Menu
Once logged in, look for the “Dashboard” or “Account” section. It is usually at the top or side of the page. This menu holds links to your domains and hosting services.
Overview Of Dashboard Features
The dashboard shows your active domains and hosting plans. You can check billing information and support tickets here. It also allows quick access to domain settings and server controls.
Update Nameservers For Domain
Updating the nameservers for your domain is a key step to connect it with your Namecheap hosting. Nameservers tell the internet where to find your website files. Changing them makes sure visitors see your hosted site when they type your domain name.
This process is simple and quick. You only need to access your domain settings and enter the correct nameserver details from Namecheap hosting. After updating, it may take some time for changes to spread across the internet.
Locate Domain Settings
First, log in to your Namecheap account. Go to the Domain List section. Find the domain you want to connect. Click the Manage button next to that domain. This opens the domain settings page.
Look for the Nameservers section on this page. It shows the current nameservers linked to your domain. You will replace these with your hosting nameservers next.
Enter Namecheap Hosting Nameservers
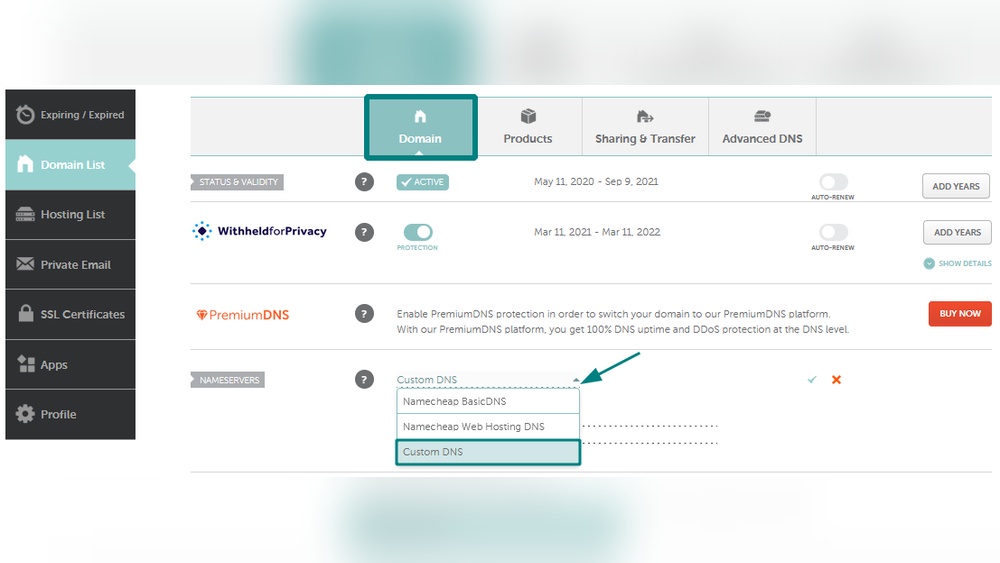
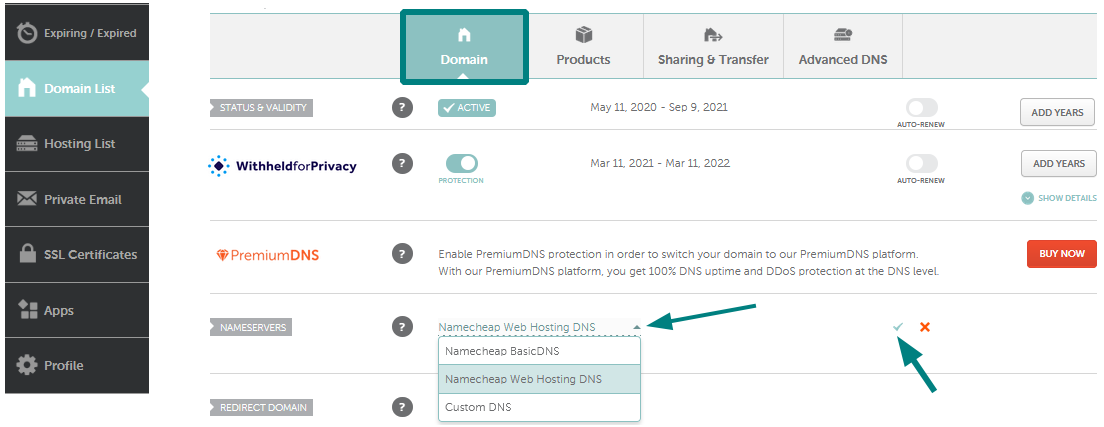
In the Nameservers section, choose Custom DNS from the dropdown menu. Enter the nameserver addresses provided by your Namecheap hosting. Usually, there are two or more nameservers to add.
Double-check each nameserver entry for accuracy. After entering, click the green checkmark or Save button. Your domain now points to your hosting server. Wait up to 48 hours for the update to fully apply online.
Credit: www.namecheap.com
Verify Dns Propagation
Verifying DNS propagation is a key step after connecting your domain to Namecheap hosting. This process confirms if your domain’s new settings have spread across the internet. DNS propagation can take time. It might be minutes or hours before your site appears correctly.
Checking DNS propagation helps avoid confusion. It shows if your website is live and accessible worldwide. Early verification saves you from unnecessary troubleshooting.
What Is Dns Propagation?
DNS propagation is the time it takes for changes in domain settings to update globally. When you change your domain’s DNS records, servers worldwide need to refresh this information. This update does not happen instantly. It can take from a few minutes to 48 hours.
How To Check Dns Propagation?
Use online DNS checker tools to monitor propagation. Enter your domain name in the tool. It shows if DNS changes have reached different locations. These tools display results from multiple servers worldwide. They help confirm if your domain points to Namecheap hosting.
What To Do If Dns Has Not Propagated?
Wait patiently for the update to complete. Avoid making more changes during propagation. Check your DNS records again to ensure accuracy. Incorrect DNS settings delay propagation. If the problem continues after 48 hours, contact Namecheap support.
Connect Domain To Hosting Account
Connecting your domain to your hosting account is a key step to make your website live. This process links your domain name with the place where your website files are stored. It allows visitors to reach your site by typing your domain name.
Following clear steps helps avoid confusion and errors. You will learn how to add your domain in the hosting panel and set up your website files. Both steps are important to get your site running smoothly.
Add Domain In Hosting Panel
Log into your Namecheap hosting panel. Find the section called “Domains” or “Addon Domains.” Here, you can add your domain name. Enter your domain exactly as registered, without “www.”
Set the document root, a folder where your site files will live. Choose a simple folder name to keep things clear. Save the settings to link your domain with your hosting account.
Set Up Website Files
Next, upload your website files to the document root folder. Use the File Manager in your hosting panel or an FTP client. Make sure the homepage is named “index.html” or “index.php.”
Check all files are complete and correctly placed. After uploading, your website will display when someone visits your domain. Test your site by typing your domain in a browser.

Credit: www.youtube.com
Troubleshooting Common Issues
Troubleshooting is key when connecting your domain to Namecheap hosting. Small mistakes can stop your website from working. Understanding common problems saves time and stress. Below are simple tips to fix usual issues fast.
Dns Changes Not Reflecting
DNS changes can take time to show. It usually takes up to 48 hours. This delay is normal due to internet servers updating worldwide.
Clear your browser cache. This helps show the latest site version. Use tools like “DNS checker” to see if changes spread globally.
Double-check your DNS records in Namecheap dashboard. Ensure you entered the correct nameservers or A records. Typos cause errors.
Website Not Loading
When your site won’t load, check hosting status first. Your server might have downtime or maintenance.
Verify domain is pointing to the right hosting server. Wrong IP addresses stop your site from appearing.
Check if your hosting plan is active and paid. An expired plan disables your website.
Disable any firewall or security plugins temporarily. They can block access if misconfigured.
Tips For Smooth Setup
Setting up your domain name with Namecheap hosting can be simple. A smooth setup avoids errors and saves time. Follow these clear tips to connect your domain without hassle.
Check Your Domain’s Dns Settings
Start by verifying your domain’s DNS settings. Make sure they point to Namecheap’s servers. Incorrect DNS can cause your site to not load.
Use Namecheap’s Default Nameservers
Choose Namecheap’s default nameservers for easy setup. This keeps things simple and works well for most users. Custom nameservers require extra steps.
Allow Time For Dns Propagation
After updating nameservers, wait for DNS propagation. This process can take up to 48 hours. Your site might be slow to appear during this time.
Keep Your Account Information Ready
Have your Namecheap login details and domain info handy. It helps you make quick changes if needed. Staying organized speeds up the setup process.
Test Your Website After Setup
Once connected, visit your website to test it. Check if all pages load correctly. Fix any errors by reviewing your DNS and hosting settings.
Credit: help.pixpa.com
Frequently Asked Questions
How Do I Link My Domain To Namecheap Hosting?
To link your domain to Namecheap hosting, update your domain’s nameservers to Namecheap’s. Then, add your domain to your hosting account via the cPanel. This connects your domain with your hosting server effectively.
Can I Use A Domain Bought Outside Namecheap?
Yes, you can connect external domains to Namecheap hosting. Change the domain’s nameservers to Namecheap’s and configure hosting settings to ensure proper connection and website functionality.
How Long Does Dns Propagation Take After Connecting?
DNS propagation typically takes 24 to 48 hours. During this time, your domain may not resolve correctly everywhere. Be patient as the changes spread across the internet.
What Are Namecheap’s Default Nameservers?
Namecheap’s default nameservers usually are: ns1. namecheaphosting. com and ns2. namecheaphosting. com. Use these when pointing your domain to Namecheap hosting for smooth integration.
Conclusion
Connecting your domain to Namecheap hosting is simple and quick. Follow each step carefully to avoid errors. Check your DNS settings and wait for changes to spread. This process may take some time. Once done, your website will be live and accessible.
Keep your login details safe for future updates. Stay patient and double-check your work. Enjoy your new website with Namecheap hosting!


