
Are you ready to launch your website but feeling overwhelmed by the technicalities of connecting your GoDaddy domain to Namecheap hosting? You’re not alone.
This is a common hurdle many face, but with the right guidance, it can be a smooth process. Imagine the satisfaction of watching your website go live, knowing you have successfully connected the dots. In this guide, we’re going to walk you through each step clearly and simply.
You’ll discover how easy it is to bridge GoDaddy’s domain services with Namecheap’s hosting solutions, ensuring your site is up and running without a hitch. Stick with us, and soon you’ll be ready to share your website with the world.

Credit: www.youtube.com
Setting Up Your Domain
Connecting your GoDaddy domain to Namecheap hosting can be simple. This guide will walk you through the steps. Follow each section to ensure seamless domain setup. Let’s dive into the process.
Log Into Godaddy Account
Start by accessing your GoDaddy account. Visit the GoDaddy website. Enter your username and password. If you forgot them, use the recovery option. Once logged in, proceed to the next step.
Access Domain Management
After logging in, locate the domain management section. Click on “My Products” in the dashboard. Here, you’ll see all your domains listed. Select the domain you wish to connect. Click on “Manage” beside your domain name.
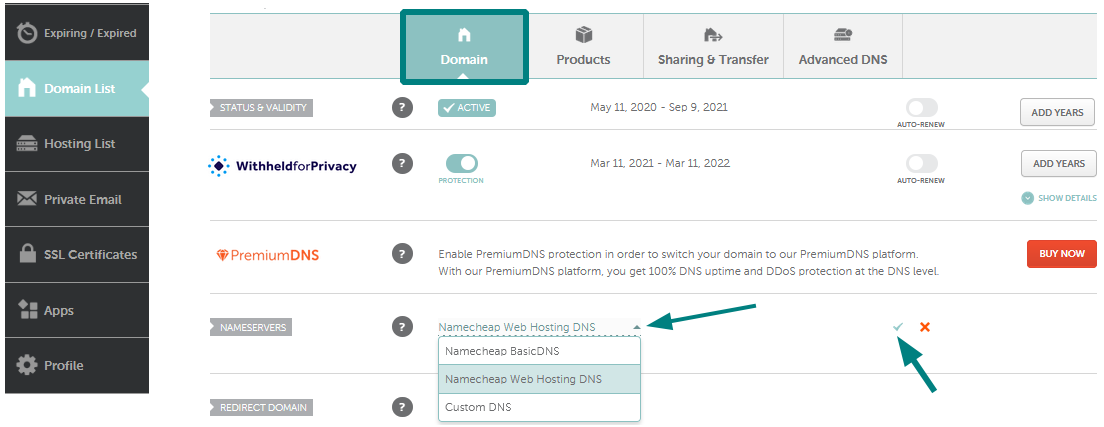
Look for the DNS settings option. This is crucial for domain connection. Make sure to update the nameservers to Namecheap’s details. This step will link your domain to Namecheap hosting.
Credit: www.namecheap.com
Configuring Dns Settings
Linking a GoDaddy domain to Namecheap hosting involves updating DNS settings. Access your GoDaddy account and locate the DNS management section. Enter the Namecheap hosting nameservers to connect your domain seamlessly.
Configuring DNS settings is a crucial step. It connects your GoDaddy domain with Namecheap hosting. This process ensures your website is accessible online. Proper DNS setup directs traffic to your site efficiently. It enhances user experience by minimizing downtime.Find Dns Zone File
Locate the DNS Zone File in your GoDaddy account. It’s essential for managing domain settings. Log into your GoDaddy account. Navigate to the domain settings. You’ll find the DNS Zone File there. This section holds all DNS records. It allows you to modify domain configurations.Modify Nameservers
Changing nameservers is critical for connection. Access your GoDaddy account once more. Select the domain you wish to connect. Look for the nameserver settings. Enter the Namecheap nameservers details. Save changes to update the connection. This step completes the DNS configuration. Your domain should now point to Namecheap hosting.Linking Domain To Namecheap Hosting
Connecting your GoDaddy domain to Namecheap hosting is simple and quick. First, log into your Namecheap account and find the DNS settings. Then, update your GoDaddy domain’s nameservers to match those provided by Namecheap. Your domain will be linked once the DNS changes propagate.
Linking your GoDaddy domain to Namecheap hosting is simple. This process connects your domain name with your hosting account. This allows you to build and publish your website. Below are the steps to link your domain to Namecheap hosting.Log Into Namecheap Account
First, open the Namecheap website in your browser. Enter your username and password. Click on the “Sign In” button. This takes you to your account dashboard. Here, you can manage your hosting services.Navigate To Hosting Dashboard
Once logged in, find the “Hosting” section. Click on it to access the hosting dashboard. This is where you manage your hosting plans. Look for the “Manage” button next to your hosting plan. Click on it to view hosting details. This area allows you to configure your hosting settings. Connecting your GoDaddy domain to Namecheap hosting is crucial. It ensures your website is accessible online. Follow these steps carefully. You’ll have your domain linked and ready in no time.Adding Domain In Namecheap
Connecting a GoDaddy domain to Namecheap hosting is straightforward. Update the domain’s DNS settings on GoDaddy. Then, input Namecheap’s nameservers. This links your domain to your hosting account, making your website accessible.
Adding your domain to Namecheap is a crucial step in connecting your GoDaddy domain to your Namecheap hosting. This process ensures that your website is properly linked to your domain name, allowing visitors to find you online. It’s a straightforward task, but attention to detail is key to avoid any hiccups. Let’s walk through the steps to add your domain to Namecheap.Select Add Domain Option
Begin by logging into your Namecheap account. Once you’re in, navigate to the dashboard. You’ll see an option labeled “Add Domain.” Clicking on this will open a new window where you can enter your domain details. Make sure you have the domain name ready. This is where you’ll input your GoDaddy domain. Double-check the spelling to avoid errors that could lead to connection issues.Verify Domain Connection
After adding your domain, it’s time to verify the connection. This step ensures everything is linked correctly and that your domain is pointing to your Namecheap hosting. Check the DNS settings to confirm they match the Namecheap hosting requirements. It’s a good idea to refresh your settings after making changes to ensure they’re saved. Sometimes, changes can take a few minutes to propagate. Use this time to double-check your entries and make sure everything is accurate. Have you ever faced issues with domain connections before? If so, taking extra care during the verification process can save you time and frustration later on.Testing Domain Connection
After connecting your GoDaddy domain to Namecheap hosting, ensuring the connection is successful is crucial. Testing the domain connection helps verify if your website is live and accessible. This process confirms your domain is properly linked to your hosting. It also helps identify any potential issues early.
Check Propagation Status
Domain propagation is the time it takes for DNS records to update across the internet. It can take anywhere from a few hours to 48 hours. Use online tools to check propagation status. These tools show if your domain is pointing to the correct IP address. Enter your domain in a propagation checker to see global DNS updates. If most locations show your domain, propagation is complete.
Troubleshoot Common Issues
Sometimes, your domain might not connect as expected. Common issues include incorrect DNS settings or IP address mismatches. Double-check your DNS records on GoDaddy. Ensure they match the settings provided by Namecheap. Clear your browser cache to see recent changes. If problems persist, contact Namecheap support for assistance. They can help resolve more complex issues.

Credit: www.youtube.com
Additional Tips
Consider double-checking DNS settings to ensure proper connection. Use online tools to verify domain propagation. Seek help from customer support if needed.
Connecting your GoDaddy domain to Namecheap hosting can be a smooth journey with the right guidance. However, the process may leave you with a few questions. In this section, we’ll delve into additional tips to ensure everything runs as smoothly as possible. Let’s make sure your domain and hosting work seamlessly together.Ensure Proper Configuration
Double-checking your settings is crucial. Make sure your domain’s DNS settings in GoDaddy are pointing to the correct Namecheap hosting servers. A simple typo can cause hours of unnecessary troubleshooting. Cross-reference with Namecheap’s DNS configuration guide to avoid any pitfalls. Remember, changes can take up to 48 hours to propagate. Patience is key, but if you’ve done everything right, your site will be live shortly.Utilize Support Resources
Never underestimate the power of asking for help. Both GoDaddy and Namecheap offer extensive customer support and knowledge bases. If you’re stuck, use their chat or call services. Real-time support can often solve problems faster than searching on your own. Have you ever wasted hours because you didn’t ask for help? Don’t repeat that mistake. Reach out and use the resources available to you. These extra steps can save you time and hassle. Keep these tips in mind, and your domain-to-hosting connection will be a breeze.Frequently Asked Questions
How To Connect Domain From Godaddy To Namecheap Hosting?
Change the domain’s nameservers in your GoDaddy account to Namecheap’s. Log in to GoDaddy, go to “Manage Domains,” select your domain, and update the nameservers to Namecheap’s. Save changes and wait for the DNS propagation to complete, which may take up to 48 hours.
How To Link Godaddy Domain And Hosting?
Link your GoDaddy domain to hosting by updating nameservers in your domain settings. Access your hosting account, locate DNS settings, and enter GoDaddy’s nameservers. Save changes to establish the connection. Ensure both accounts are under the same GoDaddy login for seamless integration.
Check propagation status for successful linkage.
How Do I Connect My Domain To Namecheap Hosting?
Log in to Namecheap, go to the “Domain List,” select your domain, and click “Manage. ” Set nameservers to Namecheap’s or custom ones. Save changes and allow propagation.
How Do I Add A Namecheap Domain To Godaddy?
Log into your Namecheap account and find the DNS settings. Update the nameservers to GoDaddy’s. Next, access your GoDaddy account and add the domain using the “Add Domain” feature. Confirm DNS propagation for the domain connection. Ensure all settings are saved correctly for proper integration.
Conclusion
Connecting your GoDaddy domain to Namecheap hosting is simple. Follow the steps carefully. Update DNS settings in GoDaddy. Enter Namecheap’s nameservers. Changes may take a few hours. Test your domain after propagation. Ensure everything works smoothly. This process helps you manage your website efficiently.
Both GoDaddy and Namecheap offer support. Use their resources for any issues. Now, your domain is linked with Namecheap hosting. Enjoy seamless management of your site. This connection is essential for better control. Keep your website running smoothly. Happy hosting!


