
Are you ready to take your website live? Connecting your domain with hosting is a crucial step in making your online presence a reality.
If you’re using Namecheap for your domain and hosting, you’re in luck! This process is straightforward, but if you’re new to it, it might seem a little daunting. Imagine the satisfaction of seeing your website up and running, easily accessible to visitors from around the world.
In this guide, we’ll walk you through the steps to seamlessly connect your domain with hosting on Namecheap. By the end, you’ll be equipped with the knowledge to confidently manage your website, ensuring it works flawlessly. Let’s dive in and get your site connected and live!
Choosing The Right Domain
Choosing the right domain is a critical step in establishing your online presence. Your domain name is the first thing people see, and it can make a lasting impression. It’s not just a web address; it’s part of your brand. Think of it as your digital storefront.
Consider your domain as an asset, something that will grow with your business. You want it to be memorable, relevant, and easy to spell. Imagine a potential customer trying to remember your website; make it easy for them.
Domain Name Selection
Your domain name should reflect your brand and the content of your website. It’s your identity in the digital world. A well-chosen domain name can give you an edge in search engine rankings.
Short names are easier to remember and less prone to typos. Avoid using numbers or hyphens as they can confuse users. If your business is local, consider including your location.
Think about future growth; choose a name that won’t limit your expansion. If you’re planning to sell products, avoid names that solely focus on a service. Could your domain name stand the test of time?
Registering Your Domain
Once you’ve selected the perfect name, the next step is registration. It’s a straightforward process, but it’s vital to act quickly. Popular names get snapped up fast.
Visit Namecheap, a trusted provider, and search for your chosen domain. If it’s available, proceed with registration. If not, they offer suggestions that might suit you.
During registration, ensure your details are accurate. Domain privacy protection is an option you should consider to keep your information secure. This small step can safeguard your privacy.
Remember, a domain is an investment. It’s not just an expense. Have you thought about the future value of your domain?
Choosing and registering a domain is not just about today but about what you want your business to be in the future. With the right domain, your hosting setup with Namecheap will be seamless and ready to support your ambitions.

Credit: www.youtube.com
Understanding Hosting Options
Connecting your domain with hosting is crucial for your website. Namecheap offers various hosting solutions to fit different needs. Understanding these options will help you make the best choice.
Types Of Hosting Plans
Hosting plans vary based on features and pricing. Shared hosting is budget-friendly, ideal for small websites. You share resources with other sites, keeping costs low. VPS hosting provides more control and resources. It’s suited for growing sites. Dedicated hosting gives you an entire server. Best for large businesses needing maximum performance. Each type serves different needs and budgets.
Selecting A Hosting Plan
Choosing the right plan depends on your website’s requirements. For a personal blog, shared hosting might suffice. If your site has high traffic, consider VPS or dedicated hosting. Think about future growth and scalability. Assess your site’s current and future needs. Make an informed decision that aligns with your goals.
Setting Up Namecheap Account
Setting up your Namecheap account is the first step in connecting your domain with hosting. It’s an exciting moment where you lay the groundwork for your online presence. Let’s make this process smooth and straightforward, ensuring you have a solid foundation to build on.
Creating An Account
To start, visit Namecheap’s website and look for the Sign Up button. It’s usually in the top right corner. Click it to enter your details. You’ll need a valid email address and a strong password. Choose a password that’s easy for you to remember but hard for others to guess.
Once you’ve entered your information, hit the Create Account button. You’ll receive a confirmation email. Open the email and click the verification link. This step is crucial; it keeps your account secure.
Think about it: Your domain is like your home address on the internet. You want to ensure it’s protected, right? This is why security matters. Make sure your email is something you check regularly.
Navigating The Dashboard
After your account is set up, log in to Namecheap. You’ll be greeted by the Dashboard. This is your control center where you’ll manage domains, hosting, and other services.
Take a moment to explore. On the left side, you’ll find a menu with options like Domain List, Hosting List, and Profile. Click around and familiarize yourself. Each section has specific functions that you’ll use as you manage your domain.
Ever wonder why some websites are so smooth while others struggle? It often comes down to how well the backend is managed. Learning your way around the dashboard can save you a lot of time and headaches later.
Use the search bar at the top if you need to find something specific. It’s a handy feature that can quickly direct you to the right place.
So, what’s next? With your account set up and dashboard mastered, you’re ready to connect your domain to hosting. But first, ensure you’re comfortable with these steps. Your confidence now will pay off as you dive deeper into the process. Are you ready to take the next leap in your online journey?
Credit: www.namecheap.com
Linking Domain To Hosting
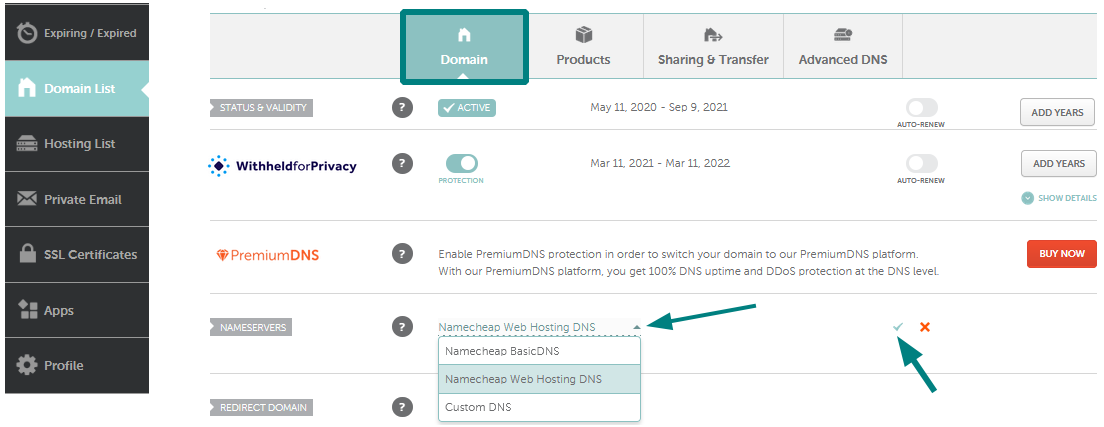
Easily connect your domain with hosting on Namecheap by updating DNS settings. Access your Namecheap account, choose your domain, and modify the nameservers to match your hosting provider. This simple process ensures your website goes live smoothly.
Linking your domain to your hosting service is a crucial step in establishing your online presence. Think of your domain as your website’s address, while the hosting is its home. Connecting them is like putting your house on the map. If you’ve chosen Namecheap as your domain registrar and hosting provider, you’re in good hands. The process is straightforward, even for beginners. Dive in and see how you can efficiently link your domain to your hosting account. ###Accessing Dns Settings
First, log in to your Namecheap account. Once you’re in, head over to the “Domain List” on your dashboard. Here, you’ll see all the domains you’ve registered. Choose the domain you want to connect. Click on the “Manage” button next to your domain. This will open a new page with various options. Look for the “Advanced DNS” tab. This is your gateway to configuring your domain. ###Updating Nameservers
Once you’re in the DNS settings, scroll down to the “Nameservers” section. You’ll see a dropdown menu here. Select “Custom DNS” to enter your hosting nameservers. Your hosting provider should have provided you with specific nameservers, usually in the format of ns1.yourhost.com and ns2.yourhost.com. Enter these in the fields provided. Save the changes. It may take some time for the changes to propagate across the internet. This is normal, so don’t panic if your site doesn’t appear immediately. Connecting your domain to your hosting is a vital skill for website owners. Have you faced challenges with it before? Share your experience or tips in the comments below!Verifying Connection
After connecting your domain to your Namecheap hosting, it’s crucial to verify the connection. This ensures your website is live and accessible. Verifying the connection is straightforward. You’ll need to check the domain status and troubleshoot any potential issues.
Checking Domain Status
Log into your Namecheap account. Navigate to the ‘Domain List’ section. Find your domain and click on ‘Manage’. Check if the domain status is active. An active status means your domain is connected properly. Visit your website to confirm it loads correctly.
Troubleshooting Common Issues
Sometimes, your domain may not connect. First, check if DNS settings are correct. Ensure you’ve set Namecheap’s nameservers for your domain. If changes were made, they might take up to 48 hours to apply. Clear your browser’s cache if your website isn’t loading.
Still facing issues? Verify your hosting account is active. Contact Namecheap support for further assistance. They can help resolve persistent issues swiftly.

Credit: www.youtube.com
Advanced Configuration
Connecting your domain with hosting on Namecheap involves a few simple steps. Start by accessing your Namecheap account, then select your domain and navigate to DNS settings. Finally, enter your hosting provider’s nameservers to link your domain efficiently.
Connecting your domain with hosting on Namecheap is a straightforward process, but diving into advanced configuration can truly enhance your website’s functionality and security. When you master these steps, you gain more control over your web presence. Have you ever wondered how advanced setups can improve your site’s performance and credibility? ###Setting Up Email Forwarding
Email forwarding is a handy tool that allows you to route emails from your domain to another email address. This is perfect if you want to maintain a professional appearance without juggling multiple inboxes. To set up email forwarding in Namecheap, go to the domain list and click ‘Manage’ next to your domain. Under the ‘Advanced DNS’ tab, you will find the ‘Email Forwarding’ section. Here, you can add your desired email address where you want to receive your emails. What happens when your emails are efficiently organized? You save time and keep your communication streamlined. ###Implementing Ssl Certificates
SSL certificates are essential for encrypting data between your server and clients. They boost your site’s trustworthiness and can positively impact your SEO rankings. In Namecheap, implementing an SSL certificate starts with purchasing one from their SSL section. Once acquired, navigate to your hosting dashboard and find the SSL section. Input your certificate details and follow the guided setup. Have you considered how your visitors feel when they see a secure connection? It’s not just about safety; it’s about trust. Advanced configuration in Namecheap isn’t just about technical prowess. It’s about making your online presence more effective and secure. As you explore these features, think about the potential impact on your audience and your business growth. Are you ready to take your site to the next level?Tips For Seamless Integration
Connecting your domain with hosting on Namecheap can seem daunting. Follow these tips for seamless integration. Ensure your website runs smoothly and efficiently. A few simple steps make the process straightforward.
Monitoring Domain And Hosting
Regular checks on your domain and hosting are crucial. Verify settings are correct. Ensure your domain points to the right hosting servers. Namecheap offers tools for monitoring. Use them to track domain status. This helps in identifying issues early.
Check DNS settings regularly. Confirm they match the hosting service. This prevents downtime. Namecheap’s dashboard provides easy access to these settings. Review them periodically for peace of mind.
Utilizing Customer Support
Customer support is a valuable resource. Namecheap has a dedicated team. They assist with domain and hosting integration. Reach out if you face challenges. Fast and helpful responses make the process easier.
Explore Namecheap’s knowledge base. It contains guides and articles. Many common issues have solutions here. This helps in understanding technical aspects. Use their live chat for immediate support. It’s available 24/7 for convenience.
Frequently Asked Questions
How To Connect Domain To Hosting In Namecheap?
To connect your domain to hosting in Namecheap, log into your account. Go to “Domain List” and select your domain. Click “Manage” and update the nameservers to your hosting provider’s nameservers. Save the changes and allow 24-48 hours for DNS propagation.
How To Connect A Domain With Hosting?
Log in to your hosting account. Find the DNS settings or domain management section. Update the nameservers with the ones provided by your hosting provider. Save the changes. Wait for DNS propagation, which can take up to 48 hours. Your domain will then be connected to your hosting.
Does Namecheap Domain Come With Hosting?
Namecheap domains do not include hosting by default. You need to purchase hosting separately. Namecheap offers various hosting plans, including shared, VPS, and dedicated options. Choose the hosting package that suits your website needs. Always ensure compatibility between your domain and hosting services for seamless operation.
How Do I Start Using My Hosting On Namecheap?
Log in to your Namecheap account. Go to “Dashboard” and select your hosting plan. Access the “cPanel” to manage your website files, domains, and emails. Use the “Softaculous” installer for easy app installations. Refer to Namecheap’s Knowledgebase for detailed setup guides.
Conclusion
Connecting your domain with hosting on Namecheap is simple. Follow the outlined steps to ensure a smooth setup. First, log into your Namecheap account. Navigate to the Domain List. Select your domain and choose “Manage. ” Update the DNS settings.
Finally, link to your hosting provider. This process ensures your website is live and accessible. Keep your login details secure. Regularly check for updates. This helps maintain your site’s performance. With these steps, your website is ready for visitors. Enjoy your online presence with ease.


