
Are you ready to make your website live but unsure how to connect your domain name to your GoDaddy hosting? You’re in the right place.
Linking your domain to your hosting is a crucial step that can seem tricky at first, but with the right guidance, you can do it quickly and easily. This guide will walk you through every step, so you won’t waste time or feel overwhelmed.
Keep reading to unlock the simple process that gets your website up and running in no time. Your online presence is closer than you think!

Credit: www.youtube.com
Choose A Domain And Hosting Plan
Choosing the right domain name and hosting plan is the first step to build a website. Both must fit your needs and goals. A good domain name helps people find you. A strong hosting plan keeps your site fast and secure.
Select The Right Domain Name
Pick a domain name that is short and easy to remember. Use common words that describe your business or topic. Avoid numbers and special characters. Check if the domain name is available on GoDaddy. Choose a domain extension like .com or .net. These are familiar and trusted by users.
Think about your audience. Use words they will recognize. Keep it simple and clear. This helps your site rank better on search engines. A good domain name builds trust and makes your site easy to share.
Pick A Suitable Hosting Package
Choose a hosting plan that fits your website size and traffic. GoDaddy offers different packages for beginners and advanced users. Shared hosting is affordable and good for small sites. VPS or dedicated hosting works better for larger sites with more visitors.
Check the storage, bandwidth, and speed offered by each plan. Look for plans with good customer support and security features. Make sure the hosting package supports your website platform, like WordPress. A reliable host keeps your site online and fast.
Access Your Godaddy Account
Connecting your domain to your hosting starts with accessing your GoDaddy account. This step is essential to manage your domains and hosting settings. Follow clear steps to enter your account and find your domains easily.
Getting into your account quickly saves time and makes the process smooth. Keep your username and password ready to avoid delays.
Log In To Godaddy Dashboard
Open your web browser and go to GoDaddy’s official website. Click on the “Sign In” button at the top right corner. Enter your username or customer number and your password. Click “Sign In” to access your dashboard.
Check your credentials carefully. Using the wrong details will block access. If you forget your password, use the “Forgot Password” link to reset it.
Navigate To Domain Manager
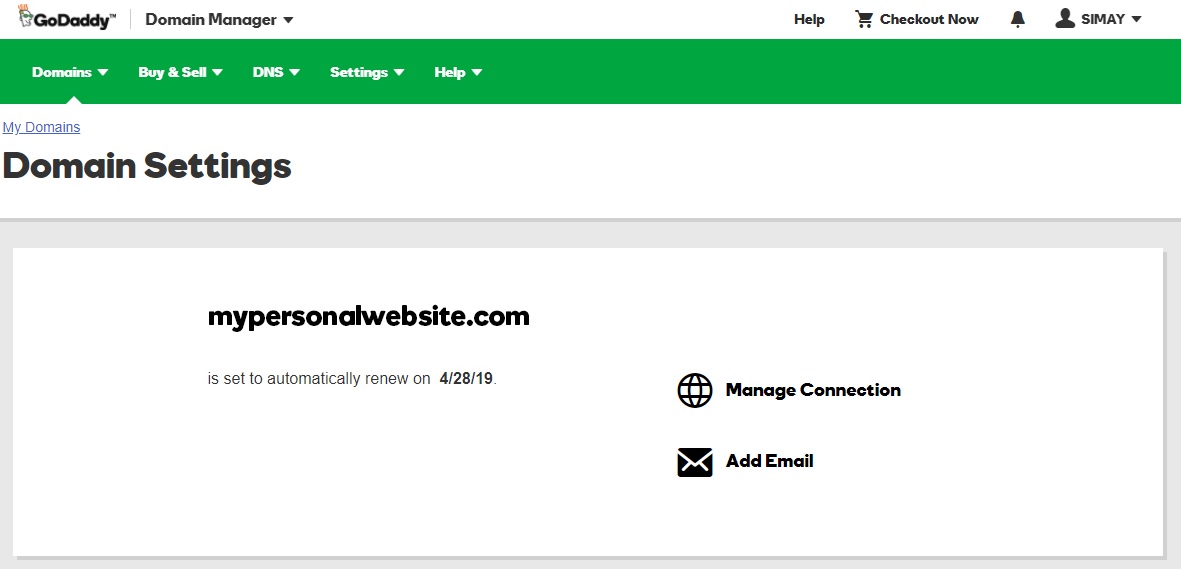
Once logged in, find the “My Products” section in your dashboard. Look for the “Domains” area and click on “Manage All.” This action opens the Domain Manager page.
In Domain Manager, you see a list of all domains you own. Select the domain you want to connect to your host. This area lets you update domain settings easily.
Update Nameservers For Your Domain
Updating the nameservers for your domain is a key step in connecting your domain name to your hosting provider. This process tells the internet where to find your website files. Without updating nameservers, visitors cannot reach your website.
This section guides you through changing nameservers on GoDaddy. The steps are simple and clear. Follow them carefully to ensure your website works properly.
Locate Nameserver Settings
First, log in to your GoDaddy account. Go to the “My Products” page. Find the domain you want to connect. Click on “DNS” or “Manage DNS” next to your domain name.
Scroll down to find the “Nameservers” section. Here, you see the current nameservers used by your domain. By default, GoDaddy uses its own nameservers.
Enter Hosting Provider Nameservers
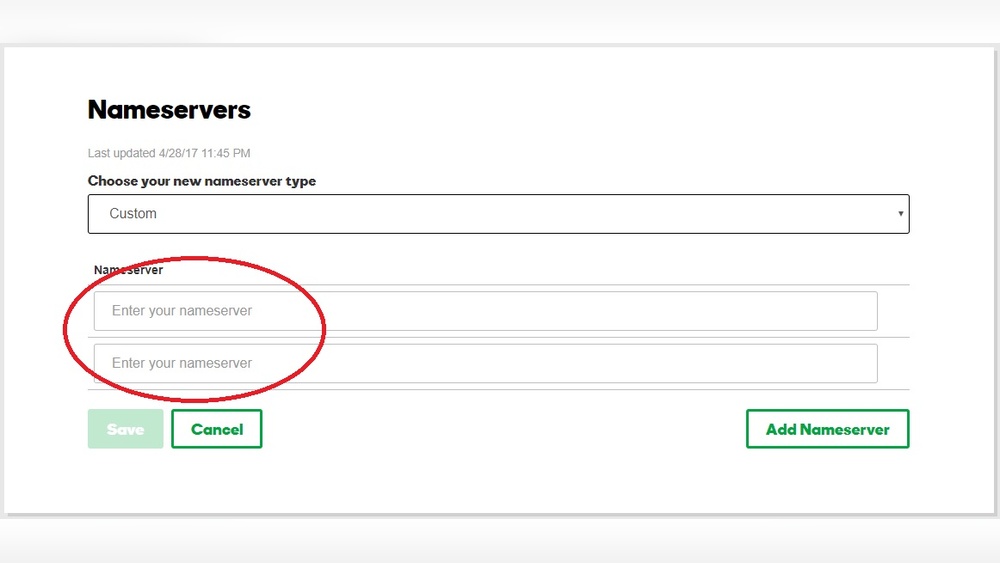
Get the nameserver addresses from your hosting provider. They usually look like ns1.example.com and ns2.example.com. Enter these nameservers in the fields provided on GoDaddy.
Remove the old nameservers before typing the new ones. Double-check for any typing errors. Save the changes once you finish.
Nameserver updates can take up to 48 hours to fully propagate. During this time, your website may not appear correctly. Be patient and avoid making other changes during this period.
Verify Dns Settings
Verifying DNS settings is a key step in connecting your domain name to GoDaddy hosting. It ensures your website points to the right server. Without proper DNS setup, visitors may not find your site. Checking your DNS records helps avoid downtime and errors. This process is simple and important for smooth website operation.
Check A And Cname Records
The A record links your domain to an IP address. It tells browsers where to find your website. Check that the A record matches the IP address from your GoDaddy hosting account. The CNAME record directs subdomains to your main domain or other services. Make sure the CNAME points correctly, especially for www versions of your site. Incorrect records cause loading issues or errors.
Ensure Proper Propagation
After updating DNS records, changes take time to spread worldwide. This process is called propagation. It can take from a few minutes to 48 hours. During propagation, your site might not load properly for some users. Avoid making more DNS changes until propagation finishes. Use online tools to check if your DNS updates have propagated fully.
Connect Domain To Hosting Panel
Connecting your domain to the hosting panel is an important step for your website. It links your domain name with the server where your site files are stored. This connection allows visitors to see your website when they type your domain name in a browser.
The process involves adding the domain to the hosting control panel and setting the correct folder for your website files. This guide explains these steps clearly so you can set up your site quickly.
Add Domain In Hosting Control Panel
Start by logging into your hosting control panel. Look for an option called “Add Domain” or “Domain Manager.” Enter your domain name exactly as you registered it with GoDaddy.
Choose the domain type. Use “Addon Domain” if you want to host multiple sites or “Primary Domain” for your main website. Save the changes to add your domain to the hosting account.
Configure Domain Root Directory
After adding your domain, set the root directory where your website files will live. This directory is a folder on your server that holds your site content.
Assign a folder name that matches your domain or use the default one created by the system. Make sure this folder is empty or contains your website files.
Save the settings to link your domain with its root directory. This step ensures your site loads correctly when visitors access your domain.
Test Your Website Connection
Testing your website connection is a key step after linking your domain to GoDaddy hosting. It confirms your site is live and accessible. This step helps spot issues early. Quick checks save time and hassle.
Clear Browser Cache
Your browser keeps old data to load sites faster. This can block new changes from showing. Clear your browser cache before testing. This forces the browser to load fresh files from your hosting.
To clear cache, go to browser settings. Find privacy or history section. Choose the option to clear cached images and files. After clearing, restart the browser for best results.
Access Site Via Domain Name
Type your domain name in the browser address bar. Press enter to load your website. Check if the correct site appears. This confirms your domain points to your GoDaddy host.
If the site does not load, wait a few minutes. DNS changes can take time to update worldwide. Try refreshing the page or using a different device.
Troubleshoot Common Issues
Connecting your domain name to GoDaddy hosting can sometimes cause issues. These problems can stop your website from working correctly. Knowing common issues helps fix them fast. Here, we cover two main problems and how to solve them.
Dns Propagation Delays
DNS changes take time to spread across the internet. This delay is called DNS propagation. It can take up to 48 hours for changes to show everywhere.
During this time, some users may see the old website or get errors. Patience is key. Avoid making more changes while waiting. Use online tools to check DNS status worldwide.
Incorrect Nameserver Entries
Nameservers direct your domain to the hosting server. Incorrect nameserver entries cause your site to not load.
Double-check that you entered the correct nameservers from GoDaddy. Even a small typo breaks the connection. Update nameservers in your domain settings carefully.
After fixing, allow time for DNS propagation again. Confirm your site works by visiting your domain in a browser.
Credit: knowledge.hubspot.com
Tips For Smooth Domain Hosting Setup
Setting up your domain with GoDaddy hosting can be easy. Follow some simple tips to make the process smooth. These tips help avoid delays and errors during setup. They also keep your website running without issues.
Keep your account details correct and use the support tools GoDaddy offers. These steps save time and reduce frustration. Let’s explore these tips in detail.
Keep Account Information Updated
Always keep your GoDaddy account information current. Check your email address and phone number regularly. GoDaddy sends important messages about your domain and hosting here. If these details are old, you might miss alerts or verification requests.
Update your billing information too. Unpaid bills can pause your hosting service. This causes your website to go offline. Avoid this by confirming your payment details are correct.
Use Support Resources
GoDaddy provides many support options. Use their help center to find guides and FAQs. These resources answer common questions fast. You can also use live chat or phone support for urgent issues.
Do not hesitate to ask for help. Support teams can guide you through any problem. This saves you time and prevents mistakes during setup.
Credit: www.godaddy.com
Frequently Asked Questions
How Do I Connect My Domain To Godaddy Hosting?
To connect your domain to GoDaddy hosting, update your domain’s nameservers to GoDaddy’s. This links your domain with the hosting server for website access.
What Are Godaddy Nameservers For Domain Connection?
GoDaddy nameservers typically are nsXX. domaincontrol. com and nsYY. domaincontrol. com. Replace XX and YY with your specific server details found in your GoDaddy hosting account.
Can I Connect A Domain From Another Registrar To Godaddy?
Yes, you can connect an external domain by changing its nameservers to GoDaddy’s. This directs the domain traffic to your GoDaddy hosting.
How Long Does Domain Connection To Godaddy Take?
Domain propagation after updating nameservers usually takes 24 to 48 hours. During this time, your website may be temporarily inaccessible.
Conclusion
Connecting your domain name to GoDaddy hosting is simple and clear. Follow each step carefully, and you will see your website live soon. Double-check your DNS settings to avoid common mistakes. Give some time for changes to spread across the internet.
Once done, your site will be ready for visitors. Keep this guide handy for quick reference anytime. Enjoy your online presence with confidence and ease.


