
Are you ready to make your website live but unsure how to link your domain to your hosting? Connecting your domain to hosting is a crucial step that can feel confusing if you’re new to it.
But don’t worry—this guide will walk you through the process in simple, clear steps. By the end, you’ll have your website up and running smoothly. Keep reading, because getting this right means your visitors can find you easily online, boosting your site’s success from day one.
Credit: www.godaddy.com
Choose The Right Hosting Provider
Choosing the right hosting provider is a key step in connecting your domain to hosting. The right provider ensures your website runs smoothly and stays online. It affects your site speed, security, and how easy it is to manage your site.
Many hosting options exist, each with different features and prices. Understanding these options helps pick the best one for your needs. Think about what your website needs now and in the future.
Types Of Hosting Services
Shared hosting is the cheapest option. Many websites share one server. It works well for small sites with low traffic.
VPS hosting offers more power. You get a part of a server just for your site. This is good for growing websites.
Dedicated hosting means you rent a whole server. It gives the best performance and control. Best for large websites with high traffic.
Cloud hosting uses many servers. It can handle traffic spikes easily. You pay for what you use.
Factors To Consider
Check uptime guarantees. Your site should be online almost all the time. Look for providers with at least 99.9% uptime.
Speed matters. Faster servers improve user experience and SEO. Choose providers with good server locations near your audience.
Security features protect your site. Look for SSL certificates, backups, and malware scans.
Customer support helps solve issues fast. 24/7 support with live chat or phone is best.
Price matters but don’t pick only by cost. Balance features and budget for best value.
Register Your Domain Name
Registering your domain name is the first step to building your website. A domain name is your site’s address on the internet. It helps visitors find you easily. Choosing the right domain is very important for your brand and online presence.
Selecting A Domain Registrar
A domain registrar is a company that sells domain names. Choose a registrar that is trustworthy and easy to use. Look for clear pricing and good customer support. Popular registrars include GoDaddy, Namecheap, and Google Domains. Check if the registrar offers extra features like privacy protection.
Tips For Choosing A Domain
Pick a domain name that is short and easy to remember. Avoid using numbers or special characters. Use words related to your business or niche. Choose a common domain extension like .com or .net. Make sure your domain name is unique and not similar to others. This helps avoid confusion and legal issues.
Access Your Domain Control Panel
Accessing your domain control panel is the first step to connect your domain to hosting. This panel lets you manage your domain settings easily. You can change DNS records and link your domain to your hosting service here.
Knowing how to log in and navigate the DNS settings is important. It helps you avoid mistakes that could disrupt your website. Follow simple steps to find the right place and adjust your settings correctly.
Logging In
Start by visiting your domain registrar’s website. This is where you bought your domain name. Look for the login button, usually at the top right corner.
Enter your username and password carefully. Use the credentials you created during registration. If you forgot your password, use the reset option to get a new one.
After logging in, you will see your account dashboard. This dashboard shows all your domains and services. Find the domain you want to connect to your hosting.
Navigating Dns Settings
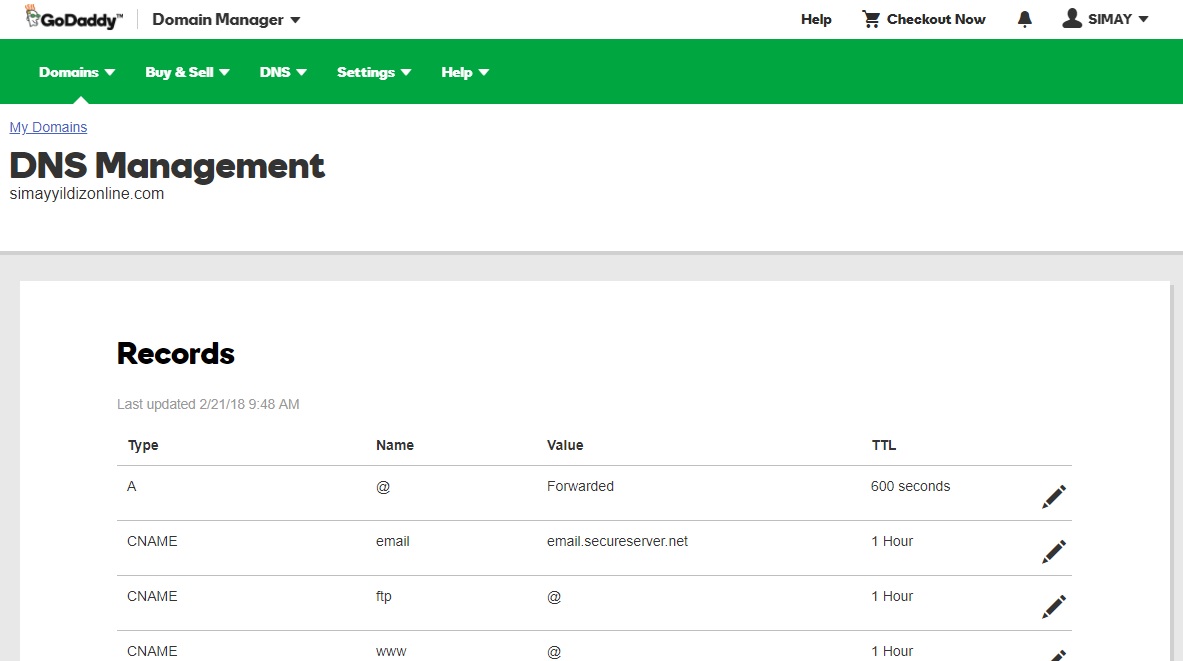
Once you find your domain, look for DNS management or DNS settings. This section controls how your domain works on the internet.
Here, you can edit records such as A, CNAME, and MX. These records tell the internet where to find your website and email services.
Make sure to save any changes you make. Incorrect settings can cause your website to go offline. Take your time and double-check before saving.
Credit: www.namecheap.com
Update Nameservers
Updating nameservers is a key step in connecting your domain to your hosting. Nameservers tell the internet where to find your website. Without updating them, your domain will not show your hosting content. This process helps your domain point to the correct server.
Finding Hosting Nameservers
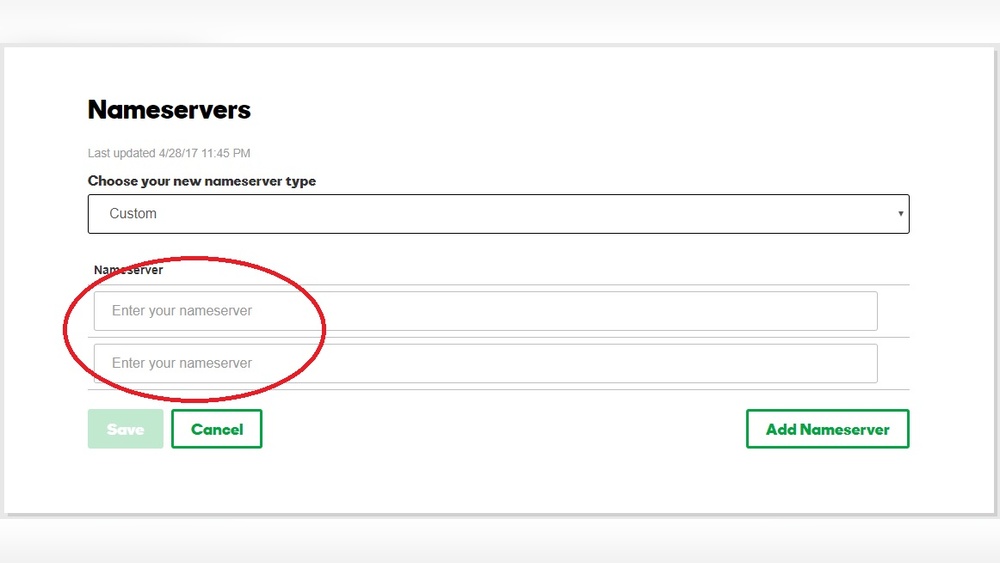
Start by logging into your hosting account dashboard. Hosting companies usually display nameservers in the control panel. Look for sections like “DNS Settings” or “Account Information.” Nameservers often look like ns1.examplehost.com and ns2.examplehost.com. Copy these addresses exactly as they appear.
Replacing Default Nameservers
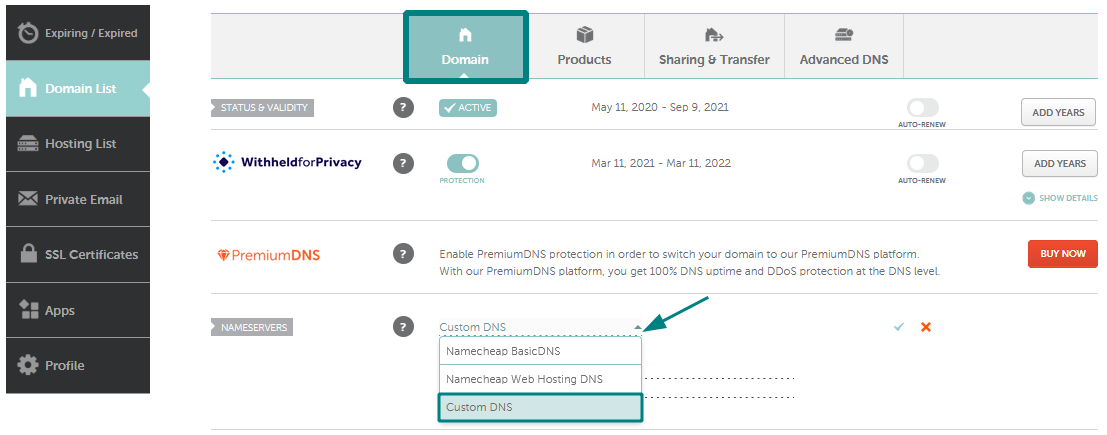
Next, go to your domain registrar’s website. Find the option to manage your domain’s DNS or nameservers. Replace the default nameservers with the ones you copied from your hosting. Save the changes to update your domain records. The update may take a few hours to fully work worldwide.
Configure Dns Records
Configuring DNS records is an important step to connect your domain to your hosting. DNS records tell the internet where to find your website. They link your domain name to the server where your website files are stored.
Proper DNS setup ensures visitors reach your website quickly and without errors. It also helps with email delivery if you use domain-based email services. Two key types of DNS records are A records and CNAME records.
Setting A Records
A records point your domain to an IP address. This IP address is the location of your hosting server. To set an A record, log in to your domain registrar’s DNS settings.
Find the section for A records and enter the IP address of your hosting server. Usually, the main domain uses the “@” symbol for the host name. Save the changes. It may take a few minutes to propagate worldwide.
Adding Cname Records
CNAME records link subdomains to another domain name. For example, “www” often points to the main domain. This helps ensure users typing “www.yoursite.com” reach your website.
Go to the DNS settings and find the CNAME record section. Add a new record with the subdomain as the host and your main domain as the target. Save the record and wait for the update to apply.

Credit: www.youtube.com
Verify Domain And Hosting Connection
Verifying the connection between your domain and hosting is a vital step. It ensures your website is live and accessible to visitors. Without this check, your site might not load properly or show errors.
This step confirms that your domain points correctly to your hosting server. It also helps spot any mistakes in the setup early. A smooth connection means your website runs as expected.
Using Online Tools
Several free online tools help verify your domain-hosting connection. Tools like DNS Checker and Pingdom provide clear insights. They check if your domain’s DNS records point to your hosting IP.
These tools show propagation status worldwide. They reveal if DNS changes have spread fully. Simple results mean your connection is good.
Enter your domain name in the tool. Wait a few seconds for the report. Look for the correct IP address linked to your host. This confirms the domain points to your hosting.
Troubleshooting Common Issues
Sometimes, the connection fails or shows errors. Common reasons include wrong DNS settings or propagation delays. Double-check your domain’s nameservers and A records.
Clear your browser cache and try again. DNS changes can take up to 48 hours. Patience helps during propagation.
Check for typos in domain or hosting details. Contact your hosting provider if problems persist. They can assist with deeper technical checks.
Wait For Dns Propagation
After you connect your domain to hosting, DNS propagation begins. This process updates the internet with your domain’s new server information. It takes some time for all servers worldwide to recognize this change. During this period, your website might not appear correctly for everyone. Patience is key as the changes spread.
Typical Timeframes
DNS propagation usually takes between 24 to 48 hours. Some updates can happen faster, within a few hours. In rare cases, it may take up to 72 hours. The exact time depends on your domain registrar and internet service providers. Keep in mind, some users may see the site sooner than others.
How To Check Status
Use online tools to check DNS propagation status. Enter your domain name in these tools to see current DNS records. They show how many servers have updated with your new hosting info. Check multiple locations to get a clear picture. This helps you know when your site is fully live.
Secure Your Website With Ssl
Securing your website with SSL is a crucial step after connecting your domain to hosting. SSL (Secure Sockets Layer) protects your site by encrypting data transferred between users and your server. This keeps sensitive information safe from hackers and builds trust with your visitors.
Many hosting providers offer free SSL certificates, making it easy to add security. Installing SSL is simple and improves your site’s ranking on search engines. Visitors see a padlock icon in their browser, signaling a secure site.
Installing Ssl Certificates
Start by checking if your hosting provider offers free SSL certificates. Most hosts provide an easy way to install SSL via their control panel. Locate the SSL or security section in your hosting dashboard.
Choose the option to install a free SSL certificate or upload a certificate if you bought one. Follow the on-screen instructions carefully. The system will configure the SSL certificate for your domain automatically.
Once installed, confirm that the certificate is active. You can use online tools to verify the SSL status of your website.
Enabling Https
After installing SSL, switch your website from HTTP to HTTPS. This change tells browsers to use a secure connection. Many content management systems and hosting services offer settings to enforce HTTPS.
Update your website links and settings to use HTTPS URLs. This prevents mixed content errors and ensures all data is encrypted. Redirect HTTP traffic to HTTPS for all users automatically.
Test your website by visiting it with https:// before the domain. The padlock icon should appear, showing your site is secure. HTTPS helps protect your users and boosts your website’s credibility.
Frequently Asked Questions
How Do I Link My Domain To My Hosting Provider?
To link your domain, update your domain’s DNS settings with your hosting provider’s nameservers. This directs traffic from your domain to your hosting server efficiently.
Can I Connect A Domain To Hosting Without Changing Dns?
No, changing DNS settings is essential. It tells the internet where your website files are hosted, enabling proper connection between domain and hosting.
How Long Does Domain-to-hosting Connection Take?
DNS propagation can take 24 to 48 hours. During this time, your domain gradually points to the hosting server worldwide.
What Information Do I Need To Connect Domain To Hosting?
You need your hosting provider’s nameserver addresses. These are entered in your domain registrar’s control panel to link domain with hosting.
Conclusion
Connecting your domain to hosting is simple with clear steps. Start by updating your domain’s nameservers to match your host. Then, wait for the changes to take effect, which can take a few hours. Check your website to make sure it loads correctly.
Troubleshoot any problems by reviewing your settings or contacting support. Taking time to connect your domain properly helps your website run smoothly. This small effort ensures visitors find your site easily and quickly.


