
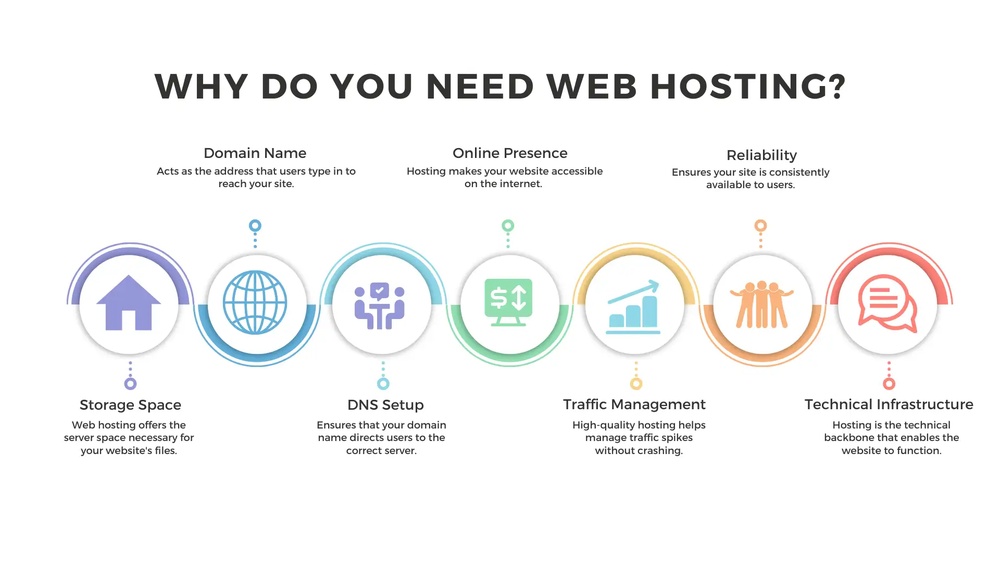
Setting up your website starts with one crucial step: connecting your domain name to your web hosting. If you’re wondering how to make this connection work smoothly, you’re in the right place.
Imagine your domain as your website’s address and your web hosting as the house where all your content lives. Without linking the two properly, your visitors won’t find you online. This guide will walk you through simple, clear steps to configure your domain name with your web hosting.
By the end, you’ll have full control and confidence to get your site live quickly. Ready to make your website accessible to the world? Let’s dive in.
Choosing A Domain Name
Choosing a domain name is the first step in creating your website. It gives your site an identity and helps visitors find you online. A good domain name should be simple, easy to remember, and reflect your brand or topic clearly.
The right domain name can build trust and improve your site’s visibility in search engines. Take your time to pick one that fits your goals and audience. A well-chosen domain name sets the foundation for your online presence.
Tips For Selecting A Domain
Keep the domain name short and easy to spell. Avoid numbers and hyphens as they can confuse users. Use keywords that relate to your business or content. Choose a name that sounds professional and trustworthy. Consider the future growth of your site when picking a name.
Checking Domain Availability
Check if your desired domain name is available using domain search tools. Many web hosting providers offer free domain search services. If the name is taken, try variations or different extensions like .net or .org. Avoid names that are too similar to popular sites to prevent confusion. Always confirm the domain is free to register before moving forward.
Selecting A Web Hosting Provider
Selecting a web hosting provider is a crucial step in setting up your website. The right host ensures your site runs smoothly and stays online. Choosing carefully saves time, money, and future headaches. Understanding your options helps you make the best choice for your needs.
Types Of Hosting Services
Shared hosting is affordable and good for small websites. Many sites share the same server resources here.
VPS hosting offers more power and control. It divides a server into virtual parts for each user.
Dedicated hosting means renting an entire server. It suits large sites needing high performance.
Cloud hosting uses multiple servers to keep your site online. It scales easily with traffic demands.
Factors To Consider
Check uptime guarantees to avoid frequent downtime. Aim for hosts with 99.9% or higher uptime.
Look at storage and bandwidth limits. Make sure they fit your website size and visitor volume.
Consider customer support availability. Fast help is vital if problems arise.
Review security features such as SSL certificates and backups. These protect your site and data.
Compare prices and renewal fees. Some hosts offer low initial rates but higher renewal costs.
Registering Your Domain
Registering your domain is the first step to building your website. It gives your site a unique address on the internet. This address helps visitors find your website easily. Choosing the right domain name is important. It should be simple, easy to remember, and related to your content.
The registration process connects your chosen domain to your web hosting. This connection allows your website to appear online. Let’s explore how to register your domain correctly.
Using Domain Registrars
Domain registrars are companies that sell domain names. They help you find and buy the domain you want. Popular registrars include GoDaddy, Namecheap, and Google Domains. These sites offer tools to check if your domain is available. You can compare prices and features easily. Choose a registrar that fits your budget and needs.
Completing The Registration Process
After picking a registrar, start the registration. Enter your chosen domain name in their search box. Confirm the domain is free. Then, add it to your cart and proceed to checkout. You will need to provide your contact details. These details become part of the public domain record. Some registrars offer privacy protection to keep your info safe.
Pay for your domain using a credit card or other methods. After payment, you receive a confirmation email. This email contains important information about your domain. Keep it safe for future reference. Your domain is now registered and ready to connect with your web hosting.
Credit: simpledns.plus
Accessing Your Hosting Account
Accessing your hosting account is the first step to connect your domain name with your web hosting. This process allows you to manage your website files, databases, and settings. Understanding how to log in and navigate the control panel makes website management easier and faster.
Logging Into The Control Panel
Start by visiting your hosting provider’s website. Look for the login button, usually at the top right corner. Enter your username and password. These details are often sent in your welcome email after signing up. Use strong passwords to keep your account secure.
After entering your login details, click the submit or login button. The control panel dashboard will appear. This area is your central hub to control your hosting services.
Navigating Key Features
The control panel contains many tools. Find sections like file manager, domain manager, and email accounts. Use the file manager to upload or edit your website files. The domain manager helps you link your domain to your hosting.
Check the email section to create and manage email accounts linked to your domain. Look for settings or help buttons if you need assistance. Spending time here helps you understand how to manage your hosting easily.
Pointing Domain To Hosting Server
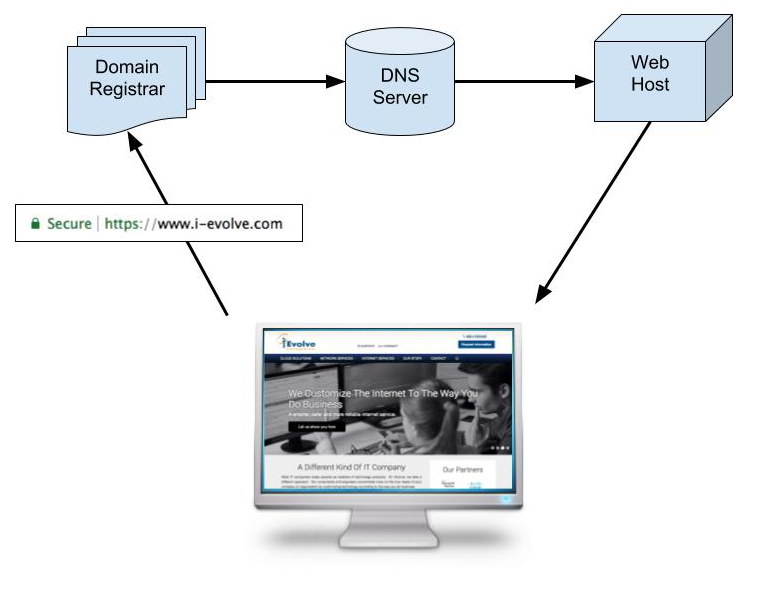
Pointing your domain to a hosting server is a key step in making your website live. This process tells the internet where to find your website files. Without pointing your domain correctly, visitors cannot access your site. The main task is to connect your domain name with your hosting server.
This connection happens through domain name system (DNS) settings. You can update these settings in two common ways. Both methods guide your domain to load your hosted website properly.
Updating Nameservers
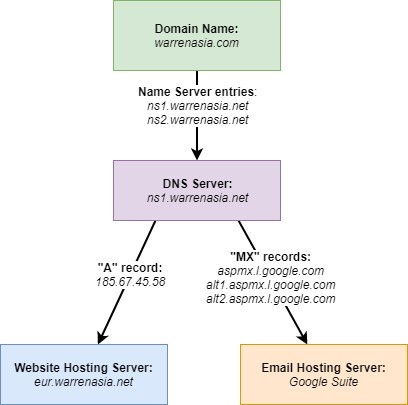
Nameservers are special servers that manage your domain’s DNS records. Your hosting provider gives you nameserver addresses. These usually look like ns1.example.com and ns2.example.com.
To update nameservers, log in to your domain registrar’s control panel. Find the section called “Nameservers” or “DNS Settings.” Replace the current nameservers with the ones from your hosting provider. Save the changes. It may take up to 48 hours for updates to spread worldwide.
Using Dns Management Tools
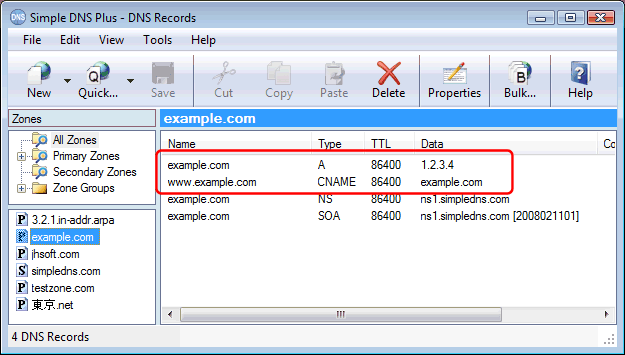
DNS management tools let you change specific DNS records without switching nameservers. Common records include A, CNAME, and MX records. These control where your domain points for web, email, and other services.
Access your domain registrar’s DNS management area. Here, add or edit the A record to point to your hosting server’s IP address. Enter the IP address provided by your host. Save your changes. This method updates your domain quickly, often within minutes to hours.
Credit: www.i-evolve.com
Verifying Domain Connection
Verifying your domain connection is a key step after setting up your domain with web hosting. It confirms that your website is ready to go live. This process ensures your domain points correctly to your hosting server. Without verification, visitors may not reach your website.
Proper verification helps avoid downtime and errors. It also improves your site’s reliability. Let’s explore how to check your domain connection effectively.
Checking Dns Propagation
DNS propagation means spreading your domain’s new settings across the internet. This process can take from a few minutes to 48 hours. Use online tools like DNS checker to monitor propagation status.
Enter your domain name and check if the DNS records show your hosting server’s IP. If the records match, propagation is complete. This means your domain is connected correctly.
Troubleshooting Common Issues
Sometimes, the domain may not connect due to common problems. A frequent issue is incorrect DNS settings. Double-check your nameservers and DNS records.
Clear your browser cache and try accessing the site again. Also, verify there is no typo in your domain name. Contact your hosting provider if issues persist.
Setting Up Website Files
Setting up your website files is a key step after linking your domain name with web hosting. These files make your website visible online. You need to place your website files correctly on the server. This process is simple and can be done in two main ways.
Uploading Via Ftp
FTP stands for File Transfer Protocol. It helps move files from your computer to the hosting server. You need an FTP client like FileZilla or Cyberduck. Connect to your hosting account using FTP details from your provider. After connecting, drag and drop your website files into the public_html folder. This folder is the main directory for your website. Wait for the upload to finish before closing the FTP client.
Using File Managers
Most web hosts offer an online File Manager in the control panel. This tool lets you upload files directly through your browser. Open the File Manager and find the public_html folder. Click the upload button and select your website files. You can also create folders or edit files here. This method is good for quick updates or small changes. It does not require extra software.
Configuring Email With Domain
Configuring email with your domain gives your website a professional touch. It allows you to send and receive emails using your domain name. This builds trust with visitors and clients. Setting up email is a simple step after connecting your domain to web hosting. It involves creating email accounts and linking them to email apps. Follow these easy steps to get started.
Creating Email Accounts
Start by logging into your web hosting control panel. Find the email section, often called “Email Accounts.” Click to create a new email address using your domain name. Choose a username, like info or contact. Set a strong password to keep your account safe. After saving, your email account is ready to use. You can create multiple accounts for different purposes or team members.
Setting Up Email Clients
Email clients help you read and send emails easily. Popular clients include Outlook, Apple Mail, and Thunderbird. Open your chosen email client and find the account setup option. Enter your new email address and password. Use your web host’s mail server settings for incoming and outgoing mail. These settings include server names and port numbers. Save the settings and test by sending a message. Now, you can manage your domain email from any device.
Securing Your Website
Securing your website protects your data and builds trust. Visitors feel safe sharing information on secure sites. Security also improves your search engine ranking. It stops hackers from stealing data or injecting malware. Two key steps help secure your site: installing SSL certificates and enabling HTTPS.
Installing Ssl Certificates
SSL certificates encrypt data between your site and visitors. This stops hackers from reading sensitive information. Most web hosts offer free or paid SSL certificates. Installing one is simple. Log into your hosting control panel. Find the SSL section and follow instructions to activate it. After installation, your site shows a padlock icon in the browser. This signals safety to visitors.
Enabling Https
HTTPS is the secure version of HTTP. It uses the SSL certificate to protect data. Enabling HTTPS is crucial after installing SSL. You can force your site to load with HTTPS by editing your .htaccess file or using your hosting tools. This ensures all traffic is secure. Without HTTPS, data can be vulnerable. Make HTTPS the default for your entire website.
Credit: www.warrenasia.com
Frequently Asked Questions
What Is The First Step To Configure A Domain With Hosting?
The first step is to register a domain name with a registrar. Then, choose a web hosting provider that suits your needs. After that, link the domain to the hosting server via DNS settings.
How Do I Update Dns Settings For My Domain?
Log in to your domain registrar’s control panel. Locate the DNS management section. Replace the default nameservers with your hosting provider’s nameservers. Save changes and wait for DNS propagation, which may take up to 48 hours.
Can I Use A Domain From One Provider With Another Host?
Yes, you can. Update the domain’s nameservers to point to the new hosting provider. This directs traffic from your domain to the new host’s servers seamlessly.
How Long Does Domain And Hosting Configuration Take?
Domain and hosting configuration usually completes within a few hours. DNS propagation can take up to 48 hours. During this time, your website may not be immediately accessible.
Conclusion
Configuring your domain name with web hosting is a simple process. Follow each step carefully for best results. Double-check your DNS settings to avoid errors. Your website will go live once everything is set. This connection helps visitors find your site easily.
Take your time and ask for help if needed. A well-configured domain supports your online presence. Keep your information updated to maintain smooth access. Now, you are ready to share your website with the world.


