
Are you feeling stuck with your current web hosting and wondering how to make a change? Switching web hosting might seem daunting, but it doesn’t have to be.
Imagine a smoother, faster, and more reliable experience for your website visitors. You have the power to make that happen! This guide will walk you through the steps to change your website hosting effortlessly. Discover how you can enhance your site’s performance and security, and give yourself peace of mind knowing your website is in capable hands.
Dive into the world of hosting transition and unlock the potential for a better online presence. Your website deserves the best, and you’ll find out how to get it. Read on to transform your hosting experience.
Choosing A New Hosting Provider
First, check what each plan offers. Disk space and bandwidth are important. More space and bandwidth mean a better plan. Some plans offer free domains or SSL certificates. These are good deals. Always consider the support they provide. 24/7 support can save you in emergencies.
Make a list of features you need. Then, compare prices. Some providers are cheap but lack features. Others are costly but offer great tools. Price should match the features you get. Look for hidden fees in the fine print. Check if they offer a money-back guarantee.
Reviews tell you about other people’s experiences. They can reveal hidden issues. Look for patterns in the reviews. Many bad reviews could mean problems. Testimonials can show how happy clients are. Choose providers with mostly good feedback. Trust the reviews that seem detailed and fair.
Credit: diggitymarketing.com
Backing Up Your Website
A database holds your website’s important data. Backing up this data is crucial. Use your hosting control panel for this task. Look for the backup or export option. Save the backup file to your computer. This ensures data safety.
Website files include images and code. Backing up these files is easy. Use an FTP client to access your site. Download all files to your computer. Keep them in a safe folder. This protects your website’s content.
Many tools can help with backups. Some are free, others need payment. Choose one that fits your needs. Install the tool on your site. Set it to create backups regularly. This makes sure your site is always safe.
Transferring Domain Name
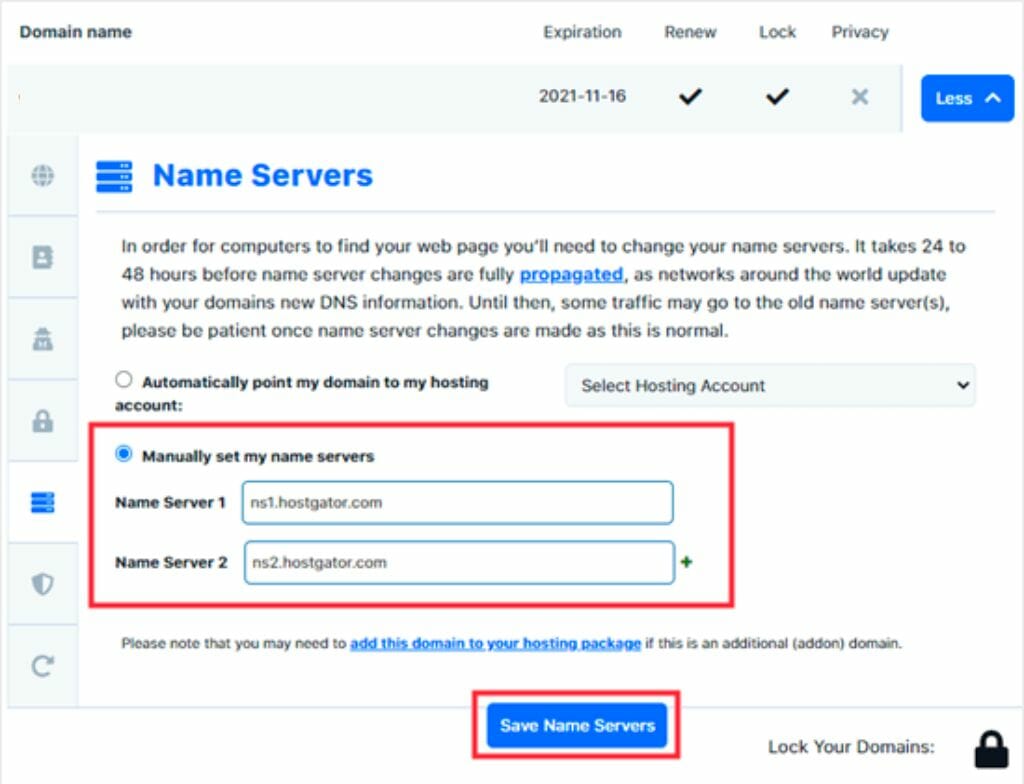
DNS records help your domain connect to your new host. Access your domain registrar to update these records. Locate the DNS settings section. Change the nameservers to those of your new host. Save your changes before exiting. This step is crucial. Without it, your site won’t function.
Transferring your domain is simple. Start by unlocking your domain. Get the authorization code from your current registrar. Provide this code to your new registrar. Pay any required fees. This process might take a few days. Be patient. Keep an eye on your email for updates.
DNS changes take time. Check the status of your DNS propagation. Use online tools to see the progress. This process can take up to 48 hours. Ensure your site is visible in different regions. Patience is key. Keep testing until everything works smoothly.
Migrating Website Files
First, log in to your new hosting account. Use the file manager or an FTP client. Begin uploading your website files. Ensure all important files transfer smoothly. Double-check for missing files. A complete upload is crucial for your site. Backup your files for safety.
File permissions are important. They control who can access files. Set permissions using your hosting control panel. Correct permissions keep your site safe. Wrong settings can cause errors. Check permissions for each file. Ensure read, write, and execute settings are correct.
Testing ensures everything works. Open your website in a browser. Check if all pages load properly. Look for broken links or images. Test different parts of your site. Ensure everything is in place. Testing helps you find issues early.
Database Migration
Exporting databases means saving your data. Use tools to help. phpMyAdmin is popular. Open it in your old host. Choose the database you need. Click Export. Save the file on your computer. This file has all your data. Keep it safe.
Importing is bringing your data to the new host. Use phpMyAdmin again. Open it in your new host. Click Import. Select the file you saved. Wait for the upload to finish. Your data is now on the new host.
Check if your data moved correctly. Open your new host. Look at the database. Compare it with the old one. Everything should match. If something is wrong, try again. Data integrity is important. Your website needs correct data.
Configuring New Hosting Environment
First, open your hosting dashboard. Find the email accounts section. Click on “Create New Email”. Enter the desired email address. Choose a strong password. Make sure to save your settings. Test your new email to ensure it works.
Go to the server settings page. Check the PHP version. Update it if needed. Adjust the memory limits. Set the correct time zone. Save all changes. These steps help your site run smoothly.
Access the software installer in your hosting panel. Find the application installer section. Look for the software you need. Click “Install”. Follow the on-screen instructions. Common software includes WordPress or Joomla. Ensure everything is up-to-date. This keeps your site secure.
Testing Website Functionality
Ensure all links work. Click each link to test it. Verify that it goes to the right page. Check the navigation bar. Make sure all menus open correctly. Each button should lead to a new page. Broken links confuse users. They make the site hard to use.
Test the site on different devices. Check how it looks on phones. Tablets too. The design should adjust automatically. Content must fit the screen. Images should resize correctly. Text must remain readable. If design is not responsive, fix it. Users will leave if they struggle.
Test all forms on the site. Fill out each field. Submit the form. Ensure you get a response. Check scripts as well. Scripts must work smoothly. They should not cause errors. Test them regularly. Fix any problems quickly. Users expect forms to work correctly.

Credit: firstsiteguide.com
Updating Search Engine Settings
Search engines need to know your site changes. Submit a new sitemap to them. Use Google Search Console for this task. It helps Google find your new pages. Bing Webmaster Tools works for Bing. Each search engine has tools. Use them for better results.
Keep an eye on search performance. Google Search Console shows how users find your site. Check clicks and search queries. Learn what users search. Improve your website based on this data. Regular checks help keep your site healthy.
Old links can break when you change hosting. Set up redirects to fix them. Use 301 redirects for permanent changes. They tell search engines where the new page is. Avoid losing visitors with broken links. Keep your website smooth and accessible.
Monitoring Post-migration Performance
Website speed affects user happiness. A slow site may upset visitors. Use tools like Google PageSpeed Insights. These tools show your site’s speed. Find what slows your site down. Improve these areas. Speed matters.
Know your visitors. Use tools like Google Analytics. See how many people visit. Track which pages they like most. Check if traffic drops after migration. Find patterns. Understand visitor behavior.
Problems may arise after migration. Broken links are common. Fix them quickly. Check for missing images. Ensure all files are in place. Use tools to find errors. Resolve issues fast. Keep your site running smoothly.
Credit: www.hostinger.com
Frequently Asked Questions
How Do I Change The Hosting Of A Website?
To change website hosting, choose a new provider, back up files, and transfer domain settings. Upload your site to the new host and test functionality. Ensure all DNS records point to the new server. This process ensures a smooth transition and minimal downtime for your website.
Can I Move My Website To A Different Host?
Yes, you can move your website to a different host. Backup your files and database first. Choose a reliable hosting provider. Transfer your website data and test it thoroughly. Update your domain’s DNS settings to point to the new host.
Ensure everything works smoothly before closing your old hosting account.
How Do I Shift A Website From One Server To Another?
To shift a website to a new server, follow these steps: backup your website files, export the database, upload files to the new server, import the database, and update DNS settings. Ensure everything is working properly and test the website thoroughly on the new server before finalizing the transfer.
How Hard Is It To Change Website Hosts?
Changing website hosts can be challenging but manageable. It involves backing up files, transferring domains, and updating DNS settings. Choose a reliable host and follow their migration guide for a smooth transition. Many hosts offer free migration services to simplify the process.
Ensure minimal downtime by planning the switch carefully.
Conclusion
Changing your web hosting can feel daunting. It’s manageable with the right steps. Start by backing up your website data. Choose a new hosting provider wisely. Ensure they meet your needs. Transfer your domain and files smoothly. Pay attention to potential downtime.
Testing your website after the move is crucial. Check for any errors or broken links. Keep track of your website’s performance. Monitor visitor feedback to spot issues early. Remember, support is essential. Contact your new hosting provider if needed. A successful transition will help your site function well.
Your online presence matters.


