
Are you feeling trapped by your current web hosting provider? Maybe it’s the sluggish loading times, the limited features, or those frustrating downtimes that always seem to happen at the worst possible moments.
Whatever the reason, you’re probably wondering how to change web hosting without losing your site’s data or your mind. Imagine a world where your website loads in the blink of an eye, your features expand as your business grows, and your visitors never face downtime.
Sounds perfect, right? The good news is, switching your web hosting provider can turn this dream into reality. But how do you make the switch without stumbling over technical hurdles or losing your website’s SEO juice? In this guide, we’ll walk you through a step-by-step process, making it as easy as pie. You’ll learn how to safeguard your data, choose the right host, and ensure a seamless transition, all while keeping your site’s performance intact. Ready to break free and boost your website’s potential? Let’s dive in.
Choosing The Right Hosting Provider
Understand what your website needs. Do you need a lot of space? Is speed important for you? Think about these things. Decide if you need extra features. Some hosts give more security or better support.
Look at different hosting options. Shared hosting is cheap. But VPS hosting gives more control. Cloud hosting can handle more traffic. Choose what fits your budget and needs best.
Read what other people say. Reviews tell you the good and bad. Testimonials show happy stories. Trust real user experiences. They help you choose the best hosting provider.
Preparing For The Transition
Backing up your website is very important. Save all your files safely. Use a trusted tool to copy everything. This includes images, text, and settings. Store these copies in a safe place. This way, you can find them if needed.
Tell your stakeholders about the move. Let them know what you are doing. Explain why you are changing hosts. This helps avoid confusion. Everyone stays informed.
Check your domain settings before moving. Make sure they are correct. Look at your email settings too. Ensure emails go to the right place. This keeps your messages flowing smoothly.
Transferring Website Files
FTP tools help move files between computers. FileZilla is a popular choice. It is easy to use and free. First, download and install the tool. Then, enter your server’s hostname, username, and password. Connect to your server. You can now see files on your computer and server. Drag files from your computer to the server. This uploads them. Remember, the internet must be stable. Otherwise, files might get lost.
Large files can be tricky. ZIP them to make them smaller. This helps in faster uploads. Use tools like WinRAR or 7-Zip. After uploading, unzip them on the server. Check if all files are there. If some files are missing, upload them again. Using a stable internet helps. Large files need more time to upload. Be patient and check progress.
File permissions are important. They tell who can read or write files. Use FTP tools to change permissions. Right-click on the file and select Permissions. Set permissions to 755 for folders. For files, set permissions to 644. This keeps your site safe. Wrong permissions can cause errors. Always double-check them. It ensures files work properly on the server.
Migrating Databases
First, open your current hosting account. Locate the database management tool. This tool is often called phpMyAdmin. Select the database you want to export. Click on the “Export” tab. Choose the format type, usually SQL. Click “Go” or “Download.” Save the file on your computer.
Access your new hosting account. Go to the database section. Create a new database. Give it a name. Add a user with full permissions. Note the username and password. You will need them soon. Keep them safe.
Open the database management tool on your new host. Select the new database. Click on the “Import” tab. Choose the file you exported earlier. Click “Go” to start the import. Wait for the process to finish. Check for any errors. Ensure all data is correctly imported.
Updating Dns Settings
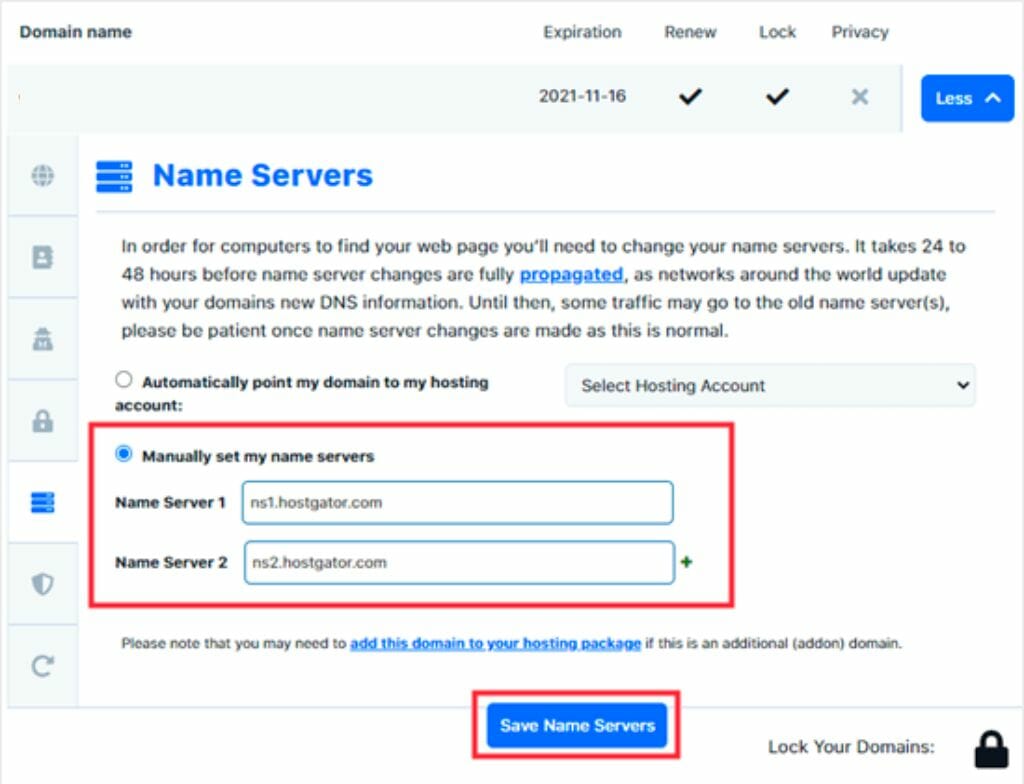
DNS Propagation is a key step. This process can take up to 48 hours. It’s about spreading new DNS info across the internet. Patience is needed during this time. Not all users will see changes right away. Some might see changes sooner than others.
To change DNS records, go to your domain registrar. Log in to your account. Find the DNS settings section. Add or edit the DNS records here. Make sure to save your changes. Double-check the information for mistakes.
Check if DNS changes are active. Use online tools like DNS checker. Enter your domain name. Look at the results. They show if changes are working. If not, review your DNS settings again.

Credit: www.liquidweb.com
Testing And Troubleshooting
Ensure all links and images work. Navigate through pages. Check if buttons respond. Verify contact forms are functional. Test loading speed. Make sure text displays correctly. Review layout on mobile devices. Confirm videos play smoothly.
Fix broken links immediately. Correct any missing images. Adjust layout for different screens. Resolve slow loading pages. Address error messages promptly. Update outdated plugins or themes. Ensure forms submit data properly.
Install a firewall for protection. Regularly update passwords. Enable SSL certificates for data safety. Monitor for unusual activity. Back up data frequently. Use strong passwords. Limit access to sensitive areas.
Finalizing The Transition
Switching web hosts can be smooth with careful steps. Start by backing up your site files. Then, update DNS settings to point to your new host. Finally, test your site to ensure everything works correctly. This process ensures a seamless transition without losing data or visitors.
Monitoring Website Performance
Regular checks help keep your site smooth. Use tools like Google Analytics. They show how fast pages load. A slow site can lose visitors. Make sure everything works well. Look for broken links and fix them. Check if images load quickly. Test on different devices. Your site should look good everywhere. Speed matters for users and search engines.
Confirming Email Setup
Emails must work right after switching hosting. Test sending and receiving messages. Use different accounts to check. Ensure important emails reach your inbox. Update your email settings as needed. Your contacts need to stay connected. Keep backups of important emails. This way, nothing gets lost. Email is key for communication.
Communicating Changes To Users
Let users know about the hosting change. Send an email update. Share the news on social media. Clear communication builds trust. Tell them what to expect. Mention any downtime during the switch. Answer questions they might have. Keep users informed about improvements. They will appreciate being in the loop.
Credit: diggitymarketing.com

Credit: firstsiteguide.com
Frequently Asked Questions
Can I Transfer My Website From One Host To Another?
Yes, you can transfer your website between hosts. Backup your files, transfer them, and update DNS settings. Ensure compatibility with the new host. Consider professional help for a seamless transition.
How Do I Change My Website Hosting?
To change your website hosting, first choose a new host. Backup your website data, then migrate it. Update your domain’s DNS settings to point to the new host. Verify the migration, ensuring everything works. Finally, cancel your old hosting service once the transition is successful.
Can I Move My Website From Godaddy To Another Host?
Yes, you can move your website from GoDaddy to another host. First, back up your website files and databases. Choose a new hosting provider, upload your files, and update your domain’s DNS settings to point to the new host. Ensure all configurations are correct for a smooth transition.
How Long Does It Take To Change Website Hosting?
Changing website hosting usually takes 24 to 72 hours. The process involves transferring files and updating DNS settings. Timelines vary based on hosting provider efficiency and domain propagation speed. Ensure backups are ready to avoid data loss during the transition.
Always verify the website functionality post-migration for a seamless experience.
Conclusion
Changing web hosting can seem challenging, but it doesn’t have to be. Follow simple steps. Prepare backup files. Choose a reliable hosting provider. Transfer your site. Update DNS settings. Test your website thoroughly. These steps ensure a smooth transition. Your website’s performance depends on it.
Take your time. Double-check everything. Ask for help if needed. A successful hosting change improves site reliability. Better speeds. Enhanced security. Your online presence deserves the best. Make the move confidently. Your visitors will thank you. Enjoy your improved web hosting experience.


