
Are you feeling stuck with your current web hosting provider? Perhaps your website is slower than a sleepy snail, or customer support is as elusive as a unicorn.
You deserve better, and switching your web hosting server might just be the breath of fresh air your site needs. But how do you make the switch without causing chaos on your site? Fear not! In this guide, we’ll walk you through the process step-by-step, so you can transition smoothly and confidently.
By the end, you’ll be empowered to make the best decision for your website’s future. So, are you ready to unlock the full potential of your online presence? Let’s dive in!
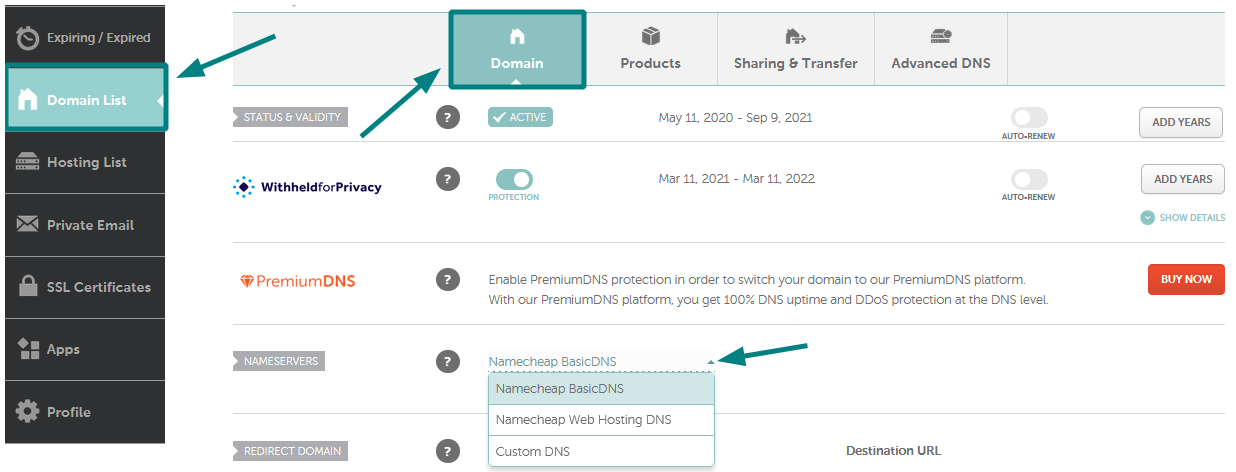
Credit: www.namecheap.com
Choosing The Right Web Hosting Provider
Start by understanding what you need. List your website’s requirements. Think about storage, bandwidth, and control. Is your site big or small? Know your traffic level. This helps in choosing the right plan.
Different plans offer different features. Look at the costs. Compare what each plan provides. Some plans have more features. Others may be more affordable. Find a balance. You want good features at a fair price.
Reviews can help you decide. Read what other people say. Check for positive and negative feedback. Testimonials are also helpful. They show real experiences. Choose a provider with good reviews. This can mean better service.
Preparing For The Migration
Always make a backup of your website files. Use tools or plugins to help. This ensures your data is safe. Store the backup in a secure place. You might need it later. Backups are like a safety net. They protect your hard work.
Verify your domain and email settings. Are they correct? Check them carefully. Your site might not work if they are wrong. Email might not reach users. This is important for smooth migration. Double-check every detail. Ensure nothing is missed.
Confirm that your website is compatible with the new host. Check the software versions. Do they match? Some features may not work if they don’t. Talk to the new host for guidance. Make sure everything is ready. This prevents future problems.
Initiating The Transfer Process
Start by logging into your current hosting account. Find the control panel. This is where you manage your website. Look for options like file manager or databases. You need to download these. Save them on your computer.
Reach out to your new host. Ask for guidance on the transfer. They often provide support. Follow their instructions carefully. They might need access to your current files. Give them what they need. This will help you transfer smoothly.
Use an FTP client to upload your files. This tool helps move files easily. Choose a reliable one. Upload your files to the new host. Next, import your databases. Use the new host’s database tools. Make sure everything is complete. Check if your site works fine.
Testing The New Server Setup
Ensure your website works well. Check links and buttons. All should be clickable. Images must load properly. Test forms on the site. They should send data correctly. Verify scripts run without errors. Each page should display content fully. The site’s design must remain the same.
Emails must send and receive. Check your email settings. Look at the SMTP configuration. Ensure it matches the new server. Test sending emails to yourself. Ensure they arrive in your inbox. Emails should not go to spam. Try responding to test emails. They should send without issues.
Speed is crucial for users. Check the site’s loading time. Use tools like Google PageSpeed. Note any slow pages. Optimize images and scripts. Server response should be quick. Monitor server uptime. Check for any downtime. Performance should be stable and fast.
Updating Dns Settings
Understanding DNS Propagation is key. It takes time for changes to spread. This process can last up to 48 hours. Patience is needed during this wait. Your website may not be reachable right away. This is normal. No need to worry.
Changing Name Servers is crucial. Start by logging into your domain registrar. Look for the DNS settings section. Enter the new name servers provided by your host. Save the changes. It may take some time to update.
Ensuring Proper Redirection is important. Check if your website redirects correctly. Use online tools to test. Make sure old links lead to the new server. This keeps your visitors happy. It also helps search engines find your site.
Troubleshooting Common Issues
Downtime happens when a server stops working. It can be frustrating. First, check your internet connection. Sometimes, it’s not the server’s fault. Restart your router if needed. If the problem is still there, contact your hosting provider. They can help fix it. Keeping your software updated also helps prevent downtime.
Broken links can be annoying. They lead visitors to nowhere. Use tools to find broken links on your site. Once found, update or remove them. This keeps your site healthy. Make sure every link is correct. Check them regularly to avoid issues.
Security is very important. Use strong passwords for your accounts. They protect your site. Install security plugins if available. They help guard against attacks. Always back up your data. This ensures you don’t lose anything important. Be careful with unknown emails or links. They might be harmful.
Optimizing The New Hosting Environment
Fast websites make users happy. Website speed is very important. To make your site fast, choose a good server. A strong server helps pages load quickly. Also, reduce image sizes. Smaller images load faster.
Caching saves time. It keeps a copy of your website. Users see cached pages fast. Use plugins for caching. They are easy to install. This makes your site faster.
Keep your site safe. Security protects your data. Use strong passwords. Change them often. Install SSL certificates. They encrypt data. Safe sites build trust with users.

Credit: www.hostgator.com
Credit: verpex.com
Frequently Asked Questions
How Do I Change My Hosting Server?
To change your hosting server, first backup your website files. Choose a new host and transfer your domain. Upload files to the new server, and update DNS settings. Test your website for functionality. Ensure everything works correctly before canceling the old hosting plan.
Can I Switch Website Hosting?
Yes, you can switch website hosting. Choose a new host, backup your data, and transfer files. Update DNS settings to point to the new host. Ensure proper testing before finalizing the switch. Switching hosts can improve site performance and security.
How Do I Shift A Website From One Server To Another?
Backup your website files and database. Upload files to the new server. Update DNS settings. Test the site on the new server. Verify everything works correctly and update any required configurations.
How Do I Change One Server To Another Server?
To change servers, first backup your data. Next, choose a new server and configure it. Migrate your data and applications. Test the setup to ensure everything works correctly. Finally, update your DNS settings to point to the new server.
Conclusion
Changing your web hosting server can seem daunting. But it’s manageable with the right steps. First, research and choose a reliable new server. Next, back up your website data carefully. Make sure to update DNS settings promptly. Test your website thoroughly after migration.
This ensures everything functions correctly. Remember, patience and attention to detail matter. Keep learning about hosting features. Stay informed on technology updates. This helps maintain your website’s performance. You now know the essentials for a smooth transition. Your website deserves the best hosting service.
Enjoy the benefits of improved website speed and reliability.


