
Switching your web host and domain registrar might seem like a daunting task. But with the right guidance, it can be a smooth and rewarding process.
Are you feeling trapped by slow website speeds or unsatisfactory customer service? Maybe you’re just looking to cut down on your hosting costs. Whatever your reason, changing your web host and domain registrar can open up a world of benefits for you and your online presence.
Imagine having a faster, more reliable website that keeps your visitors engaged. Or, picture the peace of mind that comes with knowing your domain is in trusted hands. By reading on, you’ll discover simple, step-by-step instructions to make this transition hassle-free. You’ll also learn tips to avoid common pitfalls and ensure everything goes without a hitch. So, are you ready to transform your website experience? Dive in, and let’s get started on making your online life easier and more efficient!
Choosing A New Web Host
Begin by knowing what your website needs. Traffic, storage, and features matter. Small websites may need less. Big websites need more resources. Check your future plans. Will the site grow? Choose wisely.
Look at different hosting plans. Some are cheap, some are costly. Shared hosting is for small sites. VPS hosting is for bigger sites. Dedicated hosting is for the biggest sites. Compare the costs and features. Choose what fits your needs best.
Check reviews and testimonials. People share their experiences. Find out if the host is reliable. Look for good customer support. Trust is key. Make sure the host has happy customers.
Selecting A Domain Registrar
Start by checking the reviews of various domain registrars. Look for feedback from other users. Good reviews mean better service. Check for extra features like privacy protection. These features can help keep your information safe. Customer support is important too. Choose a registrar with helpful support.
Use a domain search tool to find available names. Enter your desired domain name. The tool shows if it’s available. Try different names if it’s not. Keep trying until you find a good one. Choose a name that’s easy to remember.
Check the pricing of each registrar. Look for any hidden fees. Some registrars charge more for renewals. Compare prices with other registrars. Choose the one with better rates. Ensure you know the renewal price. This helps you plan for future costs.
Preparing For Migration
Always keep a backup of your website data. Use a reliable tool or plugin. Save everything on an external drive or cloud. This ensures safety against data loss. Check if the backup is complete and accurate. This step is crucial before any migration.
Write down your current website settings. Include server configurations and DNS details. Also, note your database settings. This helps in restoring if needed. Keep these records safe and accessible. They are important for a smooth migration.
Make a checklist for your migration process. List tasks like backing up data and updating DNS. Include testing your site after migration. A checklist keeps you organized. It ensures no step is missed. Follow it for a successful migration.
Credit: www.namecheap.com
Transferring Website Files
Start by backing up all your website files. Use an FTP client to connect to your old host. Download all your files to your computer. Connect to your new host using the FTP client. Upload the files to the new server. Check that all files transferred successfully. This ensures your site stays the same.
Open your website in a browser. Navigate through each page. Check if links and images work properly. Look for any broken elements. Make sure forms submit correctly. Double-check that contact information is right. This helps confirm everything is in order.
Sometimes things don’t work right. Check your file paths if images don’t load. Update any outdated plugins. Look into your DNS settings if the site won’t load. Contact your new host for technical support if needed. Fixing these issues can make your site run smoothly.
Updating Dns Settings
DNS acts like a phone book for the internet. It translates domain names to IP addresses. This helps computers find websites. DNS servers store these records. Changing a DNS server can affect website access. It’s crucial to understand this process. Doing it wrong can make sites unreachable. Learn about A records and CNAME records. These are basic building blocks. They help direct traffic to the right place.
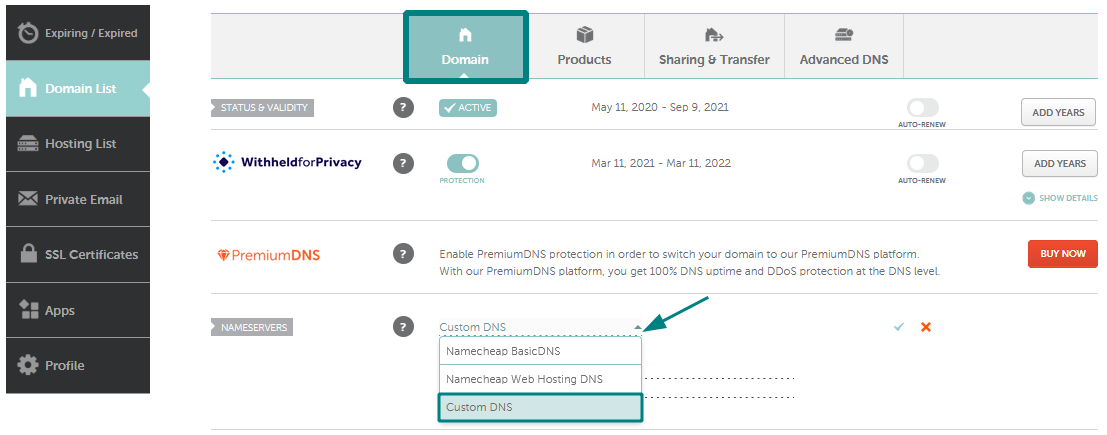
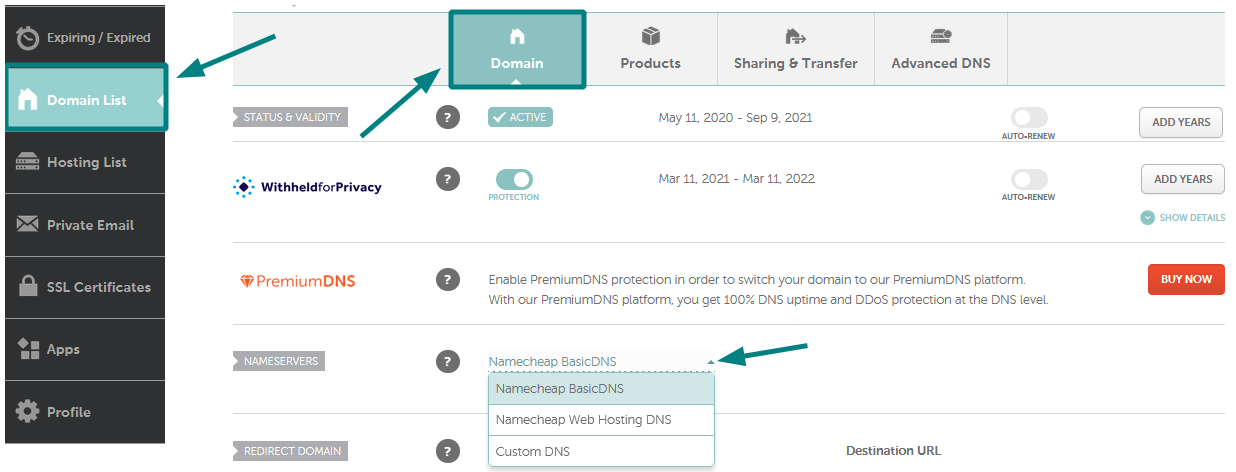
Changing DNS records is simple. First, log into your domain account. Look for the DNS settings tab. Here, you can modify records. A records point to IP addresses. CNAME records point to other domains. Always double-check changes. Mistakes can break website access. Save changes once done. This updates the DNS information. It’s important to know each record’s role. They guide traffic to your website.
DNS changes don’t happen instantly. Propagation can take up to 48 hours. During this time, some users may not reach your site. Others might see the old version. This delay is normal. It’s due to how DNS servers update. Plan changes ahead of time. Inform users if necessary. Patience is key during propagation. Websites will stabilize after this period.
Credit: www.namecheap.com
Domain Transfer Process
Switching web hosts and transferring domain registration involves a series of straightforward steps. Begin by selecting a new web host and updating your domain settings. Ensure smooth transfer by backing up files and verifying domain registration details.
Unlocking The Domain
To start, make sure your domain is unlocked. This means removing any restrictions that prevent transfer. Go to your domain settings. Look for the lock option. Click to unlock your domain. This step is vital for a smooth process.
Obtaining Epp Code
The EPP code is like a password. You need it for transferring. Log into your domain account. Find the section for transfer codes. Request your EPP code. It is usually sent by email. Keep this code safe and ready for use.
Initiating The Transfer
Start the transfer with your new host. Go to their transfer section. Enter your domain name. Use the EPP code you received. Confirm the transfer. Wait for the process to complete. This may take a few days. Patience is key during this step.
Post-migration Tasks
It’s important to check your website’s speed and uptime. Use tools like Google PageSpeed Insights. They help measure how fast your site loads. A slow site can make visitors leave. Ensure your new host provides good server response times. Regular checks help keep the site running smoothly.
Emails should work without issues after migration. Test sending and receiving emails. Make sure your email settings are correct. Check the SMTP and IMAP settings. They should match your new host’s details. Missing emails can cause big problems for users.
Security keeps your site safe from hackers. Confirm that your SSL certificate is active. It protects sensitive information. Review your firewall settings. They block unwanted access. Regular updates and checks ensure your site stays secure.
Tips For A Smooth Transition
Tell users about changes early. This helps them understand and stay calm. Email is a good way to share news. Social media also works well. Keep your message simple and clear. Users need to know what to expect.
Always keep backup copies of your website. This is very important. Backups save your files if things go wrong. Use external drives or cloud storage for backups. This way, your data stays safe. Regular backups help you feel secure.
Changing hosts can be hard. Experts can help make it easy. They know what to do and can save you time. Look for someone with good reviews. Ask friends for recommendations. Professionals can make the switch smooth.
Credit: www.yumpu.com
Frequently Asked Questions
How Do I Change The Host Of My Domain?
To change your domain host, select a new hosting provider. Update your domain’s DNS settings with the new host’s information. Ensure all website files and databases are transferred to the new host. Verify your website functions correctly on the new server.
How Do I Transfer My Domain And Hosting?
Transfer your domain by unlocking it and obtaining the authorization code. Change hosting by migrating files to the new server. Update DNS settings to point to the new host. Ensure your domain registrar and hosting provider support these processes. Follow their specific guidelines for a smooth transition.
How Do I Change My Domain Registrar?
To change your domain registrar, unlock your domain, get the transfer authorization code, and choose a new registrar. Initiate the transfer process with the new registrar using the code. Confirm the transfer via email. Ensure all contact information is updated before starting the transfer.
Can I Keep My Domain But Change Host?
Yes, you can keep your domain and switch hosting providers. Update your domain’s DNS settings to point to the new host’s servers. This process ensures your website remains accessible with minimal downtime. Always back up your site data before making any changes to avoid data loss.
Conclusion
Switching web hosts and domain registrars can seem daunting. But it’s doable. Follow the steps outlined for a smooth transition. Remember to back up your data first. Check compatibility and transfer settings carefully. Patience is key during this process. Seek support if needed.
With time and care, your site will thrive. A new host and registrar can enhance your online presence. Enjoy the benefits of improved service and performance. Embrace the change for a better website experience. Happy hosting!


