
Have you ever installed a stunning WordPress theme only to find that it’s not in your preferred language? It can be frustrating, right?
You’ve put in all the hard work to create your website, and the last thing you want is for language barriers to ruin your user experience. Don’t worry; you’re not alone. Many WordPress users face this issue, and the good news is that it’s easier to solve than you might think.
By learning how to change the theme language in WordPress, you can make your site more accessible and appealing to your audience. Stick with us, and we’ll guide you through the steps to ensure your website speaks your language perfectly. Get ready to transform your site into a multilingual masterpiece without breaking a sweat!
Credit: www.navthemes.com
Accessing WordPress Dashboard
First, open your web browser. Type in your WordPress site URL. Add /wp-admin at the end. Press enter. A login page will show up. Enter your username and password. Click on the login button. Now you are in the WordPress Dashboard. Here you can manage your site. You can see many options on the left side. These options help you control your website. You can change themes, add pages, and more. The dashboard is like your site’s control center.
Locating Theme Settings
Finding the theme settings in WordPress is easy. First, log into your WordPress dashboard. On the left side, look for the Appearance tab. Click on it. You will see Themes option. Click on Theme Customizer. This section lets you change many things. Look for Language Settings or similar. If you do not see it, your theme may not support language changes. Consider switching themes if needed.
Some themes have a Settings or Options panel. Explore these sections. They may have language settings hidden inside. Always save changes before exiting. Check if your changes appear on your site. If not, try refreshing the page.
Installing Language Files
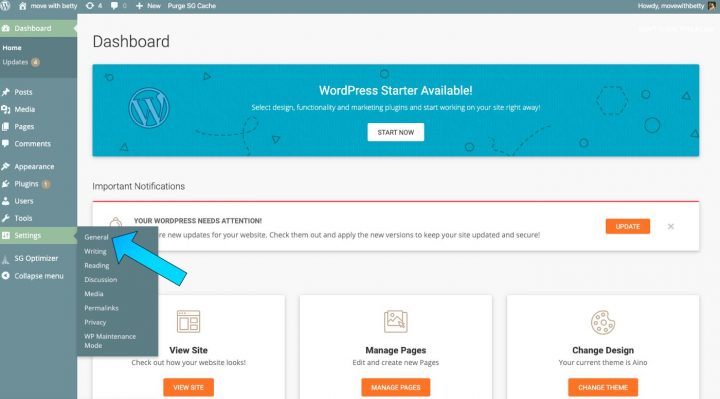
WordPress language packs make changing languages easy. First, go to your dashboard. Click on Settings, then General. Find Site Language. Choose your desired language from the list. WordPress will download the language pack automatically. Now your site is in the new language. The process is quick and simple.
Sometimes, WordPress does not have your language. You can upload your own language files. First, download the .mo and .po files for your language. Use an FTP client to connect to your site. Go to the wp-content/languages folder. Upload the files there. Go back to your dashboard. Change the Site Language in settings. Your site will now display in the new language. It is a bit more work but worth it.
Credit: www.navthemes.com
Changing Theme Language Settings
Start by logging into your WordPress dashboard. Go to the Settings menu. Click on General. Here, you can see the Site Language option. Choose your desired language from the dropdown menu. Remember to save your changes. This will change the language for the whole site. It affects the dashboard and theme.
Some themes have specific language options. Check the theme settings in your dashboard. Look for a section related to language or localization. You may find extra language packs here. Install the necessary files. Themes might offer translation files. You can use these for better localization. Always save changes to apply them.
Using Translation Plugins
Many plugins help change theme language in WordPress. WPML is a popular choice. It offers many features. Polylang is another good option. It is free and easy to use. TranslatePress is user-friendly too. Each plugin has unique features. Choose what fits your needs best.
After choosing a plugin, you need to set it up. Go to the plugin settings in your dashboard. Choose your site’s default language. Add other languages if needed. Some plugins let you translate posts and pages. Others can translate menus and widgets too. Always save changes after configuring. This ensures your settings work.
Credit: www.elmastudio.de
Editing Language Files Manually
First, find the language files in your WordPress folder. They are usually in the wp-content directory. Inside, look for a folder named languages. You will see files with .po or .mo extensions. These are your language files. They contain the words and phrases used by the theme. Keep a copy of these files for safety.
Open a language file with a simple text editor. A program like Notepad or TextEdit works well. Look for the text you want to change. Make your edits carefully. Save the file after editing. Upload it back to the languages folder. Check your site to see the changes. Sometimes, clearing the cache is needed.
Testing And Verifying Changes
Previewing Changes is important in WordPress. Look at your site after changing the theme language. Check if everything looks right. Visit different pages. See if the words are correct. Use the preview feature in WordPress. It helps you see changes before making them live.
Sometimes, things might not work. Troubleshooting Common Issues is needed. Some words might not change. Check if the theme supports language change. Try refreshing the page. If problems continue, check your settings. Look for updates or plugins that can help. Reverting to the original language might fix some issues. Always remember to save your changes.
Best Practices For Language Changes
Before changing the theme language, always backup your site. This keeps your data safe if something goes wrong. Use plugins like UpdraftPlus or BackWPup for easy backups. Store backups in a secure location. Cloud storage or external drives are good options. Double-check your backups. Ensure they are complete and accessible. Regular backups are vital for website security.
Keep your WordPress and themes updated. Updates fix bugs and improve security. Check for updates weekly. Use the WordPress dashboard for this task. Update plugins too. Outdated plugins can cause problems. Maintain your site regularly. This ensures smooth performance and keeps visitors happy.
Frequently Asked Questions
How Can I Change The Theme Language In WordPress?
To change the theme language, go to your WordPress dashboard. Navigate to Settings > General. Scroll down to Site Language and select your desired language. Save changes. Ensure your theme supports the chosen language. Some themes may require additional language files for full translation.
Is It Possible To Use Multiple Languages On WordPress?
Yes, it’s possible to use multiple languages. Use a plugin like Polylang or WPML. These plugins allow you to translate your site content into different languages. They provide a user-friendly interface to manage translations. Ensure your theme is compatible with these plugins for optimal performance.
Why Isn’t My Theme Language Changing?
If your theme language isn’t changing, check theme compatibility. Ensure the theme supports the language files. Verify that language files are correctly installed. Clear any caching plugins to see changes. Some themes might require manual editing of language files for proper translation.
Can I Translate A WordPress Theme Manually?
Yes, you can translate a theme manually. Use tools like Poedit to edit. po files. Download your theme’s. po file from the language folder. Translate the text strings and save the. mo file. Upload it back to the theme’s language folder.
This method requires some technical skills.
Conclusion
Changing your WordPress theme language is simple. First, choose your desired language. Then, adjust the settings in your WordPress dashboard. Follow the step-by-step guide for a seamless transition. This change can enhance user experience. It helps visitors navigate your site easily.
A multilingual site attracts a broader audience. Keep your theme updated for language support. Regular updates ensure compatibility. This process is not difficult. Take the time to ensure accuracy. Your efforts will be worthwhile. Enjoy connecting with users worldwide. Happy blogging!


