
Are you feeling stuck with the same old main picture on your WordPress 2017 theme? You know the one—it’s the first thing visitors see when they land on your site.
It’s essential, yet you might find yourself unsure about how to give it a fresh new look. Imagine the impact of updating it to better reflect your content and brand. The good news? Changing this crucial element is easier than you think.
By the time you finish reading this article, you’ll not only know how to swap out that main image, but you’ll also understand how a well-chosen picture can captivate your audience’s attention and enhance their experience on your site. Let’s dive into making your WordPress site as eye-catching as it deserves to be.

Credit: visualmodo.com
Accessing The WordPress Dashboard
First, log in to your WordPress account. Use your username and password. Find the login page. It’s usually at yourwebsite.com/wp-admin. Enter your details. Click the login button. Now you are in the dashboard. This is where you control your site. It’s like the control room of a spaceship.
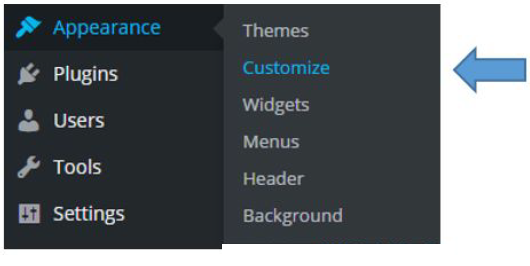
In the dashboard, look for the Appearance menu. It’s on the left side. Click on it. Now click on Customize. This will open the customizer. Here you can change your site’s look. Find the option for the main picture. It’s often called Header Image. Click to change it. Now pick a new picture. Make sure it’s a nice one!
Navigating To Theme Customizer
Accessing the theme customizer is easy. First, open your WordPress dashboard. Locate the Appearance tab on the left side. Click on it. You’ll see the Customize option. Select it to enter the theme customizer.
Here, you can change your main picture. On the left, find the Header Image section. Click to open it. You can upload a new image. Choose one from your library or upload a fresh picture.
Make sure your picture is clear and well-sized. It’s important for your site’s look. Once done, click Save & Publish. Your new picture will show up on your site.
Locating The Header Image Section
Begin by logging into your WordPress dashboard. Look for the menu on the left side. Find the option that says Appearance and click on it. A drop-down will appear. Choose Customize from this list. The customization panel will open. Search for the Header Image section here. It is usually easy to spot. Once you find it, click on it to open. This is where you can change the main picture. Make sure your new image is ready. It should be the right size for your theme. Now, you are ready to upload the new image. Follow the instructions on the screen to finish.
Selecting A New Main Picture
Select a new picture from the media library. Open your WordPress dashboard. Click on “Media”. Here, you will find all your images. Look through them. Pick the one you like. Make sure it fits well. Check the image size and quality. The picture should be clear and bright. Double-check the dimensions. It should match the theme’s requirements. Confirm your choice. Then, set it as the main picture.
Upload a new picture if needed. Go to your dashboard. Click on “Media” and then on “Add New”. Drag your image file here. Wait for it to upload. Choose an image that is high-quality. Make sure it is the right size. The image should not be too big. Check the dimensions to fit the theme. Once uploaded, select it. Set it as your main picture.
Adjusting Image Settings
Pictures tell stories. Sometimes, they need a little edit. To change the picture size, crop it first. Choose the part you like. Keep it simple. Resizing comes next. Make sure it fits well on the page. Do not make it too small. Do not make it too big. Just the right size. This helps the picture look clear and neat.
Images need a place to stand. Aligning makes them look nice. Put them to the left, center, or right. This helps the page look tidy. A well-aligned image is easy to see. People like neat pages. It keeps their attention. Arrange the image in the best spot. Make sure it matches the text.
Credit: www.wpzoom.com
Previewing Changes
Before saving, it’s good to preview your changes. This helps you see how the new picture looks. Click on the “Preview” button at the top. A new window will open. Look at the main picture. Does it fit well? Is it clear? If not, you might need to adjust it.
Check other parts of the page too. Make sure everything looks good. You don’t want any surprises later. After checking, you can close the preview window. If all looks fine, proceed to save changes. It’s always better to be sure before finalizing. Happy editing!
Saving And Publishing
Once you change the main picture, it is important to save. Click the Save button to keep your changes. This button is usually at the top. After saving, you need to publish your changes. Find the Publish button. Click it to make your new picture go live. Your changes are now visible to everyone. Check your website to see the new picture. If you see the old picture, try refreshing. Sometimes, it takes a few minutes to update. Make sure you are happy with the new picture. If not, you can always change it again. Remember to save and publish each time.
Credit: www.library.illinois.edu
Troubleshooting Common Issues
Changing the main picture on WordPress 2017 theme can sometimes be tricky. Navigate to the Customizer, then select ‘Header Image’ to update. Ensure the new image fits the recommended dimensions for best display.
Image Not Displaying
Sometimes, the main picture does not show up. This can be frustrating. Check if the image file is uploaded correctly. Make sure the file type is JPEG or PNG. These are the best for websites. Also, confirm the file size is not too big. Large images may not load.
Resolution Problems
The image might look blurry. First, check the resolution. It should be at least 800×600 pixels. This ensures clarity. Adjust the image size if needed. Use an image editor for this task. Ensure your screen settings are correct. Sometimes a simple refresh can help.
Frequently Asked Questions
How To Update Homepage Image On WordPress 2017 Theme?
To update the homepage image on WordPress 2017 theme, access your WordPress dashboard. Navigate to “Appearance” and then click on “Customize. ” Select “Header Media” and upload your desired image. Save your changes to reflect them on your homepage. This process helps refresh your site’s visual appeal effortlessly.
Can I Change Header Image In WordPress 2017?
Yes, you can change the header image in WordPress 2017. Go to your WordPress dashboard, click “Appearance,” then “Customize. ” Select “Header Media” to upload a new image. Save your changes to update the header image instantly. This enhances your site’s visual identity and branding.
What Size Should WordPress Header Images Be?
WordPress header images should ideally be 1200 x 280 pixels. This size ensures optimal display across devices and maintains image clarity. Adjust the dimensions if necessary, but ensure high resolution. Proper sizing helps your site look professional and visually appealing.
Can I Use Custom Images For WordPress Header?
Yes, you can use custom images for your WordPress header. Upload your desired image in the “Header Media” section of the “Customize” menu. Ensure it matches recommended dimensions for best results. Custom images offer personalization and enhance your site’s aesthetic appeal.
Conclusion
Changing the main picture on the WordPress 2017 theme is simple. Follow the steps outlined, and your website will have a fresh look. Updating images keeps your site engaging and visually appealing. Regular updates can improve user experience and retention.
Remember, visuals speak louder than words. A relevant image captures attention quickly. Keep practicing these skills for better results. Your site deserves to look its best. So take the time to update it. You now have the tools. Happy editing, and enjoy your refreshed website!


