Have you ever faced an email hiccup that left you scratching your head? If your emails aren’t reaching their destination, the problem might lie in your MX records.
These records are crucial for directing emails to the right server. Luckily, if you’re using Namecheap, changing your MX records is a straightforward process. But what if you’re not a tech wizard? Don’t worry—you don’t have to be. With a few simple steps, you can have your email back on track.
Keep reading to discover how you can easily manage your MX records in Namecheap and ensure your messages go exactly where they’re supposed to.
Credit: www.namecheap.com
Accessing Namecheap Dashboard
Accessing the Namecheap dashboard is the first step to changing MX records. It’s where you manage your domain settings efficiently. This process is straightforward, ensuring even non-technical users can navigate with ease.
How To Log In To Namecheap
Begin by visiting the Namecheap website. Click on the login button at the top right. Enter your username and password. If you don’t have an account, create one.
Finding Your Domain List
After logging in, head to the dashboard. Look for the “Domain List” section. It’s usually on the left side. Click on it to view all your registered domains.
Selecting The Right Domain
Choose the domain you want to modify. Click on it to open its settings. Make sure you select the correct domain to avoid mistakes.
Navigating To Advanced Dns Settings
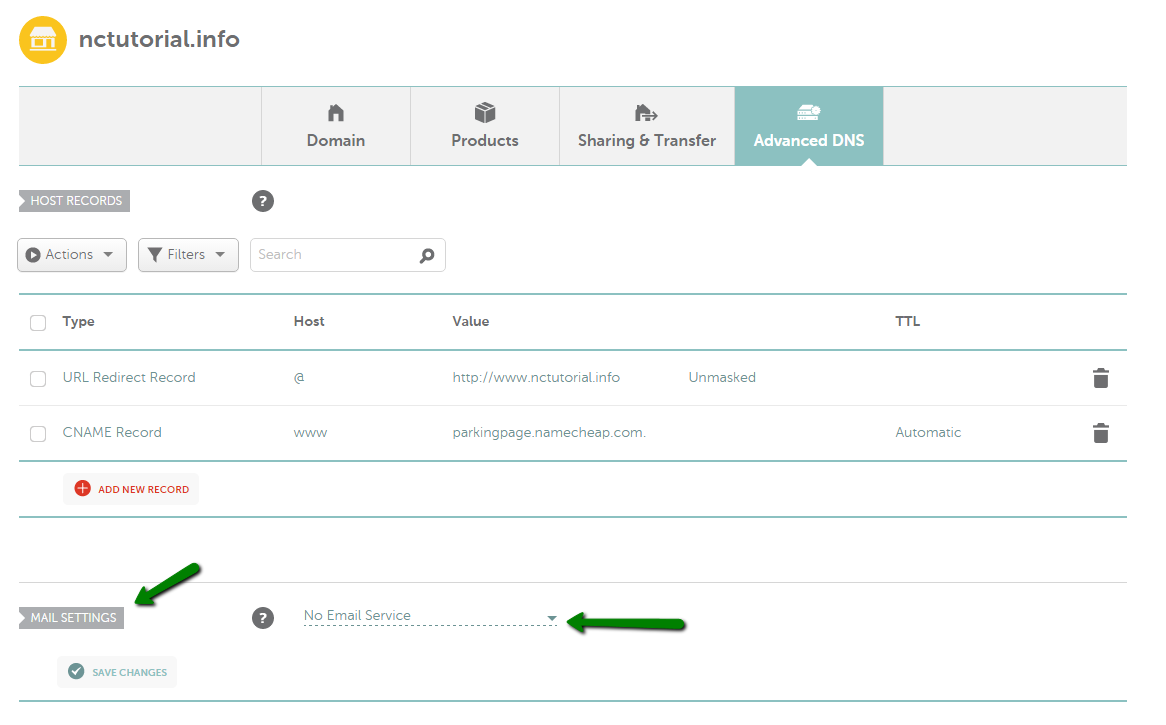
Find the “Advanced DNS” tab. It’s usually located in the domain settings. Click on it to access DNS management features.

Credit: support.titan.email
Locating Dns Settings
Changing MX records in Namecheap begins with finding the DNS settings. These settings control how your domain interacts with other servers. It’s important to know where to find these settings in your Namecheap account. This step is crucial for managing email services. Let’s explore the process step by step.
Accessing Your Namecheap Account
Log in to your Namecheap account using your credentials. Once logged in, you’ll see the dashboard. This is your control center for managing domains.
Navigating To The Domain List
In the dashboard, find the “Domain List” section. It displays all your registered domains. Click on “Domain List” to proceed. This section helps you select the domain you wish to modify.
Selecting The Domain To Modify
Scroll through your domains and find the one you want to change. Click the “Manage” button next to it. This takes you to the domain management page.
Finding The Dns Settings
On the domain management page, locate the “Advanced DNS” tab. Click on it to view DNS settings. Here, you can see and modify DNS records, including MX records.
Updating Mx Records
Easily change MX records in Namecheap by accessing your domain’s DNS settings. Navigate to the “Advanced DNS” tab. Add or edit MX records according to your email provider’s specifications.
Updating MX Records is a crucial step when you’re managing email services through Namecheap. It might sound technical, but with a bit of guidance, you can do it smoothly. Whether you’re setting up your personal email or managing a business domain, understanding how to update MX Records efficiently can prevent email delivery issues and ensure seamless communication. ###Understanding Mx Records
MX Records, or Mail Exchange Records, direct where your emails should be delivered. They tell the internet the exact location of your email server. Without the correct MX Records, emails might end up in the wrong place or not arrive at all. ###Accessing Your Namecheap Account
First, log in to your Namecheap account. Once you’re in, head over to the “Domain List” section. This is where all your registered domains are listed, making it easy to select the domain you need to update. ###Navigating To Dns Settings
After selecting your domain, look for the “Manage” button next to it. Click it, and you’ll be directed to the domain’s settings page. Here, you’ll find the “Advanced DNS” tab, which is your gateway to updating MX Records. ###Editing Mx Records
Scroll down to the “Mail Settings” section within the Advanced DNS tab. You’ll see existing MX Records listed here. To update, click the ‘Edit’ button next to the record you wish to change. Remember, accurate changes are vital, so double-check the new information before saving. ###Adding New Mx Records
Need to add a new MX Record? Click on the “Add New Record” button. Choose ‘MX Record’ from the dropdown menu and fill in the necessary details such as priority and mail server address. Ensure each entry is correct to avoid any future email hiccups. ###Saving Your Changes
Once you’ve made your updates, don’t forget to save them. Scroll to the top of the page and click the green “Save All Changes” button. It might take a few minutes for the changes to propagate, but this step is crucial to finalize your updates. ###Testing The New Setup
To confirm everything’s working, send a test email to yourself. Check if it lands in your inbox correctly. If not, revisit the MX Records to ensure all details are accurate. ###Common Mistakes To Avoid
Avoid typos in server addresses and prioritize records correctly. Missteps here can lead to email disruptions. Review your entries carefully and consult Namecheap support if you’re unsure. Updating MX Records might seem daunting, but it’s manageable with the right approach. Why not give it a try today and see how smoothly your email management improves?
Credit: www.lemwarm.com
Frequently Asked Questions
How To Change Mx Record On Namecheap?
Log into your Namecheap account. Select “Domain List” and click “Manage. ” Go to “Advanced DNS. ” Locate “Mail Settings” and choose “Custom MX. ” Enter new MX record details. Save changes.
How Do I Change My Domain Mx Record?
Log in to your domain registrar account. Find the DNS settings. Locate the MX records section. Edit the existing MX records or add new ones as needed. Save the changes. Allow some time for DNS propagation.
How To Change Dns Records On Namecheap?
Log into your Namecheap account. Go to “Domain List” and click “Manage” next to your domain. Select the “Advanced DNS” tab. Edit existing DNS records or add new ones by clicking “Add New Record. ” Save changes.
How Do I Remove Mx Records From My Domain?
Access your domain’s DNS settings through your hosting provider’s dashboard. Locate the MX records and delete them. Save changes to update DNS.
Conclusion
Changing MX records in Namecheap is straightforward. Follow the steps carefully. Double-check each entry for accuracy. Small mistakes can cause email issues. Use Namecheap’s support if needed. They offer helpful guidance. Remember, patience is key. Take your time to avoid errors.
With practice, it becomes easier. Now, your email setup should run smoothly. Proper configuration ensures reliable email delivery. Continue learning to manage your domains effectively. Stay informed about updates and changes. This knowledge empowers your online presence.