Are you trying to set up a new website or optimize an existing one and need to change your CNAME record in Namecheap? You’re in the right place!
Mastering the art of managing DNS settings can seem daunting, but it doesn’t have to be. Whether you’re linking a subdomain to an external service or simply updating your site’s configuration, understanding how to change your CNAME record is crucial.
By the end of this guide, you’ll not only know how to navigate Namecheap’s dashboard with ease but also feel empowered to take control of your domain settings. Stick around, and you’ll discover just how simple it is to make these changes, ensuring your online presence is seamless and professional.
Credit: www.namecheap.com
Accessing Your Namecheap Account
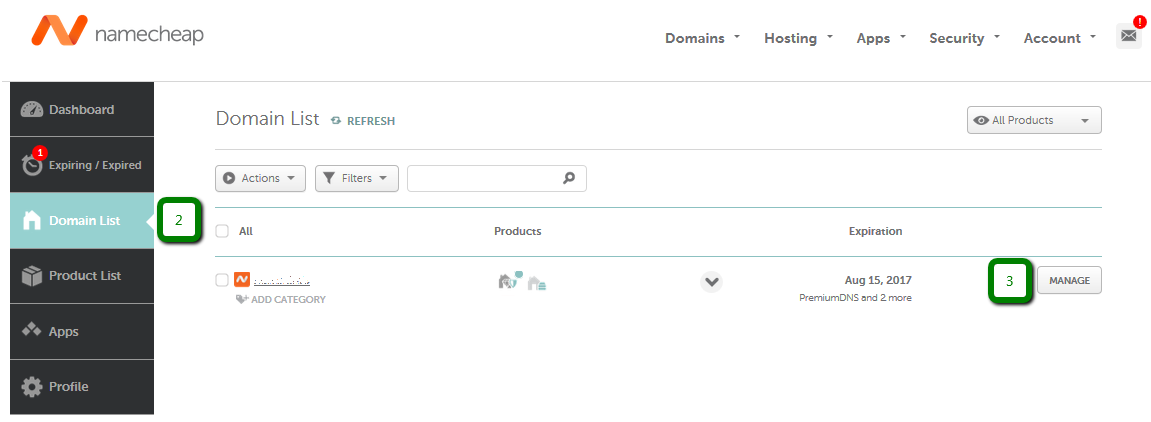
To change a CNAME in Namecheap, first log in to your account. Navigate to the “Domain List” section and select the domain you wish to modify. Under the “Advanced DNS” tab, find the CNAME record you need to update. Make the necessary changes and save.
Accessing your Namecheap account is the first step in changing your CNAME record. Whether you’re a seasoned domain owner or a newcomer, it’s crucial to have a smooth experience. Let’s dive into how you can easily navigate to your account settings.Login To Your Namecheap Account
Start by visiting the Namecheap website. Click on the “Sign In” button located at the top right corner. Use your registered email and password to log in. If you’ve forgotten your password, use the “Forgot Password” link to reset it.Navigate To Your Dashboard
Once logged in, you’ll land on your dashboard. This is your control center for managing domains and other services. Look for the “Domain List” on the sidebar. Click it to view all domains linked to your account.Locate The Domain You Wish To Edit
In the domain list, find the domain you want to change the CNAME for. Click on the domain name or the “Manage” button next to it. This will take you to the domain settings page.Access The Advanced Dns Tab
On the domain settings page, find the “Advanced DNS” tab. Click it to open a detailed view of your DNS settings. Here, you can see all records associated with your domain. Changing CNAME records might seem daunting at first, but once you’ve accessed your account, you’re halfway there. Remember the first time you attempted something new online? It felt challenging but rewarding. Similarly, understanding your Namecheap account will empower you to make changes effortlessly. Does the idea of managing your domain settings make you anxious, or do you find it exciting to learn something new? Engaging with your domain settings might reveal insights about your online presence. It’s a small step that can lead to greater control and customization. Have you ever wondered how simple changes can impact your website’s performance? Accessing your Namecheap account is just the beginning. With each click, you’re shaping how the world sees your online identity.
Credit: www.namecheap.com
Locating The Domain Management Section
Accessing the domain management section is essential for changing the CNAME record in Namecheap. Navigate to the dashboard, select “Domain List,” and find “Advanced DNS” to make necessary modifications.
Locating the Domain Management section in Namecheap is a crucial step if you want to change your CNAME records. This process might seem daunting at first, especially if you’re new to domain management. However, with a bit of guidance, you’ll find it straightforward and manageable. ###Step Into Your Namecheap Account
First, access your Namecheap account. You can do this by entering your username and password on the Namecheap homepage. If you’ve forgotten your login credentials, use the ‘Forgot Password’ link to reset them. Logging into your account is like opening a treasure chest of domain possibilities—everything starts here. ###Navigate To The Dashboard
Once logged in, head straight to your dashboard. This is your control center, where all your domains are listed. Look for a section labeled “Domain List” or similar. Does the sheer number of options confuse you? Don’t worry. Focus on the left-hand side of the page—it’s usually where the Domain List is nestled. ###Select The Desired Domain
In the Domain List, find the domain for which you want to change the CNAME. Click on “Manage” next to the domain name. Selecting the right domain is like picking the right tool from a toolbox—precision is key. If you manage multiple domains, use the search bar to quickly locate your target domain. ###Access The Advanced Dns Settings
After selecting your domain, look for a tab or option labeled “Advanced DNS.” This is where you can tweak your DNS settings, including CNAME records. Remember the first time you successfully changed a setting on your phone and felt empowered? This is a similar moment. You’re in control of your domain’s inner workings. ###Why Change Your Cname?
Before you proceed, consider why you’re changing the CNAME. Is it to point your domain to a new server or to set up a subdomain? Understanding your purpose makes the process smoother and prevents mistakes. What’s your goal with this change? Knowing this keeps you focused and efficient. Changing CNAME records might seem technical, but with each click, you’re gaining mastery over your digital assets. Keep this guide handy, and remember, every expert was once a beginner. What will you achieve with your newfound domain management skills?Editing The Cname Record
Changing the CNAME record in Namecheap is easy. First, log into your account and go to the Domain List. Select your domain and click on Advanced DNS. Add or modify the CNAME record by entering the host and target domain.
Save changes to update the record.
Editing the CNAME record in Namecheap is a straightforward process, but it’s crucial to get it right to ensure your domain works as intended. Whether you’re trying to connect your domain to a website builder, a custom email, or another service, knowing how to edit the CNAME record is essential. Let’s dive into the steps and make the process as simple as possible.Understanding Cname Records
CNAME, or Canonical Name, records are used to map a domain name to another domain name. They are particularly useful when you want to point a subdomain to an external domain. Picture it as redirecting mail from one address to another.Accessing Your Domain List
Start by logging into your Namecheap account. Once logged in, navigate to the “Domain List” section on the left sidebar. Here, you’ll see a list of all domains registered with your account.Finding The Correct Domain
Identify the domain you want to edit. Click on the “Manage” button next to it. This will take you to a page where you can control various settings for that domain.Going To The Advanced Dns Tab
Within the domain management page, find and click on the “Advanced DNS” tab. This area is where you can make changes to DNS records, including CNAME records.Locating The Cname Record
Scroll down to the “Host Records” section. Look for entries labeled as “CNAME” in the “Type” column. If you’re setting up a new CNAME record, you’ll add a new entry here. To edit, click on the pencil icon next to the CNAME record you want to change. This allows you to modify the host and value fields. Ensure the “Host” is correctly set to the subdomain, and the “Value” points to the correct destination.Adding A New Cname Record
If you need a new CNAME, click on “Add New Record”. Select “CNAME” from the type dropdown. Enter your desired subdomain in the “Host” field and the target domain in the “Value” field.Saving Your Changes
Once you’ve made your changes, click the green checkmark or “Save All Changes” button. It’s essential to save your edits; otherwise, they won’t take effect.Waiting For Propagation
DNS changes don’t happen instantly. It might take a few hours for your new CNAME record to propagate. During this time, your domain might not work as expected.Testing Your Cname Record
After the propagation period, test your domain to ensure it points to the correct location. Use online tools to verify if the CNAME is set correctly.Common Mistakes To Avoid
Ensure there are no typos in your entries. A single mistake can lead to a misdirected domain. Double-check that you’re not mixing up CNAME with other record types like A records. Are there any specific challenges you’ve faced while editing CNAME records? Share your experiences or questions in the comments below!
Credit: www.youtube.com
Frequently Asked Questions
How Do I Change My Cname Domain Name?
Access your domain registrar’s DNS settings. Locate the CNAME record. Update the value to your new domain. Save changes. Wait for propagation.
Where To Find Cname In Namecheap?
Find CNAME in Namecheap by logging into your account, navigating to “Domain List,” selecting your domain, and accessing “Advanced DNS. “
How To Change Dns Record In Namecheap?
Log into your Namecheap account. Go to the “Domain List” and click “Manage” next to your domain. Select the “Advanced DNS” tab. Click “Add New Record” or edit existing ones. Save the changes after updating your DNS records.
How To Configure A Cname Record?
Access your DNS management dashboard. Locate the CNAME section. Enter your desired alias and the target domain. Save changes to update the record. Ensure the CNAME points correctly to function as needed.
Conclusion
Changing a CNAME in Namecheap is simple with these steps. Follow each step carefully. Ensure your domain settings are correct. This ensures your website runs smoothly. Mistakes can disrupt functionality. Always double-check your entries. A smooth process will save time.
For any issues, seek Namecheap support. They can help resolve problems quickly. Remember, practice makes perfect. Adjustments become easier with experience. Keep exploring and learning. Your website management skills will grow.