
Have you ever felt stuck with your current web hosting provider? You’re not alone.
Many website owners reach a point where their hosting simply doesn’t meet their needs anymore. Whether it’s slow loading speeds, frequent downtimes, or lackluster customer support, these issues can frustrate you and your visitors. Imagine how much smoother your online presence could be with a service tailored perfectly to your needs.
Changing your web hosting might sound daunting, but it’s easier than you think. In this guide, we’ll walk you through the step-by-step process to ensure a smooth transition. We’ll help you unlock the potential for faster performance, enhanced security, and better support. Ready to take your website to the next level? Keep reading to discover how a simple switch can make a big difference.

Credit: www.liquidweb.com
Assess Your Current Hosting Needs
Think about your website’s traffic. More visitors mean more resources needed. Check your current storage. Enough space is important. Consider your site’s speed. Fast loading is key. Look at your current features. Do you need more? Compare your costs. Is it too much? Understand your support needs. Quick help is vital. Review your site’s security. Strong protection is a must.
Think about your growth. Will your site grow soon? Consider your backup options. Easy recovery is important. Check your uptime. Downtime can hurt. Know your site’s location. Closer servers are better. Evaluate your control level. Do you need more access? Look at your current scalability. Can you easily upgrade?
Research New Hosting Providers
Start by listing different hosting providers. Check what plans they offer. Look at the features each plan includes. Does it have enough storage? Is there 24/7 support? Compare the prices. Some are cheaper but lack features. Others cost more but give better value. Look for special discounts or promotions. Always read the fine print. Some providers have hidden fees. Make a list of all pros and cons.
Reviews help a lot. People share their real experiences. Look for positive and negative reviews. Check how often problems happen. Are customers happy with customer service? Do they have downtime issues? Testimonials can show you what to expect. Read them on the hosting provider’s site. Also, check independent review sites. This gives a balanced view. Choose a provider that many people recommend.
Backup Your Website Data
Backup tools help keep your website safe. They save a copy of your files. These tools can be found online. Some are free. Others may cost money. Choose a tool that suits your needs. Ease of use is important. Some tools work automatically. They save your data at set times. You do not have to remember. Make sure the tool is compatible with your website. Check if it backs up both files and databases. This ensures all data is safe.
Saving your database is crucial. It holds all your website information. Use a tool to download the database. Keep a copy on your computer. Files include images and texts. They are stored on your server. Download these files regularly. Save them in a safe place. This helps if something goes wrong. Always keep the latest version. Update your backups often. This keeps your website secure.
Select Your New Hosting Plan
Understand your website needs. Small sites need basic plans. Big sites need more resources. Consider your site’s traffic. More traffic means bigger packages. Check what each plan offers. Some plans have more features. Others offer simple setups. Look for plans with good support. Support is important. It helps solve problems quickly.
Price matters. Compare different hosting prices. Some plans are cheap. Others cost more. Read the terms carefully. Some plans have hidden fees. Discounts can save money. Look for special deals. Understand renewal prices. They can be higher. Check if there are any contracts. Long contracts can offer lower prices. Short ones give flexibility.
Prepare For Migration
Tell everyone about the hosting change. Stakeholders need to know about the move. Share the timeline and steps with them. This helps in planning better. Ask for their feedback and suggestions. Keep everyone in the loop.
Plan downtime carefully. Choose a time with least traffic. Inform users about the website being down. Communicate the reason and duration clearly. This avoids confusion. Set up a maintenance page to inform visitors. It keeps them updated.
Transfer Your Domain Name
Your domain needs to be unlocked before transfer. This keeps it safe from unwanted changes. Find the option in your domain settings. It’s usually labeled as “Lock” or “Unlock”. Click to change the status. Once unlocked, get your transfer code. This code is sometimes called “EPP” or “Auth code”. Save it carefully.
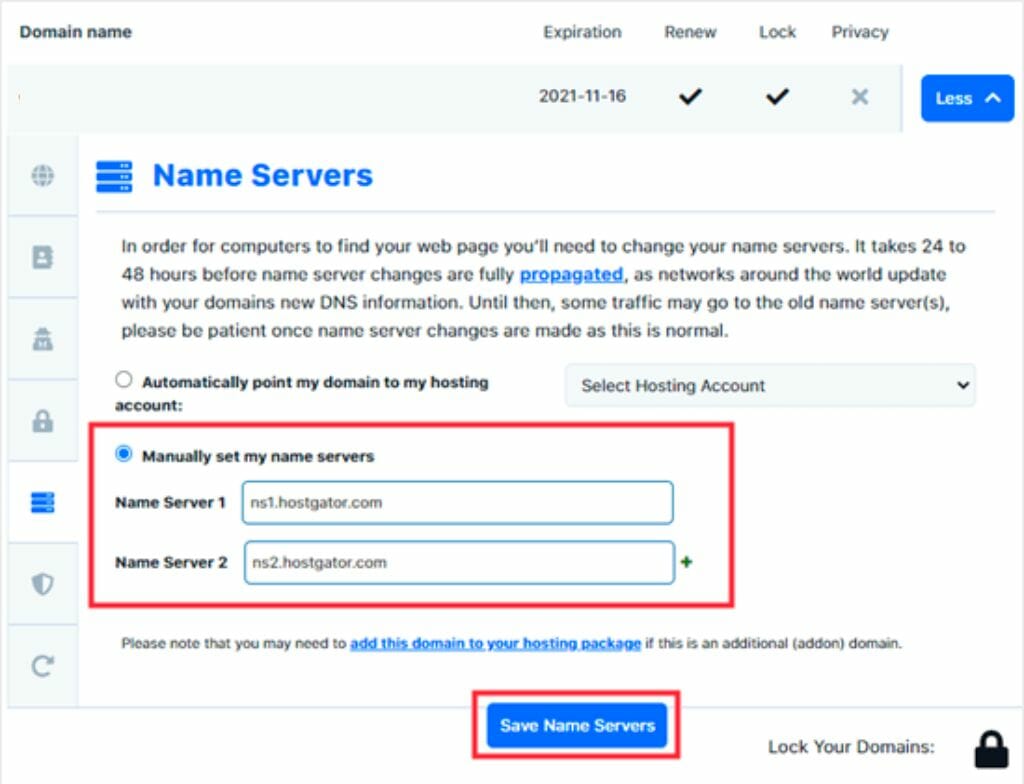
DNS settings guide traffic to your site. Changes must be made when you switch hosts. Find the DNS section in your domain panel. Look for nameservers. Replace them with new ones from your host. This change might take time to work. Usually, it takes a few hours. Sometimes, it might take up to a day. Patience is key during this process.
Upload Website Files To New Server
FTP clients help move files easily. FileZilla is a popular choice. Install it on your computer. Enter your new server’s details. This includes the host, username, and password. Connect to the server. Your files appear in two windows. One window shows your computer files. The other shows your server files.
Drag files from your computer to the server. This will upload them. Ensure all files are uploaded. Check the progress bar. Wait for it to finish. Do not close the client until it is complete.
Once uploaded, check file integrity. Use a tool to compare files. This ensures no file is missing. Check sizes and file counts. Files on the server should match your computer. Re-upload any missing files. Ensure everything is correct before going live. This step is important. It prevents errors on your website.
Credit: diggitymarketing.com
Test Your Website On New Host
Make sure all parts of your site work. Check links, images, and forms. Broken links can confuse visitors. Images should load quickly. Test each form by sending a message. Ensure that nothing is missing or slow. If something doesn’t work, fix it soon. A smooth website keeps users happy.
Website speed is very important. Slow sites make users leave. Use tools to check speed. Fast loading pages are best. Check if the site works on phones and tablets. Mobile-friendly sites reach more people. Make sure the site stays online. No one wants a site that crashes often.
Update Website Configuration
Change your website settings for a new host. It is important. First, access your control panel. Look for the settings menu. Find the domain settings. Update the DNS records. This links your domain to the new host. Check the site settings. Ensure they match your new host’s requirements. Save changes.
Security is vital for your website. Check your SSL certificates. They must be up to date. Ensure your new host supports them. Look at your site’s security settings. Enable firewalls if needed. Regularly update passwords. Use strong ones. Keep your site safe.
Notify Users Of Changes
Changing your web hosting is a big step. Make sure to inform your visitors. Place a notice on your website. This helps them know what’s happening. Clear and simple words work best. It shows that you care about their experience. A small banner or pop-up can do the trick. Tell them when the changes will happen. This way, they won’t be surprised.
Subscribers are important. They need to be kept in the loop. Send an email to explain the changes. Use a friendly tone. Thank them for their support. Provide details about what to expect. This builds trust. Let them know if there will be any downtime. Assure them that their data is safe. It’s a chance to strengthen your relationship.
Monitor And Optimize Performance
Analytics tools help track your site’s performance. Watch visitor numbers and page views. Discover how users navigate your site. Use data to find weak points. Look for pages with high bounce rates. Check which content is popular. See how long visitors stay. Identify slow loading pages. Use insights to make improvements. Better performance keeps visitors happy. Ensure your site runs smoothly.
Fast load times are crucial. A slow site frustrates users. Optimize images to reduce size. Compress files for quicker loading. Use a content delivery network (CDN). This speeds up access to site content. Minimize HTTP requests for faster responses. Remove unnecessary plugins and scripts. Keep code clean and efficient. Regularly update your hosting software. Test load times frequently. Aim for quick and smooth user experiences.
Credit: www.liquidweb.com
Frequently Asked Questions
How Do I Change The Hosting Of A Website?
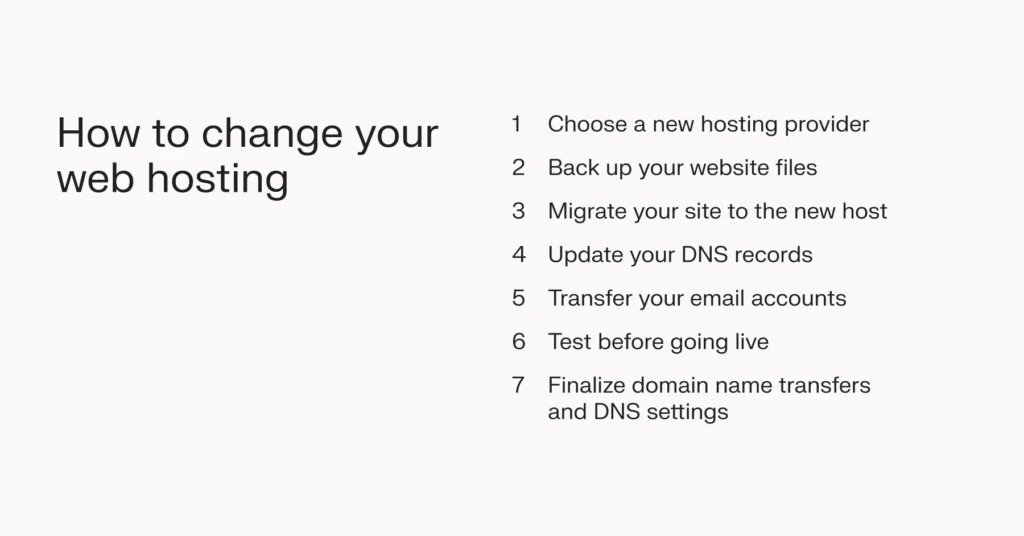
To change website hosting, choose a new provider, backup your site, and transfer files. Update DNS settings to point to the new server. Test the site thoroughly after migration to ensure everything functions correctly. Consult your new host’s support for assistance during the process.
Can I Move My Website To A Different Host?
Yes, you can move your website to a different host. Ensure you backup your files and databases. Update DNS settings to point to the new host. Verify your site functions correctly after the transfer. Consult your new host for assistance, if needed, to ensure a smooth transition.
Is It Hard To Change Web Hosting?
Changing web hosting can be simple if planned well. Backup your files and databases first. Choose a reliable new host and transfer your domain. Ensure DNS settings are updated. Most hosts offer migration assistance. With careful steps, the process is usually straightforward.
How Do I Change The Host Of My Domain?
To change your domain host, first choose a new hosting provider. Update your domain’s DNS settings to point to the new host. Ensure you back up all website data before transferring. Contact the new host for assistance if needed. Complete the transfer process to finalize the change.
Conclusion
Changing web hosting can be simple with the right steps. First, choose a reliable host for your needs. Next, back up your website data carefully. Move your files to the new host. Test your site to ensure everything works. Check links and images.
Update your domain settings to point to the new host. Monitor your site for any issues. Lastly, stay patient. Changes can take time. With these steps, you can smoothly transition your website. Enjoy improved performance with your new hosting solution.
Happy hosting!


