
Are you looking to give your WordPress site a fresh, professional touch? Building a custom header bar in your WordPress theme might be just what you need.
A well-designed header bar can instantly grab your visitors’ attention, guide their navigation, and enhance the overall user experience of your website. But where do you start, and how can you ensure it aligns with your brand’s identity? Don’t worry, we’ve got you covered.
You’ll discover step-by-step instructions to create a stunning header bar, even if you’re not a tech wizard. Imagine having a sleek, functional header that not only looks great but also boosts your site’s performance and keeps visitors coming back for more. Ready to transform your WordPress theme into a visual powerhouse? Keep reading to unlock the secrets of building the perfect header bar that captivates and converts.
Choosing The Right Theme
Customization options are very important. Check how much you can change. Colors, fonts, and layouts matter. Themes with flexible options are better. Some themes let you build things from scratch. Others have limited choices. Make sure the theme suits your needs.
Look at user reviews. They tell you about the theme’s quality. Bad reviews mean problems. Good reviews mean happy users. Also, check if the theme gets updates. Updated themes have fewer bugs. They also work with new plugins.
Installing WordPress And Theme
Begin with downloading WordPress from the official site. Save the zip file on your computer. Open the file and extract its contents. Upload these files to your server using FTP. Use a program like FileZilla. Then, create a database for WordPress on your server. Use tools like phpMyAdmin. Connect WordPress to your new database. Update the wp-config.php file. Enter your database details there.
First, find a theme you like. Download the theme file to your computer. Access your WordPress dashboard. Click on Appearance, then Themes. Choose “Add New”. Upload the theme zip file. Click “Install Now”. Once installed, activate the theme. Customize the theme using the WordPress Customizer. Add your site’s title and tagline. Adjust colors and fonts to fit your style.
Understanding Header Bar Essentials
The header bar is the top part of your website. It shows important links and logos. It makes navigation easy. The header bar can have a title, menu, and search box.
Key Components
A header bar often includes the logo of the site. This helps users recognize the brand. The navigation menu is crucial. It guides visitors to different parts of the site. A search bar allows quick access to content. Social media icons can be part of the header too.
Design Best Practices
Keep the header simple and clean. Use contrasting colors for visibility. Ensure the text is readable. Choose a font size that is clear. Make sure the header is responsive. It should look good on all devices. Test the header bar across browsers.
Credit: www.wpbeginner.com
Using WordPress Customizer
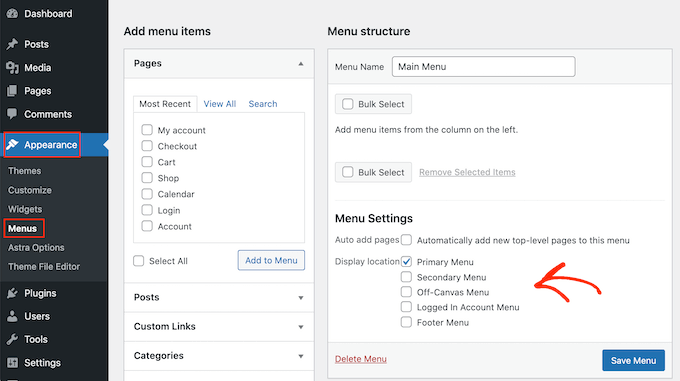
First, log into your WordPress dashboard. Find the Appearance section on the sidebar. Click on Customize to open the WordPress Customizer. The Customizer helps you change how your website looks. You can see changes in real-time. This makes it easy for everyone to use.
In the Customizer, find the Header option. Click on it to see different settings. You can change the logo, title, and background. Adjust the colors and fonts too. These settings help make your site unique. Explore different options to find what you like best. Remember to save your changes before leaving.
Adding Custom Code
Child themes help keep changes safe. They protect your work. Child themes are easy to make. First, create a folder. Name it wisely. Inside, add a style.css file. Include a functions.php file too. These files are important. They hold your code. WordPress reads them carefully. Your changes stay safe there. Always use a child theme. It saves time and effort.
CSS styles the header bar. It makes it look nice. Use simple code. Change colors and fonts. Give it a personal touch. JavaScript adds movement. It makes the bar interactive. Add a small script. Keep it short and clean. Users enjoy a responsive design. Make it fun to click and explore. Ensure the code is neat. Double-check for errors. A smooth bar enhances user experience.

Credit: support.vamtam.com
Integrating Plugins
Crafting a header bar in a WordPress theme becomes seamless with plugins. These tools streamline design, making the process efficient and user-friendly. Plugins offer customizable options to enhance aesthetics without complex coding.
Popular Header Plugins
There are many plugins for building header bars. Elementor is a popular choice. It lets you drag and drop elements. WP Mega Menu offers more menu options. Beaver Builder is another great tool. It is easy to use and learn. These plugins help make your header look unique. They save time and effort. Choose one that fits your style and needs.
Plugin Installation And Setup
First, go to your WordPress dashboard. Find the Plugins section. Click on Add New. Search for the plugin you want. Click Install Now to start. After installing, press Activate. This makes the plugin ready to use. Some plugins need more setup. Follow the plugin instructions. They guide you step by step. This ensures your header works well.
Testing And Optimization
Crafting a header bar in WordPress enhances navigation and user experience. Start by customizing the theme settings and utilize plugins for added features. Test and optimize until the header bar aligns with the website’s design and functionality goals.
Responsive Design Checks
Make sure your header works on all devices. Test on phones, tablets, and computers. Check fonts and images. They should look good everywhere. Use tools like Chrome Developer Tools. These help see your design on different screens. Make changes if something looks off. Responsive design is key for user experience. Users leave if things don’t work well. Test with real users. They give feedback on what’s wrong. Fix issues quickly. Good design keeps users happy.
Performance Optimization
Speed is important. Slow sites lose visitors. Optimize images in the header. Use small file sizes. Compress images without losing quality. Check loading speed. Use tools like Google PageSpeed Insights. These tools show what slows your site down. Remove extra code in the header. Less code means faster loading. Use a caching plugin. This saves data and speeds up loading. Fast sites keep users engaged. Improve speed for better results.
Troubleshooting Common Issues
Building a header bar in a WordPress theme can be tricky. Common issues include alignment problems and missing elements. Fix these by checking your theme settings and ensuring all necessary plugins are active.
Resolving Display Errors
Some header bars do not show up correctly. This can confuse users. First, check the theme settings. Make sure everything is set up right. Sometimes, themes have hidden settings for header bars. Adjust these settings to fix display problems.
Plugins can cause display errors. They might conflict with the theme. Try disabling plugins one by one. See if the header bar shows correctly. If it does, the plugin might be the problem. Check for updates for your plugins. Updated plugins often fix bugs.
Compatibility Problems
Not all themes work well with all browsers. Test your header bar on different browsers. Chrome, Firefox, and Safari are popular ones. Make sure the header looks good everywhere. If it doesn’t, there might be a compatibility issue. Look for updates in your theme. Updates usually improve compatibility.
Mobile devices can also cause issues. Check how the header looks on phones and tablets. Make sure it is responsive. If it isn’t, users might leave your site. Adjust the theme settings for mobile view. This can solve compatibility problems.

Credit: elementor.com
Frequently Asked Questions
How Do I Customize A WordPress Header Bar?
To customize a WordPress header bar, access the theme customizer. Navigate to Appearance > Customize. Locate the Header section. Modify elements like logo, menu, and colors. Some themes offer advanced options. Use custom CSS for additional tweaks. Ensure to preview changes before saving.
Can I Add A Logo To The Header?
Yes, adding a logo is straightforward. Go to Appearance > Customize > Header. Select the Logo option. Upload your logo image. Adjust the size and position as needed. Ensure your logo fits well with the header design. Save changes and preview to ensure compatibility across devices.
What Plugins Help With Header Design?
Several plugins enhance header design. Elementor and Beaver Builder offer drag-and-drop features. Header Footer Elementor adds customization options. WPBakery helps design responsive headers. Each plugin has unique features. Choose one that matches your design needs and skill level. Always backup before installing new plugins.
Is It Possible To Make A Sticky Header?
Yes, a sticky header remains visible while scrolling. Access your theme’s settings. Look for Sticky Header or similar options. Enable the feature if available. Use plugins like Sticky Menu & Header for themes without built-in options. Test on mobile and desktop for consistency.
Conclusion
Creating a header bar in your WordPress theme enhances user experience. It organizes navigation and highlights key content. Follow steps carefully to customize your design. Start by choosing the right tools. Focus on simplicity and functionality. Test your header for responsiveness.
Ensure it looks good on all devices. Keep your branding consistent. Visitors notice clear and attractive designs. A well-built header boosts engagement. It’s an essential part of your website’s identity. Enjoy crafting your header bar and improve your site’s appeal.
Happy designing!


