
Struggling with the content width in your WordPress theme? You’re not alone.
A well-adjusted content width can dramatically enhance your site’s readability and user experience. Imagine your content fitting perfectly on any screen, making it easier for your audience to engage with your message. You don’t need to be a coding wizard to make these changes.
With just a few tweaks in the theme’s CSS, you can transform your site’s look and feel. In this guide, you’ll discover simple, step-by-step instructions to adjust your content width effortlessly. Ready to make your WordPress site more user-friendly? Let’s dive in and make your content shine.
Credit: elementor.com
Basics Of Css In WordPress
CSS is like a magic tool for your website. It makes things look nice. In WordPress, CSS is used to design themes. Themes are the clothes of your website. They give it style and color.
CSS helps to shape the look of your site. It decides the size of text. It also controls the colors and layout. Without CSS, websites would look plain. It gives life to pages.
You can find the CSS files in the WordPress dashboard. Go to Appearance, then Editor. You will see the stylesheets there. These files have codes. The codes tell your site how to look. Be careful when changing these codes. Small changes can make big differences.

Credit: wordpress.com
Identifying Content Width
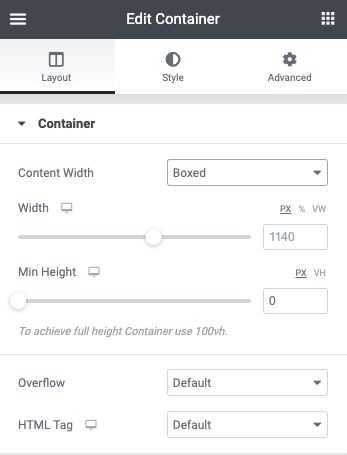
Adjusting content width in a WordPress theme involves tweaking the CSS file. Locate the specific class or ID controlling width, then modify the values to suit your design needs. This simple change can enhance your website’s visual appeal and user experience.
Locating The Right Css Selectors
Finding the right CSS selectors is key. First, open your theme’s style sheet. Look for .content or .main classes. These usually control width. Check if there are any width properties. If present, note the values. Sometimes, you may find max-width. This limits how wide your content gets.
Using Browser Developer Tools
Open your browser. Find the developer tools option. Right-click on the webpage. Choose “Inspect” from the menu. This opens a panel. Use this to see the HTML and CSS. Hover over different sections. Look for highlighted areas. They show you the width. Check the styles panel. It shows the CSS applied. You can adjust widths here. Experiment with values. Refresh the page to see changes.
Modifying Css For Width Adjustment
Open the WordPress dashboard. Go to Appearance and select Theme Editor. Find the stylesheet file named style.css. In this file, locate the section controlling the content width. It might have classes like .content or .container. Adjust the width property by changing the px or % values. Save your changes. Check your site for the new look. If the width is not right, tweak the values again.
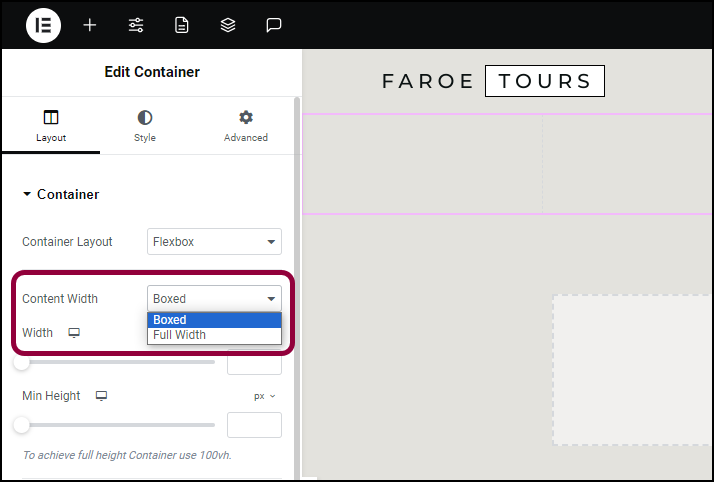
Navigate to the dashboard and click on Appearance. Select Customize. Here, find the Additional CSS option. This is where you can add custom styles. Enter your new width settings here. Use the correct CSS selectors like .content or .container. Set the desired width using px or %. Click Publish to save changes. Review your site. Adjust if needed.
Credit: elementor.com
Ensuring Responsive Design
Adjusting content width in WordPress theme CSS ensures a responsive design. Modify CSS properties like ‘max-width’ and ‘width’ to fit various screen sizes. This approach enhances user experience by making the website look good on all devices.
Implementing Media Queries
Media queries help websites look good on all devices. They change styles for different screen sizes. For example, a phone screen is small. A computer screen is big. Use media queries to adjust content width easily. Start by adding CSS rules for specific sizes. Use @media to target screen widths. Example: @media (max-width: 600px) targets screens 600 pixels wide or less. Adjust the width using percentages. Example: width: 80%; makes content smaller. This helps fit the screen better. Test changes on different devices. Ensure everything looks nice. Remember, good design makes users happy.
Testing Across Devices
Testing is important. Different devices have different screens. Check your website on phones, tablets, and computers. See if the content fits well. Use browsers to change screen size. Inspect elements to see CSS effects. Fix any issues you find. Make sure text is easy to read. Content should not overflow the screen. Keep testing till everything looks good. Users will enjoy a smooth experience. Happy users stay longer on your site. Adjustments lead to a responsive design. Responsive design is key for modern websites.
Using Child Themes For Customization
Adjusting content width in WordPress themes is easy with child themes. Customize CSS to modify layout without losing original theme updates. This approach ensures safe and efficient design tweaks, enhancing your site’s visual appeal.
Creating A Child Theme
A child theme is a special theme. It inherits the parent theme’s features. You can make changes without altering the original. First, create a new folder. It should be in the themes directory. Name it wisely. Inside, add a style.css file. This file is very important. It must have a few lines of code. These lines tell WordPress it’s a child theme. Add the Template line. It links to the parent theme. Now, you can start customizing safely.
Incorporating Custom Css Safely
Use custom CSS to change content width. Open the child theme’s style.css file. Add your custom CSS here. Ensure the code targets the right elements. Test changes frequently. This keeps your site looking good. Always keep a backup. It’s a safety net for your work. By using child themes, your customizations remain safe. Even after updates, your work stays intact.
Troubleshooting Common Issues
Adjusting content width in a WordPress theme’s CSS can resolve layout issues. Start by locating the relevant CSS file in your theme editor. Modify the width property in the specific CSS class to fit your needs. Save changes and refresh your site to see the results.
Solving Conflicts With Plugins
Some plugins may change the content width. Check your active plugins first. Disable one plugin at a time. Then, review your site. This helps find the problem quickly. Once you find the issue, look for updates. Sometimes, plugin updates fix conflicts. If not, contact the plugin developer. They might offer a solution.
Handling Cache Problems
Cache might show old content width. Clear your cache often. This refreshes your site. Use cache plugins wisely. Configure them to clear cache automatically. If problems persist, check your hosting provider’s cache settings. They may need adjustment too. Regular cache management ensures your site displays correctly.
Leveraging Plugins For Easier Adjustments
Enhancing your WordPress site’s look? Plugins simplify CSS adjustments for content width. Easily modify themes without coding.
Popular Css Adjustment Plugins
Many WordPress plugins help adjust content width. These plugins make changes easy. CSS Hero is one popular choice. It allows you to change styles without coding. Another option is SiteOrigin CSS. It provides a visual editor for CSS changes. YellowPencil is also great. It offers real-time CSS editing.
Plugins simplify the process by offering user-friendly interfaces. They have drag-and-drop features. This makes design tasks simple. No need to understand complex code. You can change widths and see results live. This instant feedback is helpful. It lets you adjust until you’re happy.
Using plugins saves time and effort. They offer flexibility. Even beginners can make changes easily. These tools are perfect for anyone wanting a custom look. Choose the plugin that suits your needs best. Enjoy the ease of designing with plugins!
Frequently Asked Questions
How Do I Change Content Width In WordPress?
To change content width in WordPress, edit your theme’s CSS file. Locate the CSS class or ID controlling width. Modify the width value, typically in pixels or percentages. Save changes and refresh your site to see the effect.
Why Is My WordPress Content Too Wide?
Your WordPress content might be too wide due to CSS settings. Check your theme’s style. css file for width specifications. Adjust the width values in the relevant CSS class or ID. This usually resolves the issue by narrowing the content area.
Can I Adjust Width Using WordPress Customizer?
Yes, you can adjust width using the WordPress customizer. Navigate to Appearance > Customize. Look for layout or design options. Some themes provide direct width adjustment settings. If not, use custom CSS in the customizer’s additional CSS section.
What Css Property Changes Content Width?
The CSS property for changing content width is “width. ” You can specify it in pixels, percentages, or other units. Adjusting this property in your theme’s CSS file changes the content’s width on your WordPress site.
Conclusion
Adjusting content width in WordPress can enhance your site’s look. It’s not difficult with some CSS knowledge. Start by identifying your theme’s CSS file. Look for width properties. Change them to fit your needs. Remember to save and preview changes.
Small tweaks can make a big difference. Your site’s readability and design can improve greatly. Always keep backups before editing. Experimenting can lead to better results. Patience and practice are key. With these steps, you can manage content width easily.
Your website will look more polished and professional.


